
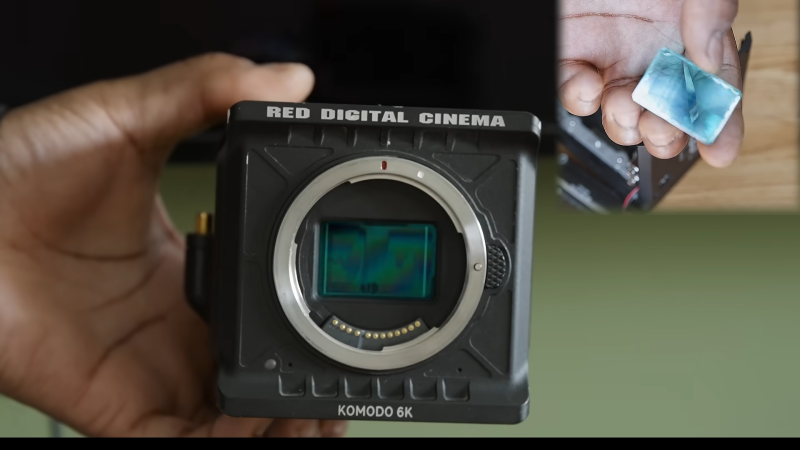
[ALT CINE] took a punt recently when purchasing a damaged RED Komodo camera online. In functional form, the 6K-capable camera sells for several thousand pounds (or dollars, or euros), whether used or brand new. However, [ALT CINE] was able to score the damaged unit for just £700. The question was—could it be repaired and turned back into a functional camera?
Things looked promising from the drop. The camera had just 3 hours of usage recorded in the firmware, and the casing seemed to suggest it had little use. However, the problem was soon revealed to be serious as the image sensor itself appeared to be damaged. Some research provided hope though—that the damage could be limited to a glass layer in front of the sensor itself that had delaminated.
Thankfully, disassembling the camera was easy enough thanks to its modular design, and [ALT CINE] soon had the sensor block on the bench for further examination. The cause of the issue was apparent—overzealous cleaning leading to fluid getting stuck to the rear of the filter in front of the sensor. Simply popping off the filter, cleaning and drying it properly, and reassembling, was enough to get the camera back to fully operational status.
RED’s repair service quoted $695 for a glass filter swap and $1,395 for a full sensor change. In contrast, [ALT CINE] was able to demonstrate that this repair was something easily within the realm of an intermediate camera tinkerer and it cost almost nothing to achieve. The video also covers an alternative potential repair route, wherein a DSMC2 filter can be subbed into a Komodo camera if the damage to the filter glass is otherwise unrecoverable.
It’s rare to get this lucky when it comes to repairing big-dollar cinema cameras like this one. We’ve featured some other great deep-dive camera repairs before, too.












Nice save! I have managed to get “untested” equipment functioning again by looking carefully at the problem (last one was a Brother MFC) and doing some cleaning. In my last case, the problem was simply that the machine had sat idle and the drum had a line of toner across it. A long cleaning session with isopropanol removed the contamination and the copies came out clean again — unit had only about 350 pages through it according to the status page!
My neighbor scored a nice zero turn riding mower at auction for 400 bucks because they couldn’t get it to start.
He took it home, turned the e-brake off and fired it up.
Just don’t drive it on sloping ground (leaves ruts) and especially near water. 2 dead in the county.
…… OK?
I put zero turn solid tires on the front of my mower.
So it understeers/pushes (‘push’ happens on left turns).
In my head, I’m nursing home an ill handling racecar for points, while I’m actually mowing.
Nice that it sounds like RED are actually not being too unreasonable in the price of an official service repair – definitively cheap enough compared to the camera to actually be worth it, which sadly these days is very rare, if the companies will even touch your product for repair (though camera companies in general do seem to be hold outs on that front). Also doesn’t seem like an insane price for the sort of work and value of replacement parts involved.
Don’t try it with BlackMagic cameras. IR filter in front of the sensor started to delaminate so I contacted their service unit in Melbourne. Two weeks’ turnaround turned into eight weeks.
They don’t actually service them in Australia, they get sent to the USA. But there was a tech conference in the USA that all the service folk were attending, so it just sat there, waiting.
Nice cameras, but don’t buy one – hire them and make it someone else’s problem if it develops a fault.
While annoying that does sound like the sort of problem you can get buying from any smaller niche product company, which is going to apply to any such high end camera company. They probably should have made it clear the turn around will be elongated given they must have known it would be, but still if the service is otherwise prompt the majority of the time and well priced… That inconvenience if it is an unusual occurrence to me doesn’t seem worth picking the camera you like less in other ways (But no idea what the differences between the two are – way way out of my price range and need really – all I have is two old DSLR, and while I’d like a more modern one with high quality fast framerate video options as it would occasionally be handy its never mattered enough to me.)
Love success stories like these.
When I was in high school , computers were expensive and I was poor. I got my first desktop and laptop because someone I know told me “if you can fix them, you can have them”.
The desktop just needed the memory re-seated, and it was good to go. The laptop was a bit trickier, but ended up being another dead-simple fix once I realized the LCD connector was loose inside the lid.
4 years ago I scored a very nice 2004 Miata with only 57k miles on it for about $300. The only “fix” was that I had to order a new VIN plate from China to match the numbers on documents to have it registered and MOT’d in the EU. Previous owner just wanted to get rid of it.
Interesting half a story
RED’s web page is great for testing connectivity. It is a graphics heavy site that is almost guaranteed not to be in someone’s browser cache. Plus it is very easy to tell someone over the phone to go to the website red.com and tell me what you see.
Seems that even buying it for 700 and adding the repair for 700 would net a savings 🤷🏼♂️