
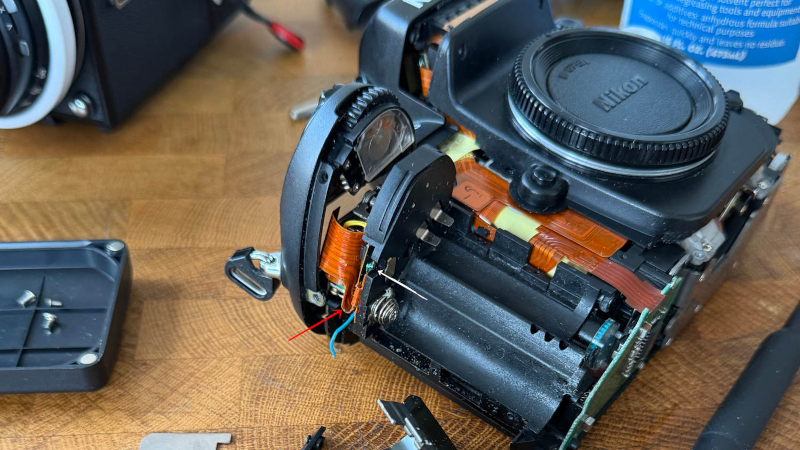
Old cameras are a fantastic way to experiment with photography, and outside a few brands, they can be an inexpensive way too. It’s easy to find older cameras in a broken condition for a lot less money, but if you’re tempted to fix one then [enthdegree] has some advice for you.
It’s ostensibly a set of notes on the disassembly and repair of a Nikon F100 35mm film SLR, but along the way it’s full of useful tips and tricks for camera disassembly. he materials you’ll need, advice on not losing screws is one, and warnings against disassembling too much is another. It’s all the stuff he wished he’d known before starting, and now you can know it too.
Fixing up old cameras in this way is rewarding, and something we’ve certainly been known to do ourselves. But it’s worth bearing in mind that it’s not for the faint-hearted, and with decades of old film cameras sitting unused, often a working example might make more sense.












There’s a scene in one of the Laura Croft movies where the assistant is disassembling a clock, video taping himself and placing screws onto a labelled grid while narrating what he’s doing “removing second screw from first inner assembly and placing it in grid 5A” and so on.
That’s basically what you need for camera or watch disassembly (and large format printers). Keep a complete record of what you’re doing, because beyond the casing you will never remember how it came apart.
Different screws attaching the same piece can have different sizes, removal/replacement order might be important, and of course which assembly comes before another is also important.
(Of interest, pick up several of those plastic pill caddys at the dollar store, the ones with small plastic bins labelled M/T/W/T/F, label each separately (A, B, C…), and use these in labelled order to hold screws. A board with 5 caddys glued to it makes a good screw sorting system.)
My brother does this some. one thing he does is put a piece of paper over a gasket or parting plane and uses a pencil to shade the locations of screws, then pushes them through the paper in the right locations as he removes them.
That paper trick is a very good idea. I may try it out.
This makes me think there is some room for a program/app that takes dictation and puts each step as a separate clip to allow easy reversal.
That scene stuck with me too. There are silicone mats you can buy with sections that work that way as well. I was debating getting a few cameras and doing recordings like what he does in the movie when I take stuff apart. Then it makes it easy to insert notes.
Sometimes when I work on cars I take all the screws for each section (throttle body, intake manifold, etc) and I put them in bags and write on them with a sharpie. Then I put the bags in a box in series…then when reassembling I just make sure to go backwards through the box.
This way you never misplace screws or have the much feared pile of “unintended extras”.
many times i’ve wished i had kept more detailed disassembly notes / photos / organization piles. but instead what i always wind up doing is YOLOing it “if it fits, it must be the right screw” and i have pretty good results…sometimes i have to back out a couple screws because i figured out where the short screw really belongs but mostly it comes together on the first try. but i also don’t do anything more involved than like a battery or screen replacement on a phone :)
For simple projects like that I tend to lay the screws to the side in the approximate location from where I took it out of the device. When you have them all spaced properly in relation to one another, its rather easy to get them back into the right holes.
For complex repair works you could wear a kevlar helmet fitted with GoPro. Surplus ones can be head cheaply,
Sometimes that’s not enough, and tinkering with photographic equipment can possibly become a big nightmare. Zoom lenses especially can have many parts that need to move in concert to get unlocked and it’s not easy getting them to do it the right way… Also, there they usually have a dozen flex cables intertwined with (or even worse, inside) the moving parts that easily get damaged while trying to get the right combination. And even if you succeed in taking it apart, you need to figure out the reverse origami move to put them back together, once again without damaging the flex cables.
iFixit (and probably others) has a couple of mats that are both magnetic and have a dry erase surface and come with a dry erase pen, so you can stick magnetic screws down in a certain place, and write a note alongside it when needed. This also allows you to stick screws in the order and pattern they came out of something.
It’s the best solution for the problem I’ve found so far.
This is why I often seek out youtubes before attempting any kind of repair for the first time – it usually ends up learning something new (how things are done) and reminding me why it’s a bad idea. Sometimes I go for it anyways but with a more realistic idea of the odds of success.
it’s also why i’m so upset about youtube clickbait dominating (there and here)… the first time i took apart a clothes dryer, i easily found a short video posted by a low-class blue collar worker who was trying to do the job and hold the camera at the same time. it was wonderful, to the point, and showed some practical techniques i have not since seen replicated.
a decade later, i’ve forgotten the best way to open a dryer cabinet, and i go looking…and it’s all clickbait. people with tripods, lighting, video editing software, logos, sponsors, wearing clean clothes and wasting 20 minutes to show awful technique they don’t understand and clearly never performed before. the only good thing to come out of the whole genre imo is the park tools (bicycle tools) guy who manages to put together short to-the-point competent videos even though he’s a professional.
just watching someone do the work before you take the thing apart only seems to be possible before the influencers get there…you have to be in some niche-not-yet-discovered or it’s all garbage
I think enthdegree has made things much harder than they need to be. An iFixit magnetic mat and their 50- or 60-bit screwdriver set will greatly simplify life. I’ve lost it, but my mat came with an erasable pen so you could label parts’ proper places as you deposited them on the mat. The list of fluids omits napthalene (lighter fluid, to be used far from flames and with good ventilation), essential for cleaning old lubricants off parts without leaving a residue. Thomas Tomosy’s repair tutorial books are enormously helpful even if they don’t cover the model on which you’re working. Still, electronic cameras are enormously complex, even with repair documents (as enthdegree notes). Older mechanical cameras are much easier to diagnose and fix. I really admire enthdegree’s mechanical and soldering skills in dealing with that F100.
You can find there : https://richardhaw.com/lens-camera-repair-fundamentals/ a lot of stuff like that, mostly vintage Nikon stuff, very interesting, you’ll need Japan Industrial Standard screw drivers if you don’t want to screw the screws.
Also captivating are the Roger Cicala posts on the Lensrental blog, a lot of disassembling and fixing for more actual stuff.
For all work of this type, one of the most useful things is to know in advance whether all fasteners are visible, whether some require removal of a camera’s leatherette cladding or an electronic device’s screen-printed label, or whether there are hidden clips requiring a spudger or palette knife (rare in the case of even half-decent cameras).