Need Something In A Pinch? SparkFun Products Now At Micro Center

sparkfun_available_in_microcenter

If you happen to live near a Micro Center retail store, you are now lucky enough to have another choice when it comes to purchasing DIY electronics components – SparkFun is selling their products at all Micro Center retail outlets.

While it seems SparkFun announced this change in June, we’re seeing quite a bit of buzz on the topic today. We’re pretty sure their entire catalog won’t be available in store, but they are promising a “wide-range of SparkFun products at all 23 Micro Center locations across the country.”

Known for being very DIY-friendly when it comes to building your own PC, Micro Center was a logical choice for SparkFun. There are definitely times when you need/want a part right away rather than waiting for it to ship, so this seems to be an ideal situation for hackers and makers within range of a Micro Center retail store.

This announcement definitely has us wondering if this will be one of the final nails in the Radio Shack coffin. While Micro Center doesn’t have nearly the market penetration Radio Shack does, a wider selection of components and a friendly, knowledgeable staff makes the SparkFun/Micro Center combination is a compelling one.

What are your thoughts? Let us know in the comments.

Matchbox-sized Line Following Robot

pocketbot_line_following_robot

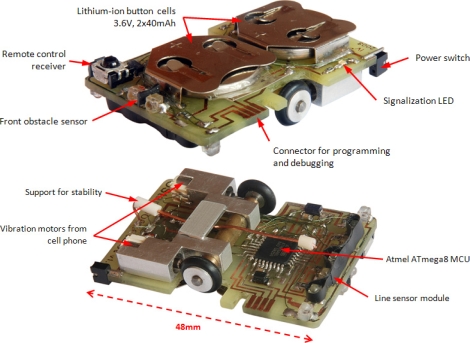
While they are not nearly as complex as their self-navigating brethren, building line following robots is no simple task, especially when they are this small. The creation of [Ondřej Staněk], this matchbox-sized line following robot is quite impressive.

PocketBot’s 48mm x 32mm circuit board also acts as its frame, supporting the wheels, motors, microcontroller and more. The brains of the operation is an ATmega8 microcontroller mounted on the bottom of the bot. A pair of wheels are driven independently using a set of mobile phone vibration motors that power the bot at speeds of up to 0.35 meters per second. Line detection is achieved by using three different IR sensors paired with four IR emitters located at the front end of the bot.

PocketBot also has an IR receiver on its top side, which allows [Ondřej] to control the robot, tweak its parameters, or calibrate its sensors on the fly using an IR remote or his computer.

The PocketBot might not be the absolute smallest line following bot we’ve seen, but it’s pretty darn close!

Continue reading to see PocketBot in action.

Continue reading “Matchbox-sized Line Following Robot”

Hybrid Control Scheme Using An Xbox Game Pad And Kinect

hybrid_game_control_using_kinect

The Kinect is an interesting beast. On one hand, it’s fantastic for hacking – a purpose for which it was not designed. On the other hand, it’s “just OK” when it comes to gaming – its entire reason for being.

One of the big complaints regarding the Kinect’s control scheme is that it’s no good for games such as first person shooters, where a large majority of the action involves walking, jumping, and aiming. For his Master’s project, [Alex Poolton] put together a fantastic demonstration showing how the Kinect can be paired with a standard Xbox controller to provide hybrid gaming input.

While you might expect a simple game that shows the fundamentals of the hybrid control system, he has put together a full fledged game demo that shows how this control scheme might be implemented in a real game. [Alex] admits that it’s still a bit rough around the edges, but there’s some real potential in his design.

Continue reading to see a video demonstration of [Alex’s] project in action, and be sure to check out his blog for news and updates on the project.

Continue reading “Hybrid Control Scheme Using An Xbox Game Pad And Kinect”

Fallout Brought To Life With This Working PIP-Boy 3000

working_pipboy_3000

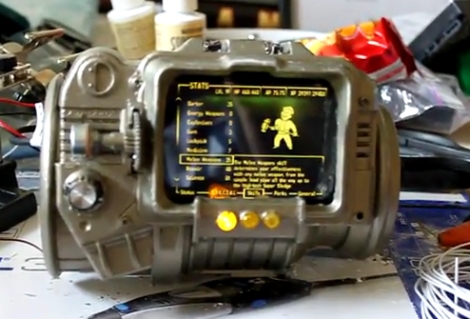
[MyMagicPudding] wanted to try his hand at hobby electronics, so he decided to go all-in and build himself a PIP-Boy 3000. If the name doesn’t ring a bell, the PIP-Boy 3000 is a wrist-mounted computer from the popular Fallout video game series.

The PIP-Boy is based around an HTC Desire HD mobile phone, which [MyMagicPudding] mounted inside case custom made for him by [Skruffy] from the Replica Prop Forum. He wanted to stay true to the game, so the wrist-mounted computer’s interface eschew’s the Desire’s touch screen and is instead controlled via a set of buttons and dials on its face. The external inputs all interface with the Desire via an Arduino Uno, which communicates with the phone using TCP over USB.

While he admits that his soldering skills are pretty dodgy, and that there’s no longer room behind the neat-looking facade to mount the PIP-Boy on his wrist, we think that it looks great. If this is an example of his first electronics project, we can’t wait to see what comes next.

Continue reading to see the PIP-Boy 3000 in action.

Continue reading “Fallout Brought To Life With This Working PIP-Boy 3000”

La Crosse Weather Station Wireless Data Acquisition

hacking_wireless_data_transfer_lacross_ws2305

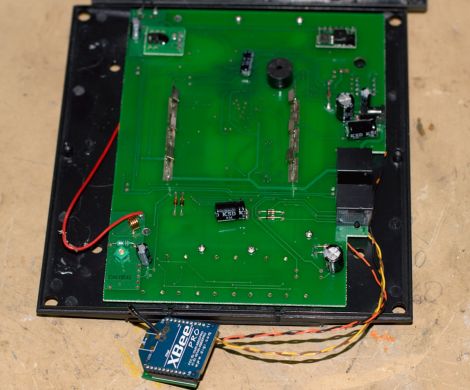
Hackaday reader [equinoxefr] posted some images to our flickr pool showing off some modifications he made (Google Translation) to his La Crosse WS2305 weather station. Having built other router-based weather stations in the past, [equinoxefr] was looking for a better way to gather weather data after one of the routers gave up the ghost.

With a brand new La Crosse WS2305 in hand, his goal was to feed the Lacross’ data to his HTPC which runs XBMC. He pulled the weather station apart and probed around with an oscilloscope until he could find the TTL Tx and Rx pins required to retrieve data from the unit. He hooked the data pins to an XBee wireless transmitter, which he then tucked away in the station’s battery compartment.

Another XBee unit was connected to his computer via an XBee Explorer board, and he was reading data from his weather station in no time.

While his isn’t the first La Crosse weather station hack we’ve seen around here, we like how simple and clean it is. If you’re interested, be sure to check out his flickr stream to see more images of the hacking process.

A Ham Radio Receiver, Manhattan Style

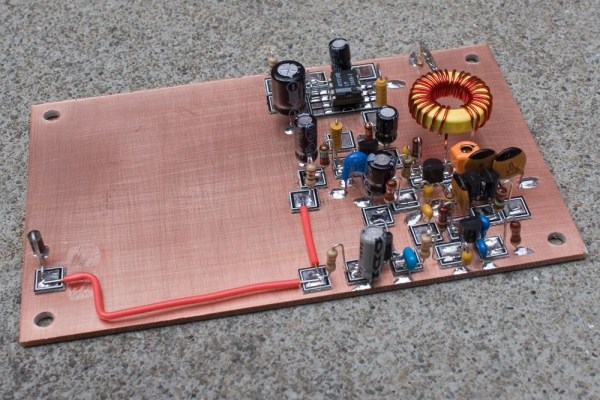
If you’ve never heard of “Manhattan Style” circuit construction, you’re not alone. Popular in ham radio circles, the process looks nicer than straight dead bug style circuit building, but not as involved as etching your own PCB – consider it a nice middle of the road solution.

This type of construction is often used to build circuits inside enclosures that are made of copper clad, which is a somewhat common practice among ham radio operators. Manhattan Style circuits are built using glued-on metal pads to which components are mounted. One might think that the large pads you see in the image above would limit you to through-hole components, but that’s definitely not the case. A wide array of SMD pads are available in common pin configurations as well, allowing you to use pretty much any type of component you prefer.

While it might not be appropriate for every project you work on, Manhattan Style circuits and copper clad boxes definitely add a nice touch to certain items, like the Wheatstone Bridge Regenerative Receiver you see above.

[via Make]

Simple Transistor Tester Makes Sorting Easy

simple_transistor_sorter

Hacker [Dino Segovis] is back with yet another installment of his Hack a Week series, and it’s looking like he isn’t too worse for wear after hunkering down to face hurricane Irene.

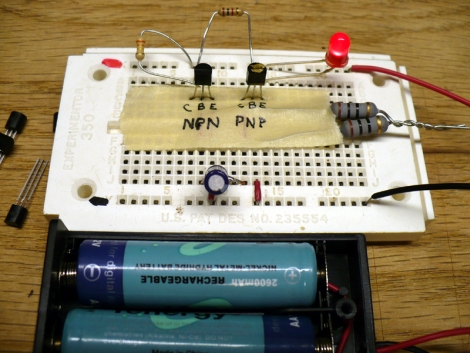
This week, it seems that [Dino] is having some problems separating his PNP transistors from his NPNs. After Albert Einstein proves to be less than useful when it comes to sorting electronic components, [Dino] decided to build a simple transistor tester to help him tell his PNPs and NPNs apart without having to resort to looking up product data sheets.

The tester itself is relatively simple to build. As you can see in the video below, it consists of a power supply, an LED, a few resistors, a pair of known transistors, and not much else. When everything is hooked together, the NPN/PNP pair causes the LED to light up, but the circuit is broken whenever one of the transistors is removed. Inserting a new transistor into the empty spot on the breadboard immediately lets you know which sort of transistor you have inserted.

Sure you can tell transistors apart with a multimeter, but if you have a whole drawer full of loose components, this is a far more efficient option.

Continue reading “Simple Transistor Tester Makes Sorting Easy”