Hackaday Prize 2023: Circuit Scout Lends A Hand (Or Two) For Troubleshooting

Troubleshooting a circuit is easy, right? All you need is a couple of hands to hold the probes, another hand to twiddle the knobs, a pair of eyes to look at the schematic, another pair to look at the circuit board, and, for fancy work, X-ray vision to see through the board so you know what pads to probe. It’s child’s play!

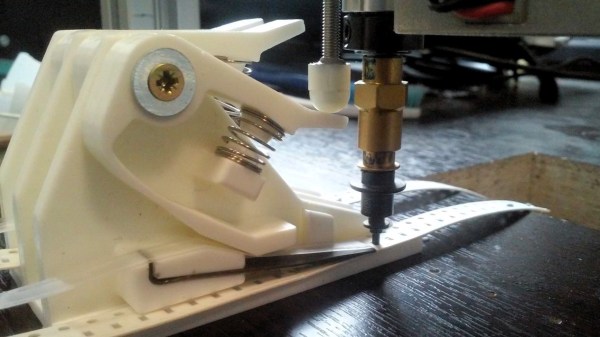
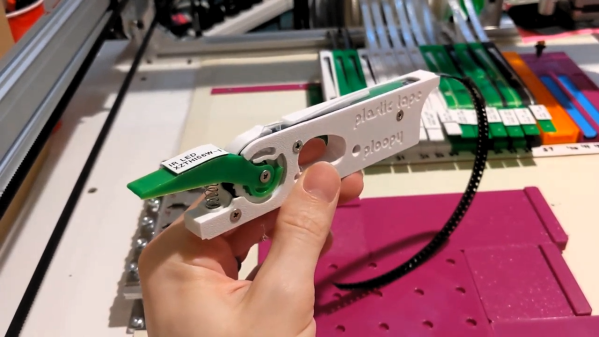
In the real world, most of us don’t have all the extra parts needed to do the job right, which is where something like CircuitScout would come in mighty handy. [Fangzheng Liu] and [Thomas Juldo]’s design is a little like a small pick-and-place machine, except that instead of placing components, the dual gantries place probes on whatever test points you need to look at. The stepper-controlled gantries move independently over a fixture to hold the PCB in a known position so that the servo-controlled Z-axes can drive the probes down to the right place on the board.

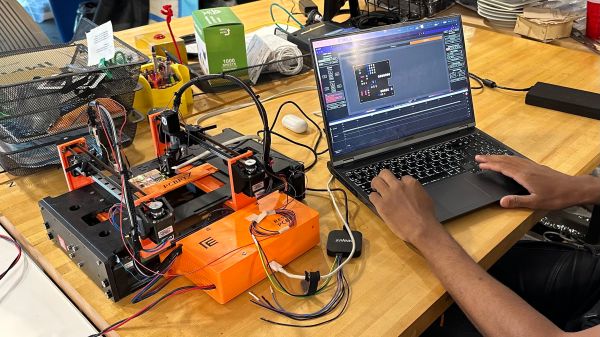
As cool as the hardware is, the real treat is the software. A web-based GUI parses the PCB’s KiCAD files, allowing you to pick a test point on the schematic and have the machine move a probe to the right spot on the board. The video below shows CircuitScout moving probes from a Saleae logic analyzer around, which lets you both control the test setup and see the results without ever looking away from the screen.

CircuitScout seems like a brilliant idea that has a lot of potential both for ad hoc troubleshooting and for more formal production testing. It’s just exactly what we’re looking for in an entry for the Gearing Up round of the 2023 Hackaday Prize.

Continue reading “Hackaday Prize 2023: Circuit Scout Lends A Hand (Or Two) For Troubleshooting”

Pick and place reels

Pick And Place Hack Chat

Join us on Wednesday, February 9 at noon Pacific for the Pick and Place Hack Chat with Chris Denney!

We in the hacker trade are pretty used to miracles — we make them all the time. But even the most jaded among us has to admit that modern PCB assembly, where components that could easily hide under a grain of sand are handled by robots, borders on witchcraft. The pick and place machines that work these wonders not only have to hit their marks accurately and precisely, but they also do it at blinding speeds and for days on end.

join-hack-chatLuckily, even those of us who design circuits for a living and depend on PCB assembly services to realize those designs can, at least to some degree, abstract the details of the pick and place phase of the process away. But making it “just work” isn’t a trivial task, and learning a little bit about what it takes to do so can make us better designers. Plus, it’s just plain cool to watch a pick and place do its thing. And to dive a little deeper into pick and place, Chris Denney, CTO of Worthington Assembly and co-host of “Pick, Place, Podcast” will stop by the Hack Chat. If you’ve ever wondered about the inner workings of PCB assembly and the role pick and place plays in it, or if you’re looking for tips on how to optimize your layouts for pick and place, this is one you won’t want to miss!

Our Hack Chats are live community events in the Hackaday.io Hack Chat group messaging. This week we’ll be sitting down on Wednesday, February 9 at 12:00 PM Pacific time. If time zones have you tied up, we have a handy time zone converter.

Continue reading “Pick And Place Hack Chat”

555 Teardown Isn’t Just A Good Time, It’s To Die For

It seems only appropriate that hot on the heels of the conclusion of Hackaday’s 555 Timer Contest that [Ken Shirriff] posts a silicon die teardown of an early version of a hacker’s favorite chip, the 555.

A Microscopic View Of the 555 Die

Starting with a mystery chip from January 1973, [Eric Schlaepfer] painstakingly sanded down the package to reveal the die, which he deemed to be a 555 timer. Why didn’t they know it was a 555 timer to start? Because the package was not marked with “555” but rather some other marks that you can see in the blog post.

In addition to a great explanation of how the 555 works in general, [Ken] has taken a microscopic look at the 555 die itself. The schematic of a 555 is easily available, and [Ken] identifies not just sections of the die but individual components. He goes further yet by explaining how the PNP and NPN resistors are constructed in silicon. There’s also a nice and juicy bit of insight into the resistors in the IC, but we won’t spoil it here.

Be sure to show your love for the winners of the 555 contest, or at the very least check out the project that took the stop spot: a giant sized 555 that you don’t need a microscope to see inside of.

Check Your Pockets For Components

The ideal component tester is like a tricorder for electronics — it can measure whatever it is that you need it to, all the time. Maybe you have a few devices like an ohmmeter and maybe a transistor socket on our multimeter. But what do you do when you need to see if that thyristor is faulty? [Akshay Baweja] wants an everything-tester at the ready, so he’s building a comprehensive device that fits in a pocket. It will identify the type and size of: Continue reading “Check Your Pockets For Components”

Printable, Castable Feeders Simplify Pick-and-Place Component Management

It goes without saying that we love to see all the clever ways people have come up with to populate their printed circuit boards, especially the automated solutions. The idea of manually picking and placing nearly-microscopic components is reason enough to add a pick and place to the shop, but that usually leaves the problem of feeding components to the imagination of the user. And this mass-production-ready passive component feeder is a great example of that kind of imagination.

Almost every design we’ve seen for homebrew PnP component feeders have one of two things in common: they’re 3D-printed, or they’re somewhat complex. Not that those are bad things, but they do raise issues. Printing enough feeders for even a moderately large project would take forever, and the more motors and sensors a feeder has, the greater the chance of a breakdown. [dining-philosopher] solved both these problems with a simple design using only two parts, which can be resin cast. A lever arm is depressed by a plunger that’s attached to the LitePlacer tool, offset just enough so that the suction cup is lined up with the component location on the tape. A pawl in the lower arm moves forward when the tool leaves after picking up the part, engaging with the tape sprocket holes and advancing to the next component.

[dining-philosopher] didn’t attack the cover film peeling problem in his version, choosing to peel it off manually and use a weight to keep it taut and expose the next component. But in a nice example of collaboration, [Jed Smith] added an automatic film peeler to the original design. It complicates things a bit, but the peeler is powered by the advancing tape, so it’s probably worth it.

Continue reading “Printable, Castable Feeders Simplify Pick-and-Place Component Management”

A Ploopy Pick And Place

A fair number of hackers reach that awkward age in their careers – too old for manual pick and place, but too young for a full-fledged PnP machine. The obvious solution is to build your own PnP, which can be as simple as putting a suction cup on the Z-axis of an old 3D-printer. Feeding parts into the pick and place, though, can be a thorny problem.

Or not, if you think your way through it like [Phil Lam] did and build these semi-automated SMD tape feeders. Built for 8-mm plastic or paper tapes, the feeders are 3D-printed assemblies that fit into a rack that’s just inside the work envelope of a pick and place machine. Each feeder has a slot in the top for the tape, which is advanced by using the Z-axis of the PnP to depress a lever on the front of the case. A long tongue in the tape slot gradually peels back the tape’s cover to expose a part, which is then picked up by the PnP suction cup. Any machine should work; [Phil] uses his with a LitePlacer. We like the idea that parts stay protected until they’re needed; the satisfyingly clicky lever action is pretty cool too. See it briefly in action in the video below.

It looks like [Phil] built this in support of his popular Ploopy trackball, which is available both as a kit and fully assembled. We think the feeder design is great whether you’re using PnP or not, although here’s a simpler cassette design for purely manual SMD work.

Continue reading “A Ploopy Pick And Place”

Control The Suck With This Manual Vacuum Pick-And-Place Tool

The tapes that surface-mount devices come in may be optimized for automated pick and place, but woe betide those who try to dig components out manually. No matter what size package, the well on the tape seems to be just a wee bit too small to allow tweezers to grip it, so you end up picking the thing up edgewise or worse, pinching too tight and launching the tiny thing into The Void. We hope you ordered extra.

Such circumstances are why vacuum handlers were invented, but useful as they are for picking and placing SMDs, they aren’t perfect. [Steve Gardener]’s sub-optimal experience with such tools led him to build this custom vacuum pick-and-place tool. It’s based on an off-the-shelf Weller unit, of which only the handpiece remains. A bigger, more powerful vacuum pump is joined in a custom enclosure by a PCB with a PIC18F13K22 microcontroller, a power supply, a solenoid to control the vacuum, and a relay to switch the pump. A footswitch starts the pump and closes the vacuum vent; letting off the pedal opens the vent to drop the part, while the pump keeps running for a variable time. This lets him rapidly work through a series of parts without having to build vacuum back up between picks. The video below shows the build and the tool in action.

We love the idea of this tool, and the polished look is pretty slick too. If manual pick-and-place isn’t for you, though, maybe converting a 3D-printer into an automated PnP is something to check out.

Continue reading “Control The Suck With This Manual Vacuum Pick-And-Place Tool”