Material Of Choice: Felt Pen On Glass

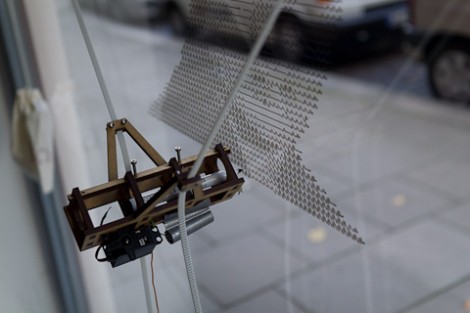
If you’re paying big bucks for those floor-to-ceiling windows why not make them into a canvas for your art as well. Der Kritzler is a motorized plotter that can make this into a reality. It’s a laser-cut pen holder suspended from a pair belt pulleys. Those belts have counterweights, which make it easier for the stepper motors to move the pen jig smoothly. The firmware running on the Arduino that controls Der Kritzler has some very precise setup requirements. Since there is no feedback for the Arduino to sense the position of the pen, the two stepper motors must be exactly 1500 mm apart with 1060mm of toothed belt between the carriage and each stepper motor when the power is turned on.

Input images are converted to code for the device using a processing sketch. So far [Alex] has tried out a couple of different effects, starting with a vector graphic, or using some open source tools to convert bitmaps to vector graphics. Don’t miss his video demonstration embedded after the break.

Continue reading “Material Of Choice: Felt Pen On Glass”

Freakin’ Huge CNC Router

[Tom] sent in a gigantic 3-axis router that he pieced together during a 2 week-long work experience placement. Looking at this picture showing a 12-inch ruler on the work area, we realized that this may be the largest CNC router we’ve seen on Hack A Day.

[Tom]’s employer gave him some obsolete axes, so piecing the mechanical components together was very easy. The only real problem was interfacing the CNC controller to a computer. This meant [Tom] had to convert G Code to the code used by the antiquated NSK axes. Where G Code defines arcs with a start point, end point, and radius, the NSK code defines arcs with a start point, end point, and another point along the arc. It’s a tricky bit of math, but [Tom] built some software that did this in Visual Basic.

Right now, [Tom] only has a pen tool attached to the router; you can check that in action after the break. We’re trying to imagine what we would do with a 4 m² work area; this could easily be used to make a giant reprap or other 3D printer.

Continue reading “Freakin’ Huge CNC Router”

A Ham Radio Receiver, Manhattan Style

If you’ve never heard of “Manhattan Style” circuit construction, you’re not alone. Popular in ham radio circles, the process looks nicer than straight dead bug style circuit building, but not as involved as etching your own PCB – consider it a nice middle of the road solution.

This type of construction is often used to build circuits inside enclosures that are made of copper clad, which is a somewhat common practice among ham radio operators. Manhattan Style circuits are built using glued-on metal pads to which components are mounted. One might think that the large pads you see in the image above would limit you to through-hole components, but that’s definitely not the case. A wide array of SMD pads are available in common pin configurations as well, allowing you to use pretty much any type of component you prefer.

While it might not be appropriate for every project you work on, Manhattan Style circuits and copper clad boxes definitely add a nice touch to certain items, like the Wheatstone Bridge Regenerative Receiver you see above.

[via Make]

Delta Robot 3D Printer

Sometimes, not all our builds work out the way we hoped. That’s what happened to [Rob] and his attempt at a Delta robot that does stereo lithography. A Delta robot is capable of very fast and precise movements, so [Rob] slapped a laser module on the end of the arms. After putting some UV curing resin in front of the laser, he was left with a blob of goo and we’re trying to figure out why.

[Rob] thinks the admittedly terrible print quality was due to diffraction and the reflective build plate. If this were the case, we’d agree with the assessment that adding some dye to the resin would help. Some commentors on [Rob]’s blog have suggested that he’s running the laser too slowly. It’s a shame [Rob] scrapped his build and turned it into a plain-jane X & Y axis build. Delta robots can be really damn fast, and adding a printer to one might mean prints that take minutes instead of hours. There are a few people working to get a Delta RepRap off the ground, but this project still has another prototype or two before that happens. Check out [Rob]’s attempt at Delta robot stereolithography after the break.

Thanks to [techartisan] for sending this one in.

Continue reading “Delta Robot 3D Printer”

Engine Hacks: Homebuilt Solid State Ignition Module

Engine Hacks Theme banner

[Dan] wanted to learn a bit about solid state ignition in engines; to get started he needed a test subject, so he decided he would upgrade his old 12 horsepower lawnmower.

Originally the lawnmower engine used a magneto coil ignition system, magnetos are simple and very common in lawnmowers. The magneto is designed to produce a high voltage spike when influenced by a magnetic field. A magnet is attached to the engine’s crankshaft to time the voltage spikes, these spikes are fed directly into the spark plugs to cause ignition, this is why you don’t need a battery. [Dan] explains how the solid state ignition works on his site as he goes through the build details. Essentially it uses a hall effect sensor to detect a spinning magnet on the crankshaft for timing, and a transistor and battery to fire the spark plugs for ignition.

Once he got his circuit up and running on a breadboard, he fitted the entire system into a neat plastic box and fixed it to the front of the lawnmower, as if it was meant to be there all along.