Photon Banner

The Revision 2011 demo party that brought us” table for two” a little while ago along with some super demos for PC’s, retro, and state of the art, has also brought us the Photon Banner(google translate). The Photon Banner is a 96X24 led matrix that was made with (of course) 2304 5mm leds, and a atmega 644 clocked at 20MHz.

The end result is a 192cm X 48cm display area that uses the single micro controller, that has been beefed up with 2 megs of SPI flash memory, 6 driver boards, and took about a month just to construct. The software to drive the show took another 15 days, and it is pretty darn impressive.

The website above contains a bunch of photos, parts lists, and schematics. Before you go running off you should join us after the break for a couple of quick videos.

Continue reading “Photon Banner”

USB Minecraft Portal

[Sprite_tm] had heard some time ago that middle of the road Nokia phones had some really interesting LCDs, they are 2.4 inch TFT’s with 320×240 resolution. He immediately got 3 beccause they are pretty low cost as well, and started working with them. Apparently these LCDs are self contained, meaning they have all the driver chips and memory on board, you just need to know the pins and commands. This too is fairly easy as they are somewhat standard setups and datasheets for similar models work in a pinch.

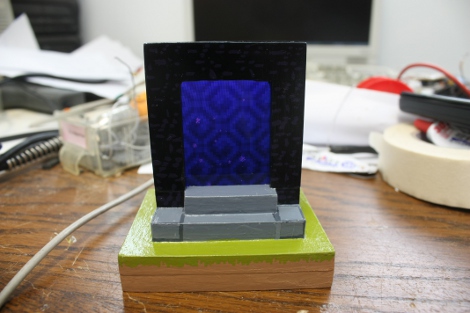
Once the things were working, what do you do with them? [Sprite_tm] decided to make a desktop minecraft portal. Since the animation is a bit complex in micro controller worlds, he grabbed one of the STM32F101CBs for their beefy cpu and got to work. Getting the texture from minecraft proved to be a bit of a bear as they are not static images, but are calculated on startup. A bit of C code on the PC quickly generates an appropriate pattern and is exported to the micro controller for display in its final home.

The case is made out of wood and once finished looks just like the “real” thing giving a presentation any “blockhead” would love to have on their desk.

Arduino Home Statistics

[Mike] is doing a little series that is about DIY smart homes. While these wont turn your house into a Hal 9000 (and hopefully wont try and kill you), they are fun and fairly easy to carry out. Parts 1 and 2 focus on the bathroom, part 3+ is in the works. Lets go ahead and look at what is done already.

DIY smart home part 1 covers the kings throne. Through the use of an Arduino, ultrasonic rangefinder, Ethernet shield, and twitter account, whenever the toilet is used a counter goes up. Calculate that against your gallons per flush and you now have reasonable water tracker.

Diy smart home part 2 hits the shower with much of the same hardware and goals. Adding on to the Arduino software there is now a PIR sensor and another twitter account. Basing knowledge from a Lady Ada tutorial on PIR sensors, the additional Arduino code slides into place and some loose ends from part one are cleaned up.

We cant wait to see what is in store for the future and wish [Mike] the best of luck.

USB Keyboard Prankster

Being a long time prankster, [cyclonite] came up with this pretty clever hack in an old USB flash drive.

The drive was removed from its case, and the stock memory and controller was removed. On the back, an attiny 2313 is glued to the pcb, while resistors are swapped to work with the VUSB library. Wirewap wire is used to jumper all the needed points to the new micro controller on the back, and a temporary ICSP header was fitted on the end to load software.

What your’re left with is an innocent looking usb drive that, when plugged in, sets itself up as a keyboard then proceeds to toggle the caps lock on your victims computer every few minuets. Classic.

Join us after the break for a quick video.

Continue reading “USB Keyboard Prankster”

Thrift Store Hard Drive Enclosure

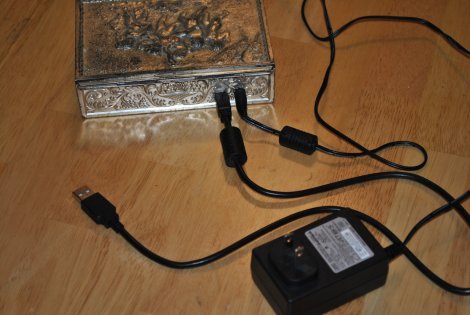
[Ken] visited our site looking for case modding stuff a little while back, but more importantly he came back to show off his latest project. Using a jewelry box found at our favorite place, the thrift store, he converted it into a 2.5 inch USB drive enclosure.

Almost instantly he found that this particular jewelry box is a perfect fit for a 2.5 inch SATA laptop drive. Taking that as a sign he whipped up some acrylic mounts and cut some holes for power and USB . The electronics are provided by another enclosure with a dead drive, again acrylic is used to insulate the drive from the decorative metal box and some rubber washers were used to help cancel out vibrations and noise.

The end result is a classy looking 150gig usb drive that looks nice on the desk, and a little reminder that if your not hitting up your local thrift / second hand stores, you could be missing out on some real gems.

Isolation Transformer 101

[Todd Harrison] has released a ~50 minute video covering everything you want to know about Isolation Transformers for protecting yourself and your costly equipment. Admittedly I have not given the subject much thought, but if you need to measure high voltages you should probably watch this video.

[Todd] Explains the differences between different types of transformers, including cost, why you would want one, safety and plenty of theory. Whiteboard in hand, all the details are clearly explained. If that’s not enough to convince you, there are some fun “don’t try this at home” experiments that hit the point home.

He has a pretty beefy 8 amp 40 lb monster that cost a fairly large amount, though its worth it to be safe. Unless you think you’re going to need that type of amperage, you wold probably be fine with a smaller model. The product shown in the video is a hospital grade, and requires a mod to make it safe for your bench. [Todd] explains that mod as well. Even if your not planning to do this, its still cool to see a transformer bigger than your hand. Plus it makes a pretty cool sound.

Join us after the break for the video.

Continue reading “Isolation Transformer 101”

Frankenstein’s Lawnmower

[phantompinecone] has an electric mower that worked great for about 4 seasons, and then the battery started to die. A replacement was installed but it started being a pain after the first season. Since the battery was brand new (and probably costly too) there must be something else.

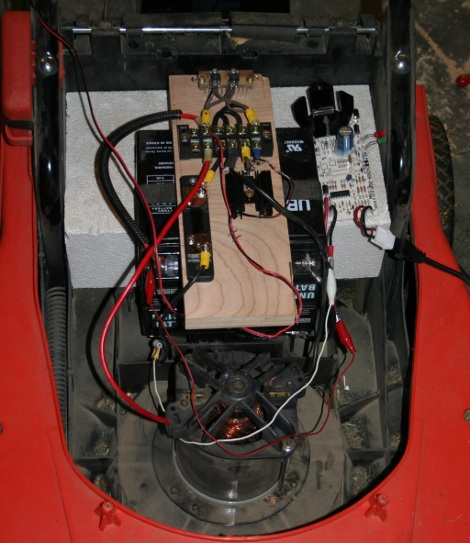
Checking the brushes, which were fine, the next logical place was the switch.These mowers are just a battery, motor, and switch. Yanking it apart there was indeed a problem, they were chewed up and corroded, not allowing full electrical contact. So [phantompinecone] replaced the simple mechanical switch with a MOSFET.

Electrically there is an IRF1405 MOSFET, some resistors to pull signals around and a couple diodes to A) keep the back emf from the motor in check, and B) drop the voltage going into the fet from 24volts to 12. Problem solved, and the motor should not have anymore trouble caused by a junked up switch.