Arduino-Fart-O-Meter

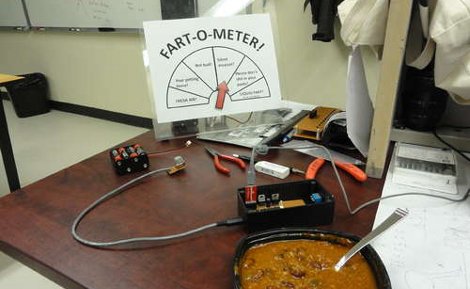
[robomaniac] shows us some serious application of modern technology with his recent Instructable, (the) Arduino-Fart-O-Meter. The wireless device uses a “perfboard Arduino” to read a remote wired methane sensor, and send data over a nRF2401A radio transceiver.

“The data” is picked up by another Arduino / transceiver combo, which then drives a servo motor connected to the pointer. The meter itself consists of 6 ranges from “Fresh Air” to “Liquid” so there is no doubt in your standing.

The wireless and remote sensor setup makes this an easy device to include into your loved ones chairs while having the meter far enough away (just in case you have to make a run for it). If you want some more accuracy check out the Fart intensity detector we posted about, which adds in temperature and sound to the equation, or how about a chair that twitters your toots?

Join us after the break for a quick video, its a real gas.

Continue reading “Arduino-Fart-O-Meter”

Black Rock City Navigator

Only a little bit out of season but better late than never! [Scott] brings us his Black Rock City Navigator. This unique bike mounted GPS device made for Burning Man 2010 features a servo driven array of LEDs. Two LED strips are used to cover the full 240 degrees of the C shaped city without modifying the servo, and are rotated over the different compass points.

It is powered by a pair of Freescale MC9S08AW32 micro controllers, and a unnamed GPS receiver. One controller deals with the servo and GPS data, the second simply drives the LEDs, and why not if you have plenty?

Housing the device is a four inch black sewer pipe end cap with a ball clamp attached, and is toped off with green acrylic engraved with the map of Black Rock City. Add some stickers (because stickers make everything better) and you have a functional device with a top-notch look for this year’s event.

DOTKLOK

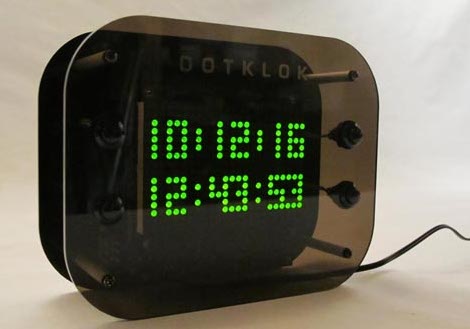
[Andrew] is showing off his latest creation, an LED matrix clock, which he is calling “DOTKLOK”. The clock is powered by an atmega328 micro controller with a real time clock module keeping the time. The display is made out of a grid of 8×8 LED matrices giving it a resolution of 24×16, and is all housed in an attractive acrylic housing.

The clock animations are inspired by classic video games such as Pong, Tetris, Pacman, and Space Invaders. Since the software is open, it is easy to jump into the Arduino source and add or modify animations to suit your taste, or even use the clock as a custom display for non clock related applications.

Available as a kit or fully assembled if youre needing a gift for that special nerdy someone. If you would like to go it alone, source, schematics, pcb, and enclosure files are available along with a bill of materials.

Join us after the break to see a short video of this fun clock in action

Continue reading “DOTKLOK”

Super Brite LED Sneakers

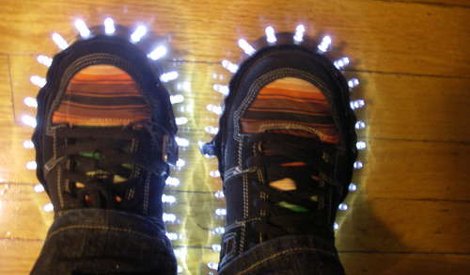
[i am jen] needed to spice up some shoes, and what better way to do that, than to spike them out in LEDs controlled by a micro controller. In order to make the LED strips, an inventive use of Velcro is applied. One half of the strip is secured to the shoes, while the other half gets a sheet of electrical tape on the sticky side. Small holes are then punched though the strip and the LEDs are then soldered.

Electronicswise the shoes are using a pair of 6 volt batteries, with no readily available holder, a “AA” battery holder is chopped to size and glued back together. Patterns are controlled by a Really Bare Bones Board Arduino, (which, even if your not an Arduino fan, is a cool little AVR breakout board for 28 pin chips) and cycles through different patterns using magnets and reed switches on the inside edges of the shoes.

Even if its not your style, check it out for a few good hacks and join us after the break for a short video.

Continue reading “Super Brite LED Sneakers”

NintendOscope

[Craig] has taken his gameboy hackery to the next step, using an oscilloscope as an external display. Back in November of 2010 [Craig] showed us how to extract the video data from a classic gameboy’s screen, armed with that information, and a pretty powerful XMega128A1 controller it seems straightforward to process that data and output it onto a oscilloscope that is in XY(z) mode, especially since he has done all of the hard work for us.

Scopes that feature XY mode typically have a Z input on the back, X controls where the beam is positioned from left to right, Y controls the beam from top to bottom, and Z controls the intensity of the beam. By sweeping the X and Y to act as lines, and Z to control the shade of the beam, its fairly easy to reuse your typically vector display as a raster display similar to televisions or computer monitors (as long as you have your math and timing right), making scopes very useful as output displays for devices like the gameboy, which do not have “standards” friendly display systems.

Join us after the break for a short video, and also check out the scope terminal, or the VGA-to Sope converter for more examples of how to use your oscilloscope as a raster display.

Continue reading “NintendOscope”

Arduino Based PC Ambient Lighting

[royboy] from the Arduino forum has recently made a post showing off his Arduino / PC ambient light system. The system is simple to wire up and easy to use, as long as your video is being sent from a PC, which for many of us that use “home theater pc” systems is very convenient. Using a sparkfun red/green/blue (non addressable) led strip, an ULN2003A, an Arduino, and a short sketch written for processing the project is easy to toss together and very effective too.

The processing sketch continuously takes screen captures and then takes the resulting pictures and averages all the colors together. That average color is fed down to the Arduino over its stock serial connection, where it is output to 3 of the pwm capable outputs. Those outputs are connected to the 2003 Darlington transistor array to switch the 12 volt led strip.

It may seem like it would be slow, as processing is an interpreted Java based language, plus serial communication, plus Arduino overhead, but its actually very responsive and completes its task with little or no lag. Join us after the break for a quick video to see for yourself.

Continue reading “Arduino Based PC Ambient Lighting”

Bellows Camera To DSLR

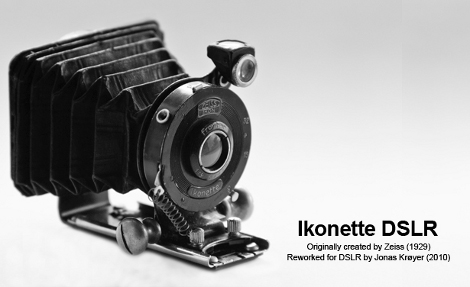
[Jonas Kroyer] is a digital  photographer, with a fascination with old cameras and pairing the two together sounded like a fun idea. Searching around on the net he fell in love with the design of the Zeiss Ikon Ikonette (1929-31), and found one with a chipped lens.

After dismantling the camera completely, it was found out that he needed the lens/shutter mechanism, the bellows, and the rails that allow the lens to slide back and forth. The bellows were glued to the body of the camera, but some careful prying and they were quickly removed unharmed. Next was to make an adapter so he could attach the lens to a digital DSLR camera, a steel plate and a Nikon Bayonet swiped off of a no name lens holds everything together. Rails were reattached using rivets, and the bellows were glued onto the plate. Other mods include adding small brass knobs to aid in adjustments, and a spring from a ballpoint pen to hold the original shutter open.

The new old lens is said to be easy to operate, and produces some beautiful images. Though since the lens does not have any modern day coatings it does have its drawbacks, like a diamond shaped flare in the middle of the image, which can be good when you want it, or partially removed in photoshop if you don’t.