DIY Thickness Sander

DIY Thickness Sander Is Good Enough For A Guitar Shop

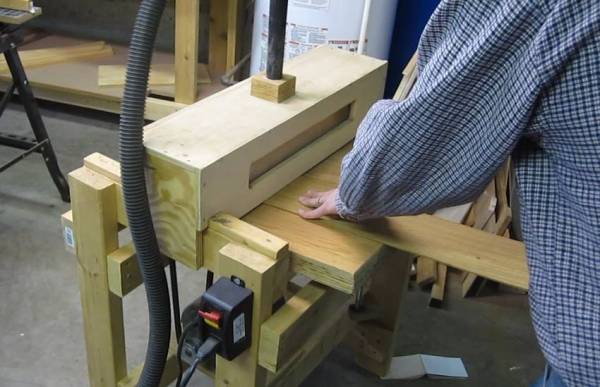
[Pat] is a luthier and general guy that likes to build stuff. In order to get his guitars to come out the best they can, he needed a thickness sander. For those who don’t know, thickness sander is a machine that will sand off a small amount of material from the surface of a large wood panel. There are certainly commercially available thickness sanders but [Pat] thought that they were simple enough machines so he decided to give a go at making one himself.

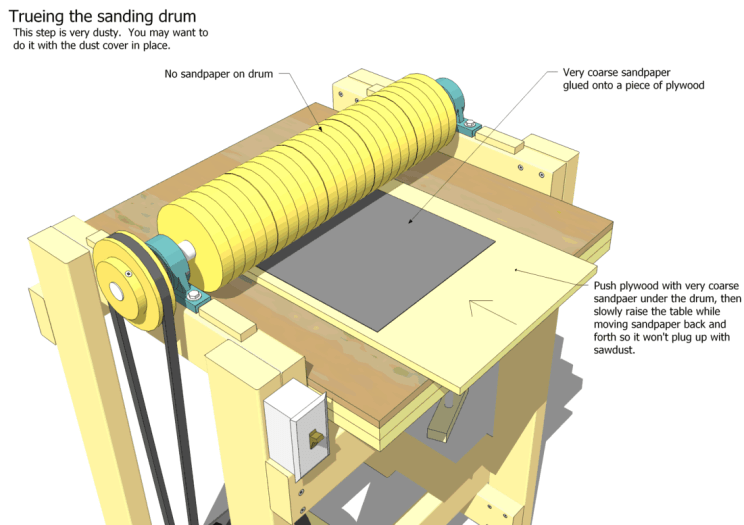
Since [Pat] already had access to a pretty nice wood shop, it only made sense to build the thickness sander primarily out of wood. The frame is made from standard 2×4’s. The drum is made from many disks of MDF mounted on a shaft and spun by an AC motor. You might imagine that a bunch of MDF disks mounted on a shaft would not result in a very cylindrical shape and that is exactly what happened here. So before applying the sand paper to the drum, course sandpaper was applied to a sheet of plywood and used to sand the drum round. It’s a super simple technique that resulted in a true-spinning drum. Afterward, velcro is attached to the drum and velcro-backed sandpaper is wrapped around the drum. This allows quick and effortless changing of sand paper.
thickness_sander-tn

Continue reading “DIY Thickness Sander Is Good Enough For A Guitar Shop”

diy conveyor belt

DIY Conveyor Gets You From Here To There

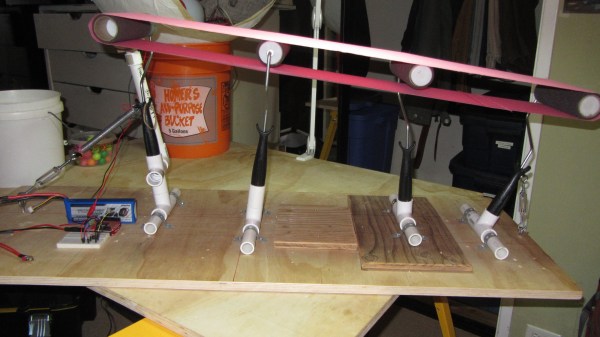
[gwfong] was in a bind. He had to make a unique Halloween prop that dispensed candy to young trick-or-treaters at a Haunted House. He decided on a conveyor belt system and besides being functional, it also had to be inexpensive to make. After poking around the hardware store [gwfong] had an idea: make it out of items he can re-use after Halloween!

As you can see, the main roller system is made of paint rollers. These are cheap and certainly re-useable after the conveyor is disassembled. Luckily for the project, the handle of the paint roller just happens to fit very snugly into a 3/4″ PVC pipe fitting. Four T-fittings and some short lengths of PVC pipe were purchased and are used to mount the paint rollers to a wooden base. A piece of canvas cut to length and sewed into a continuous loop makes up the conveyor belt. A loose belt certainly won’t deliver any candy so two turnbuckles, one at each end, keep the belt tight on the rollers.

There is a DC motor that spins a pulley which is coupled, via a standard rubber band, to one of the end paint rollers. A full-speed conveyor haphazardly flinging candy around wouldn’t work out to well so an Arduino and motor shield are used to control the conveyor’s speed and duration. A 7.4 5000mAh Li-Po battery provides the necessary electricity for a nights-worth of un-tethered candy dispensing.

Continue reading “DIY Conveyor Gets You From Here To There”

dremelduplicator

Dremel Powered Duplicating Carving Machine

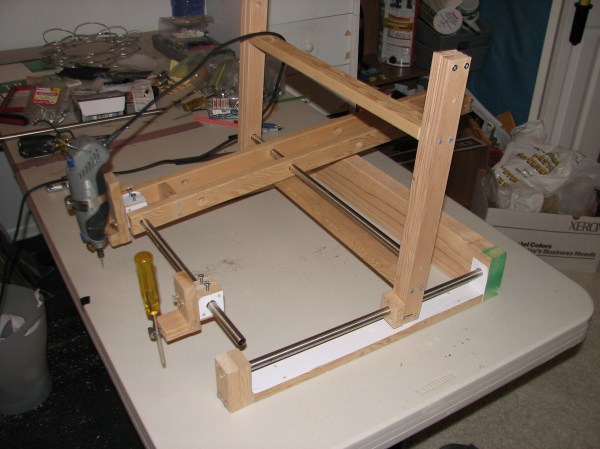
[Adran] wanted to be able to accurately cut out a bunch of the same parts out of wood but didn’t have the cash to spend on buying or building an automated CNC machine. After thinking about it for a while he decided to build a mechanical device that will allow him to duplicate objects by tracing them in 3 dimensions. This type of duplicator uses a stylus to trace over the surface of an object while the cutting tool is also moved over a piece of raw material, cutting as it goes. The end result is a newly carved object that is the same shape as the original. The idea is like a pantograph that works in 3 dimensions.

The wood frame is constructed to move freely front to back and left to right. To control the height of the cutting tool, in this case a Dremel, the frame pivots up and down and the X-axis rail. A screw driver is mounted off the side of the Dremel that acts as a stylus. It is mounted in the same orientation as the Dremel bit and is constrained such that it and the Dremel move in the same direction and amount at all times. When the tip of the screwdriver is traced over a 3D part, the Dremel moves the exact same amount carving a part out of a block of material.

Although the machine works, [Adran] admits there is some room for improvement. The left to right motion is a little choppy as the wood frame is riding directly on steel rails. He plans on adding linear bearings for the next revision to smooth things out.

Box Fan Computer Case

Fan-tastic Box Fan Computer Fan

Sure, it’s a great idea to keep your computer components cool…. but why? PC components consume energy and in doing so they generate heat. That heat can reduce overall system performance or even damage specific parts. You’ve certainly noticed those huge aluminum finned heatsinks covering critical components in your PC. They are there for a reason, to keep things cool. Most PC’s have at least one fan, if not several, usually only a few inches in diameter. If a small fan does an okay job at cooling a PC, how would a large fan do….. we’re talking a really large fan? [Envador] wanted to find out and made a PC case with the largest fan possible.

Looking at the photo it is pretty obvious that PC case frame is fabricated from standard PVC piping. The side of the case is hinged to allow access to the internal components. That huge set of blades started out as an off-the-shelf box fan. It was taken apart and mounted directly to the PVC case door. It wouldn’t make too much sense to have side panels on this case since the fan is so large. So, instead of solid sides [Envador] used chrome-plated plastic grills that are usually reserved for fluorescent ceiling lights. Perforated metal strapping holds all the drives, power supply and mother board in place.

Unfortunately, [Envador] doesn’t give any before/after temperature data but states that the PC tops out at 95°F and he hasn’t had any problems with computer performance.

Old Timey MP3 Player

Old-Timey MP3 Player Blends Old Styling With New Technology

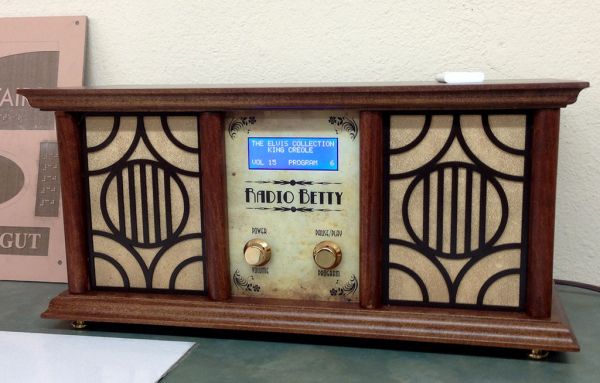
No, this isn’t the first commercial MP3 player ever produced. It’s a blend of the old and the new, old time looks with modern electronics. [viscomjim] recently made this MP3 Player from the ground up for the noble reason to give as a Christmas present.

[viscomjim] started by laying out a circuit using a solder-less breadboard to test his circuitry. He’s using PIC microcontroller to control the unit. There is an 20×4 LCD display, two rotary encoders with push buttons, a serial MP3 player module, real time clock and an infrared receiver. A wires-all-over mess wasn’t acceptable for this Christmas gift so [viscomjim] put on his learning cap and tried out Autotrax Dex PCB layout software. This was his first project with the software and everything went well. After the design was done, the board files were sent out to a fab shop. A few weeks later they were delivered. All the parts were wired up and tested and… it worked!

Next up was building a cabinet, this one was built out of wood and stained to give it a feeling of yesteryear. A pair of 4″ car speakers are responsible for sharing the tunes and are powered by a small amplifier and power supply mounted inside the enclosure. The front panel is laser cut clear acrylic and backed with a nicely prepared Photoshop’d parchment paper graphic. And those fancy grill covers, also laser cut acrylic, this time opaque brown in color.

There are only two knobs for control, the left is the volume and the right is the program changer. Push the left knob inward and the unit turns on or off, the right plays and pauses. This MP3 player plays music off the internal SD card on the MP3 module. [viscomjim] also went one step further and implemented some code to work with an Apple remote he had kicking around, hence the IR receiver mentioned above.

If you’d be interested in making something similar, you’re have-way there as [viscomjim] made his schematics available but, unfortunately, not his code. Want to build your own MP3 Player but want something a little smaller? Check this tiny one out.

diy ATX power supply

Is This Power Supply Bigger Than A Bread Box? No, It Is One.

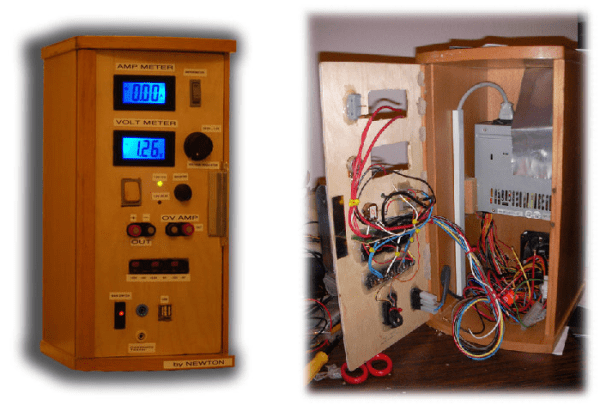
[newtonn2] must have had food on his mind when he was deciding to embark on a power supply project. The enclosure is quite different…. it is a Bread Box! Even so, flipped up on end we must say it looks pretty cool. [newtonn2’s] previous power supply had crapped out and he needed a replacement supply ASAP, it was a loaf or death situation for this electronics enthusiast.

Similar to a lot of DIY bench power supplies, this one would also be based on an ATX computer power supply. These are good high-current supplies that output voltage in several convenient amounts and in this case are are all routed to their own spring terminals mounted on the enclosure. Even though those standard voltages might be good enough for most, [newtonn2] is extremely kneady and wanted a fully adjustable output so he designed up an adjustable voltage regulation circuit using an LM350 regulator. A volt meter and an amp meter indicates the power being supplied on the adjustable circuit.

Since his last power supply was toast, [newtonn2] wanted this one to be easily repairable. The ATX power supply inside can be replaced in two minutes because nothing is hard wired. The only connections are the ATX connector and power cord. For cooling, holes were drilled in the side of the enclosure so that fans could be installed. This was the yeast he could do to keep the temperature of the interior components down.

In the end [newtonn2] completed his goal of building a pretty unique and functional bench top power supply without spending a lot of dough. Check out his Instructable for extremely detailed build instructions including schematics for how all his components are wired.

Head Mouse

Right Hand Loses Job As Head-Mouse Enters Mousing Arena

Moving the cursor around your computer screen is an everyday occurrence that we humans do not give much of a second thought to. But what if you didn’t have to move your hands from the keyboard anymore? Sure there are keyboards with Track Point or even track pads not to far from the keys, which isn’t too bad. What if you could just slightly point your face in the desired direction the mouse would move? The [Sci-Spot] folks wondered that same question and came up with a DIY Head Mouse.

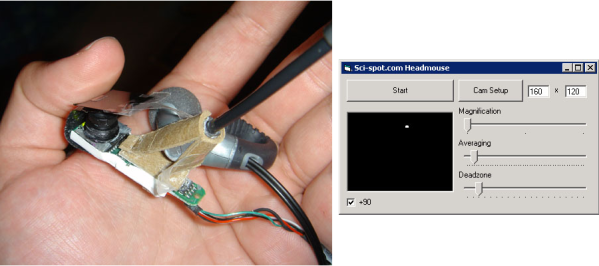
The concept is pretty darn simple; a web cam is mounted to the user’s head and points at the computer screen. Mounted on top of the screen is one IR LED. Our eyes can not see the IR light so it is not annoying or distracting. The camera, however, is filtered to only see IR by placing a couple of layers of camera film negative over the lens. Before you go complaining about strapping a camera to your noggin just think of building it into a hat, which we’ve seen used for adaptive technologies like this PS3 controller.

Custom software was written to move the mouse cursor; see the black window in the above dialog box? That represents the webcam’s field of view and the white spot is the IR LED. When the user’s head moves, the IR LED moves in relation to the camera’s field of view, in turn telling the computer to move the cursor a certain amount. There are a couple of options available like ‘magnification’ which changes how much the cursor moves with a given amount of head movement and ‘deadzone’ that ignores extremely small movements that can result from breathing.

There is no mention of how button clicks are recorded but we think a couple of buttons right below the space bar would be great. The control software is available for download on the Sci-Spot page for those who want to make their own.