Troubleshooting A Broken Power Supply

IMG_0657

How many power bricks have died on you? Have you ever tried to fix them? Sometimes it’s easier to grab another one (they grow on trees right?), but wouldn’t it be nice to save the broken ones from filling up landfills? Depending on the cause of death, it could be a super simple fix!

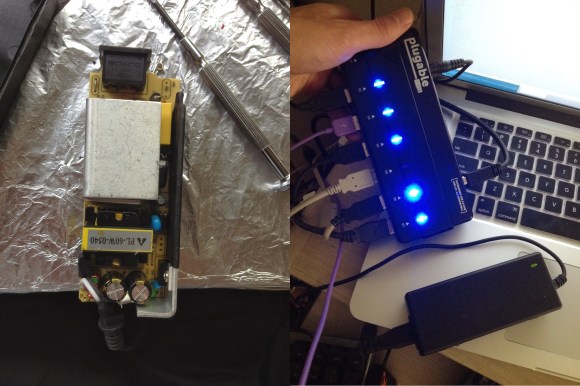
[Chaim-Leib] recently purchased a powered USB hub that came with a beefy 5v, 4A power supply — it worked great — until 6 months later, when it didn’t. The company sent him a new one, and let him keep the faulty one. Looking for a challenge, [Chaim-Leib] decided to crack it open and see if he could fix it himself.

No burnt caps, no fried diodes, no burn marks anywhere in fact! Luckily he spotted the culprit: One lonely resistor had lifted up from its pad. Having never jostled or dropped the power brick, this failure likely came from some kind of stress formed during original assembly — throw in a bunch of hot and cold thermal changes, and pop goes the solder pad!

It was a simple fix with some solder, and he emailed the company photos of his operation — they’ve promised to send them on to the engineering team to further evaluate the problem.

That was easy.

Mini-Forge On A Budget

7

Feeling a little black-smithy? Ever wanted to hammer some red-hot steel into a new shape? Turns out, it’s well within your reach!

We’ve seen soup can forges, paint can forges, and even full blown coal fired forges — but none quite as simple as this. All you need is a fire brick — and some tools.

The problem is, fire bricks are kind of fragile. In order to drill into it without cracking the brick [Mike] advises us to clamp it in a wooden jig to help support it. Slowly drill a long hole lengthwise in it, slightly oblong to allow for your work piece to go inside. Flip the brick sideways, and add a second perpendicular hole in order to insert your gas torch of choice.

Now before you go heating it up, it is wise to reinforce the brick by wrapping some wire around it to prevent it from falling apart when it inevitably cracks due to temperature changes. A more permanent solution is to encase the entire brick in concrete to make it more durable, which [Mike] plans on doing next time. Continue reading “Mini-Forge On A Budget”

Motion Tracking On The Cheap With A PIC

motion tracking

Ever need a cheap motion tracker for very basic object following? Did you know you can throw one together with a few IR distance sensors and a PIC?

The setup is fairly simple. [Aron Horan] is using a dsPIC30F4011 PIC, a SHARP infrared distance sensor, an RC servo, and a PICkit2 for testing. It works by scanning left and right using the servo motor. When the edge of an object is detected, it will turn away from the object until it can no longer detect the edge — then it turns back. Unfortunately this does mean it will always be twitching, even when it’s tracking an object.

Like many of the other projects [Aron] has documented, he’s included everything you need to know to be able to recreate the project yourself. Flowcharts, wiring diagrams, and the code — written in C of course! The following video includes an excellent demonstration, but if you want to skip straight to the action, you can see it start tracking a multimeter at about 0:39 in.

Continue reading “Motion Tracking On The Cheap With A PIC”

Thrust-Vectoring Hovercraft On A Budget

FANEWZ5HRH0XXYR.MEDIUM

Looking for a fun little experiment in thrust vectoring? [Saral Tayal] has come up with what he thinks is the first style of thrust vectoring hovercraft.

A typical hovercraft uses one or two drives, one to hover, one to direct movement — or one for both, diverted to the two outputs. [Saral’s] toy hovercraft uses two, but unlike traditional designs, instead of having a rudder on the back to direct the airflow for steering, he steers the entire fan assembly. On a full size hovercraft, this could be a lot of fun.

It’s a pretty simple project that you could quite easily build on a weekend — if you’ve got RC parts kicking around, even easier! He’s using two brushless motors with ESCs, a 9g servo, and a small RC transmitter/receiver. The props come from a regular RC plane — just pick one suitable for the motor being used. Depending on what you have on hand, this project will be under $100 to build. The rest is mostly foam-board, balsa wood, and glue.

Check out the following video to see how it hovers!

Continue reading “Thrust-Vectoring Hovercraft On A Budget”

Wearing A Homemade EKG Whilst Base Jumping!

video.overlay

[Andrew Wilson] is a pretty extreme guy. He base jumps for fun, and is also a hacker. And while you can try to explain the awesome adrenaline rush that comes with this kind of extreme hobby, it’d be nice if you could show it off, you know, quantitatively. So, he decided to make his own EKG, pair it with his GoPro, and go for a jump!

An EKG is an electrocardiogram — a fancy term for a heart rate monitor — and [Andrew’s] has built his own using a small instrument amplifier circuit. This circuit amplifies the differential signal put out by your heart. The data are fed through an ADC on an Arduino Uno, and then saved to a SD card. He also added a piezo buzzer to try to help sync the data to the video — unfortunately it was too quiet for the GoPro to pick up. So for now he’s stuck with pressing record and start on his EKG at the same time.

Once he was satisfied with a few safe tests, he decided to take it for a base jump. For our viewing pleasure, he’s taken the data collected from the EKG and post-processed it into a nice scrolling graph overlay for the video.

We guarantee your hands will get sweaty as his heart rate goes up as he prepares to make the plunge.

Continue reading “Wearing A Homemade EKG Whilst Base Jumping!”

Self-Balancing Uni-board?

Capture

There are skateboards, long boards, and snowboards. This was originally a snowboard, but we’re not quite sure how to classify it now… Introducing the Segbot Snowboard.

[Steve Ghertner] has been playing around with accelerometers lately and decided to try making something practical. He’s taken a snowboard and turned it into a two-wheeled, segway-like balancing board. The two parallel wheels are powered individually by 12V scooter motors. An Arduino Uno takes care of processing the data from a MPU-6050, which is a triple axis gyro and accelerometer.

You can control the board by leaning, or  by using a small two-button remote. He hasn’t taken it very far out of the lab yet, but plans to after cleaning up the programming a bit.

Stick around for the following video where he explains it at his local hackerspace in Nashville, the Middle TN Robotic Arts Society where members strive to “Control Them (robots) Before They Control You!”

Continue reading “Self-Balancing Uni-board?”

The Mac9000 — A Photo Frame With Style (Maybe?)

Digital photo frames — as tacky as they may be — are a handy way to show off photos, especially considering how few photos get printed these days! [Rene] decided he could really use one at work, but he wanted it to look cool as well. Feeling a bit nostalgic with the 30th anniversary of the Macintosh Classic II, he decided to gut one and turn it into this awesome linux based “Mac9000”!

He started by picking up the Mac off eBay and cleaning it up a bit. It had definitely belonged to a school considering how worn it was. A bunch of sandpaper, bleach wipes, and elbow grease later, and it almost looks like new again! The next step was gutting the insides to make room for the new hardware. This is a bit tricky because you are dealing with high-voltage equipment! Make sure to discharge it safely before sticking your hands in!

Once the unit was empty, he began upgrading it with some more recent technology. A 7″ LCD, a Raspberry Pi (with PIR sensor), and a WiFi adapter to name a few. In addition to his blog, he also has a great photo gallery of the entire process over at LYTRO. He’s set up Raspbian “Wheezy” to automatically snag photos off of a DropBox directory, making this one of the easiest to use photo frames we’ve ever seen. He also plans to show videos on it, but alas, that is a project for another day.