CNC Router Converted to 3D Printer

CNC Router Converted To 3D Printer

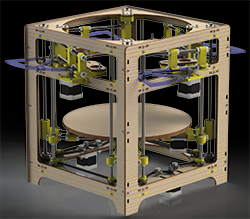
3D Printers have come down significantly in price over the past few years. Nowadays it is even possible to get a 3D printer kit for between $200-300. It’s arguable how well these inexpensive printers perform. [Jon] wanted a printer capable of quality prints without breaking the bank. After researching the different RepRap types that are available he concluded he really wasn’t up for a full machine build. He had previously built a CNC Router and decided it was best to add a hot end and extruder to the already built 3 axis frame.

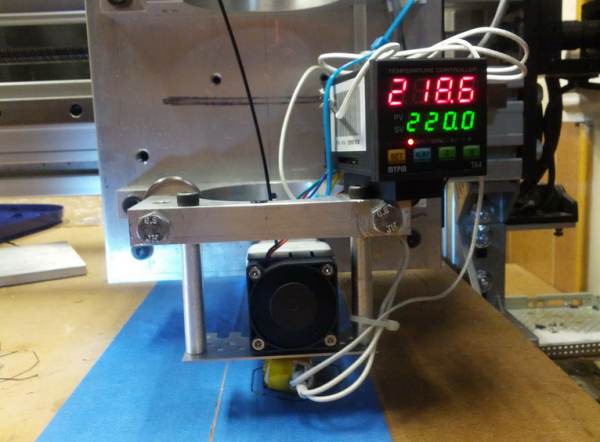
The CNC Router frame is made from aluminum, is very rigid and has a 2′ by 2′ cutting area. All axes glide smoothly on THK linear bearings and are powered by NEMA 23 motors driven by Gecko 540 stepper drivers. The router was removed from the machine but the mounting bracket was left on. The bracket was then modified to hold the extruder and hot end. With 3D Printers there is typically a control board specifically designed for the task with dedicated outputs to control the temperature of the hot end. Since [Jon] already had the electronics set up for the router, he didn’t need a specialized 3D Printer control board. What he does need is a way to control the temperature of the hot end and he did that by using a stand-alone PID. The PID is set manually and provides no feedback to the computer or control board.

Huge Whistle
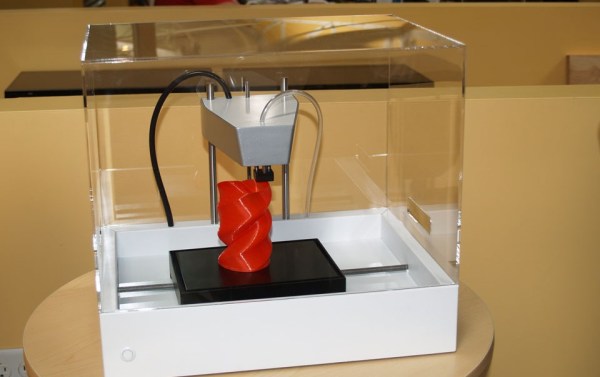
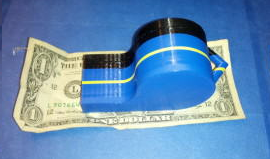
[Jon] used liked Mach3 for controlling his CNC Router so he stuck with it for printing. He’s tried a few slicers but it seems Slic3r works the best for his setup. Once the g-code is generated it is run though Mach3 to control the machine. [Jon] admits that he has a way to go with tweaking the settings and that the print speed is slower than most print-only machines due to the mass of the frame’s gantry and carriage. Even so, his huge whistle print looks pretty darn good. Check it out in the video after the break…

Continue reading “CNC Router Converted To 3D Printer”

THP Semifinalist: Theta Printer

thetaThe early 3D printers of the 80s and 90s started off as cartesian bots, and this is what the RepRap project took a cue from for the earliest open source 3D printer designs. A bit later, the delta bot came on the scene, but this was merely a different way to move a toolhead around build plate. We haven’t really seen a true polar coordinate 3D printer, except for [Tyler Anderson]’s incredible Theta printer.

[Tyler]’s theta printer is designed to print in as many different materials as possible, without the reduction in build volume that comes with multiple toolheads on more traditional printers. It will be able to lay down different colors of plastic in a huge build volume, and even some of the weirder filaments out there, all in a single print.

The theta printer is based on a polar coordinate system, meaning instead of moving a hot end around in the X and Y axes, the build plate rotates in a circle, and the extruders move along the radius of the circle. This spinning, polar coordinate printer is the best way we’ve seen to put multiple extruders on a printer, and has the added bonus of being a great platform for a 3D scanner as well.

With four extruders, four motors to control the position of each extruder, a rotation motor, and the Z axis (that’s 10 steppers if you’re counting), this is very likely the greatest number of motors ever put in a 3D printer. Most electronics boards don’t support that many stepper drivers, and the one that will won’t be ready for the end of The Hackaday Prize. Right now, [Tyler] is running a fairly standard RAMPS board, running two extruders and R axes in parallel. Still, it’s good enough for a proof of concept.

One interesting aspect of [Tyler]’s design is something even he might not have realized yet: with a single bed and four extruders, he’s effectively made a 3D printer geared for high-volume production; simply by printing the same part with all the extruders, he’s able to quadruple the output of a 3D printer with the same floor space as a normal one. This may not sound like much, but when you realize Lulzbot has a bot farm producing all their parts, the Theta printer starts to look like a very, very good idea.

Videos of [Tyler]’s Theta below.


SpaceWrencherThe project featured in this post is a semifinalist in The Hackaday Prize.

Continue reading “THP Semifinalist: Theta Printer”

THP Entry: An Affordable Metal 3D Printer

metal
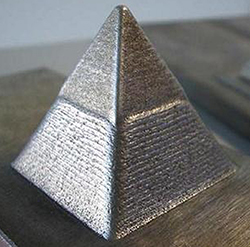
For years now, people have been trying to develop an affordable, RepRap-derived 3D printer that will create objects in metal. There has been a lot of work with crazy devices like high-powered lasers, and electron beams, but so far no one has yet developed a machine that can print metal objects easily, cheaply and safely. For The Hackaday Prize, [Sagar] is taking a different tack for his metal 3D printer: he’s extruding low temperature alloys just like a normal 3D printer would extrude plastic.

[Sagar]’s printer is pretty much a carbon copy of one of the many ‘plastic-only’ 3D printers out there, the only change being in the extruder and hot end. As a material, he’s using an alloy of 95.8% tin, 4% copper, and 0.2% silver in a 3mm diameter spool. This alloy melts at 235° C, about the same temperature as the ABS plastic these printers normally use.

The only real problems with this build are the extruder and nozzle. [Sagar] is milling his own nozzle and hot end out of stainless steel; a challenging bit of machining, but still within the realm of a hobbyist. He has some doubts about the RepRap derived plastic geared extruder being able to handle metal, so he’s also looking at designing a new version and milling that out of stainless as well.

It’s an awesome project, and we hope we’ll be seeing some updates to the project shortly. While a 3D printer that produces objects out of a low temperature alloy won’t be building rocket engines any time soon, it could be a great way to fabricate some reasonably high-strength parts at home.


SpaceWrencherThe project featured in this post is an entry in The Hackaday Prize. Build something awesome and win a trip to space or hundreds of other prizes.

A Closer Look At New Matter’s MOD-t 3d Printer

So last week the SupplyFrame office Prusa i3 finally gave up the ghost — the z-axis threaded rods unwound themselves from their couplers and the whole thing fell apart. So we needed to get some better couplers as our tubing wasn’t going to cut the mustard anymore. Thankfully Pasadena is full of 3d printer people! Within a few blocks of our office we have New Matter, DeezMaker, and a soon to be announced 3d printer from ToyBuilderLabs.

The one everyone is talking about right now is New Matter who recently announced an already successful fundraising campaign for the first run of their $250 3d printer, the MOD-t. This has been making the rounds recently due to its low price and stated aim of bringing 3d printing into the home of the masses (a tale as old as time, right?). It’s a lovely goal for sure, but they will definitely have their work cut out for them, but perhaps this is the team to make it happen? We decided to head over to their lab since it’s just around the corner from our office and see if we could get them to print some new couplers and maybe take a look at their printer while we were at it, videos and pictures after the break!

Continue reading “A Closer Look At New Matter’s MOD-t 3d Printer”

Turning A Laser Cutter Into A 3D Printer With OpenSLS

STL

[Andreas Bastian] has been working on a device that turns an off-the-shelf laser cutter into something capable of selective laser sintering of powdered plastics into 3D objects. He’s put in a lot of work, but now he gets to see the fruits of his labor: he’s successfully printed a few objects out of wax and powdered nylon.

Unlike just about every other inexpensive 3D printer, [Andreas]’ design doesn’t rely on either squirting plastic onto a bed or curing liquid resin with UV light. Instead, a fine layer of powder is spread over a build platform and melted with a laser. The melted layer drops down, another layer of powder is applied, and the cycle repeats until the part is finished. It’s a challenge to build one of these machines, but [Andreas] had the great idea of retrofitting an off-the-shelf laser cutter, allowing him to focus on the difficult task of designing the powder and piston system.

It’s an extremely interesting project, and most of the custom parts are made from laser cut acrylic: easily cut to size on whatever laser cutter you’re retrofitting with 3D printing capability. There’s a lot of info over on the Wiki, and a few videos showing the sintering process and powder distribution below.

Oh. One last note. [Andreas] developed this while at [Jordan Miller]’s amazing lab at Rice University. There’s a lot of interesting things happening at this Advanced Manufacturing Research Institute, including bioprinting, DLP resin printers, and using inkjets for cell cultures. Check out this post for a great talk at the Midwest RepRap Festival.

Continue reading “Turning A Laser Cutter Into A 3D Printer With OpenSLS”

Man Builds Concrete 3D Printer In His Garage

[Andrey Rudenko] is building a house in his garage. Not with nails and lumber, but with concrete extruded by his 3D printer. We’ve seen concrete 3D printers in the past, but unlike those projects, [Andrey] isn’t part of a of a university or corporation. He’s just a contractor with a dream. His printer is directly derived from the RepRap project. It’s even commanded by Pronterface.

[Andrey] started with an Arduino Mega 2560 based RepRap RAMPS style controller. His big printer needed big NEMA34 stepper motors, far beyond the current capacity of the stock RAMPS stepper drivers. [Andrey] got in touch with [James] at MassMind who helped him with an open source THB6064AH based driver. [James] even came up with an adaptor cable and PCB which makes the new drivers a drop-in replacement.

Now that his printer was moving, [Andrey] needed a material to print. Concrete chemistry is a science all its own. There are many specialty blends of concrete with specific strength and drying times. Trucking in custom mixtures can get expensive. [Andrey] has come up with his own mixture based on bags of regular concrete mix, sand, and some additives. [Andrey’s] special sauce doesn’t cure especially quickly, but it is viscous enough to print with.

Every piece of [Andrey’s] printer had to be designed and refined, including the nozzle. The concrete printer works somewhat like a frostruder, extruding concrete in 20mm wide by 5mm tall layers. He’s even managed to print overhanging layers and arches exactly like a giant RepRap Mendel.

The printer’s great unveiling will be this summer. [Andrey] plans to print a playhouse sized castle over the course of a week. He’s looking to collaborate with architects, builders, and other like-minded folks. We’d suggest uploading the project to  Hackaday.io!

Continue reading “Man Builds Concrete 3D Printer In His Garage”

OpenExposer, The DIY SLA Printer

printer

Precisely applied ultraviolet light is an amazing thing. You can expose PCBs, print 3D objects, and even make a laser light show. Over on the Projects site, [Mario] is building a machine that does all of these things. It’s called the OpenExposer, and even if it doesn’t win the Hackaday Prize, it’s a great example of how far you can go with some salvaged electronics and a 3D printer.

The basic plan of the OpenExposer is a 3D printer with a small slit cut into the bed, and a build platform that moves in the Z axis. The bed contains a small UV laser and a polygon mirror ripped from a dead tree laser printer. By moving the bed in the Y direction, [Mario] shoot his laser anywhere on an XY plane. Put a tank filled with UV curing resin on the bed, and he has an SLA printer. Put a mounting bracket on the bed, and double-sided PCBs are a cinch.

The frame is made of 3D printed parts and standard RepRap rods, with the only hard to source component being the polygonal mirror. These can be sourced from scrounged laser printers, but there’s probably some company in China that will sell them bulk. The age of cheap SLA printers is dawning, friends. Video below, github here.

Continue reading “OpenExposer, The DIY SLA Printer”