Kindle thermometer

Kindle Gets Downgraded To An Expensive Thermostat

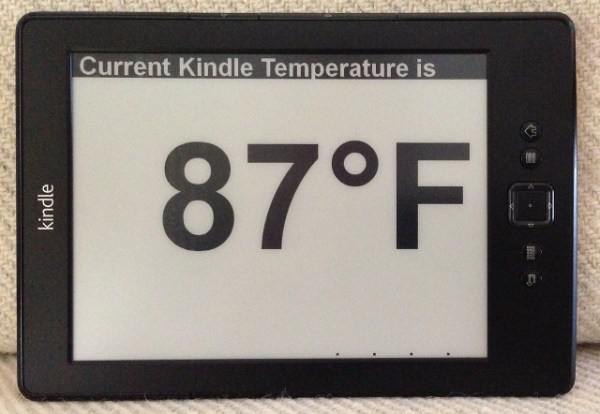
E-readers are awesome, don’t get us wrong — but if you have an old one collecting dust, why not use it for something? [John] decided to hack his old Kindle  to act like a thermometer!

The Kindle’s Linux OS is re-purposed to use the Freescale CPU’s internal temperature sensor as a thermometer — since it’s not doing anything most the time, it should be relatively accurate of the ambient temperature.

Unlike some of [John’s] earlier hacks, this one is completely self-contained and reversible. In fact, it’s just a few scripts that check the temperature every minute and then display it in large digits on the screen. The buttons allow you to convert units or reverse boot to the original Kindle software. It can even graph the recent temperature! It makes for a very easy to read outdoor thermometer.

And not to waste all of its hardware features, [John] also set it up to act as a web server, sending the temperature data via port 8014.

You could also take it a step further and have a full weather station, in a nice wooden frame.

Papilio Duo: FPGA, Logic Analyzer, Debugger, And Arduino Compatible

Back

It’s been a while since we’ve seen some new boards that combine an FPGA and an Arduino, so naturally the state of the art is a little bit behind. The latest from [Jack Gassett], the Papilio Duo, aims to change that by addressing all the complaints of the original Papilio and adding some neat, modern features that you would expect on a board designed in 2014.

On board the Duo is an ATMega32u4, the same chip used in the Arduino Leonardo, allowing for easy integration with your standard Arduino projects. The top of the board is where the real money is. There’s a Spartan 6 FPGA with 9k logic cells, enough to run emulate some of the classic computers of yore, including the famous SID chip, Yamaha YM2149, and the Atari POKEY (!).  With host and device USB, 512k or 2M of SRAM, and an ADC on the FPGA inputs, this board should be able to handle just about everything you would want to throw at it. There’s even a breakout for HDMI on the bottom.

There are a few interesting software features of the Duo, including a full debugger for the ATMega chip, thanks to an emulated Atmel JTAG ICE MKII. Yes, an Arduino-compatible board finally has a real debugger. The FPGA can also implement a 32 channel logic analyzer, making this not only an extremely powerful dev board, but also a useful tool to keep around the workbench.

Talking To ISEE-3

hello.again.m

ISEE-3, the plucky interplanetary spacecraft fueled by the dreams of thousands of crowdfunding backers and hydrazine is now transmitting data to Earth.

Where all radio contact with ISEE-3 this year has only been a carrier frequency, the folks at the reboot project have successfully commanded ISSE via the huge Arecibo telescope to transmit data back to Earth. Usable data are now being received at 512 bits/second at ground stations in Germany, Kentucky, and California, surely being looked over by the ISEE reboot project engineers.

Simply transmitting the commands to put the data multiplexers into their engineering telemetry mode was no small task; a power amplifier needed to be built, shipped to Arecibo, and installed in the giant dome hanging over the Arecibo dish. The amplifier was only installed in the last day, during an earthquake, no less.

There’s still a lot of work to be done before the project can go any further; the team will need to check the status of the spacecraft from the data received, more systems will be checked out, and eventually the spacecraft will be commanded to perform a 17-hour long burn with its small thrusters, putting it on course to be captured by Earth some time in August.

It’s an amazing achievement to do any sort of communication on this scale, and now events in the ISEE-3 mission timeline will be coming rather quickly. We’re trying to organize a video/blog/cast thing with the team from NASA Ames or Morehead State, but the team is, understandably, a little busy right now.

TIQ probe and test box

TIQ Probe Is More Logical Than Most

[youtube=https://www.youtube.com/watch?v=XZz1W-LurlU&w=580]


We had [Mark] on our “dance card” for people to find at Maker Faire. But before we could track him down he bumped into us holding the TIQ Probe in one hand and a testing box in the other. TIQ is conceived in the form factor of a traditional logic probe but thanks to the Cypress PSoC 5LP inside it’s much, much smarter than the decades-old bench tools. Sure, it can tell you if that uC pin is a 1 or a 0, but it can also detect what type of signal it’s probing and has built-in protection for over-voltage.

The point of the tool is to bridge the gap between things which would be measured with a DMM and those measured with a proper Oscilloscope. We think he did a pretty good job of including the things that someone just starting out without expensive bench equipment might want. For instance, you can set it to trigger on common data protocols like i2c, and use the probe itself as a rudimentary pulse generator.

The bulk of the details on the probe can be found on its Kickstarter page (which has just a few days left). You may also be interested in his company page. We’re curious about the insides of the test rig he was hauling around. [Mark] is a regular reader so hopefully he’ll leave a comment below with the details of that black box.

Meet Jimmy: An Open Source Biped Robot From Intel

Jimmy_Arm_Up

Intel’s CEO [Brian Krzanich] stopped by the Re/Code conference to announce Jimmy, the first robot from the 21st Century Robot project. The project is the brainchild of [Brian David Johnson], Intel’s resident futurist. We love the project’s manifesto:

 Robot Is: Imagined first. Easy to build. Completely open source. Fiercely social. Intentionally iterative. Filled with humanity and dreams. Thinking for her/him/itself.

Jimmy may not be all those things yet, but he definitely is exciting. For starters, he wasn’t built in some secret lab at Intel HQ. Much of Jimmy’s construction took place at Trossen Robotics, a name well known to Hackaday. [Matt] and [Andrew] at Trossen describe all the details in their video down past the break.

This version of Jimmy is a research robot, which mean’s he’s not going to come cheap. Jimmy sports an Intel i5 NUC motherboard, 20 Dynamixel servos, a 5052 aluminum frame and a host of sensors. A  4S 14.8v 4000mAh LiPo battery will power Jimmy for 30 to 60 minutes between charges, so be sure to budget for a few spare packs. The most striking aspect of Jimmy is his 3D printed shell. The 21st Century Robot Project gave him large, friendly eyes and features, which will definitely help with the social aspect of their goals.

Jimmy is all about open source. He can run two flavors of Linux: Ubuntu 14.04 LTS or a custom version of Yocto Pokey. There is a lot to be said for running and developing on the same hardware. No specialized toolchains for cross compiling, no NFS shares to move binaries around. If you need to make a change, you can plug a monitor (or launch an VNC session) and do everything with Jimmy’s on-board computer. Jimmy’s software stack is based upon the DARwIn OP platform, and a ROS port is in the works.

We’re excited about Jimmy, but at $16,000 USD, he’s a bit outside our budget. Thankfully a smaller consumer version of Jimmy will soon be available for around 1/10th the cost.

Continue reading “Meet Jimmy: An Open Source Biped Robot From Intel”

Hackable Arduino Cellphone

Phoenard: Arduino Phone As Small As An Arduino Mega

[youtube=https://www.youtube.com/watch?v=_hXgwTRqwRU&w=580]


Hanging out at one side of the Atmel booth at Maker Faire was [Pamungkas Sumasta] who was showing off his Arduino cellphone called Phoenard. We really like the form-factor but its hackability is where it really shines. [Sumasta] showed off the menu system which is quite snappy and makes it simple for you to add your own applications. Software isn’t the only thing you can customize, as there’s a connector at the bottom of the phone. He showed off a breadboard attachment which was hosting LEDs of various colors. Their intensity can be altered using a simple slider app on the touchscreen. But there’s more power if want it. Also on exhibit was a self-balancing robot body which has a connector at the top for the phone.

[Sumasta] won the Atmel Hero contest and we assume that’s how he made it all the way to San Francisco from The Netherlands for Maker Faire. You can learn a few more technical details about Phoenard on the Facebook page.

Super Simple Gimbal For Multi-Rotor Aircraft Laughs In The Face Of Complexity

Super Simple Multi Rotor Gimbal

After the first flight of your newly built multi-copter, you will immediately want to add a camera. This sequence of events follows the laws of physics and is as predictable as gravity. Just strapping a camera on by way of a fixed bracket may technically solve that problem, but it creates another. A multi-copter tilts and rolls as a result of changing flight direction. If the multi-copter tilts and rolls, so does your camera. This is where a gimbal comes in handy, it adjusts the camera in an equal and opposite direction than that of the aircraft. If the aircraft tilts forward, the gimbal tilts the camera backward the same amount. The result is a steady camera for capturing some sweet videography.

Super Simple Multi Rotor GimbalTeam SSG over at rcgroups.com has come up with what they are calling the Super Simple Gimbal. Their vision was a gimbal that would be inexpensive, easy to build and add minimal weight to the aircraft. On a normal gimbal, there are two motors or servos, each one specifically controls a single axis of movement. On the SSG, there are 2 servos but they do not move independently from one another. The camera is mounted to a plate that is supported on one end by a piece of silicone tube which becomes a fulcrum for the system. The other side of this plate is supported by 2 linkages (also made of silicone tube) that are themselves connected to the servos. If both servos move up, the camera is tilted down. If the right servo moves up and the left down, the camera is tilted to the left.

Continue reading “Super Simple Gimbal For Multi-Rotor Aircraft Laughs In The Face Of Complexity”