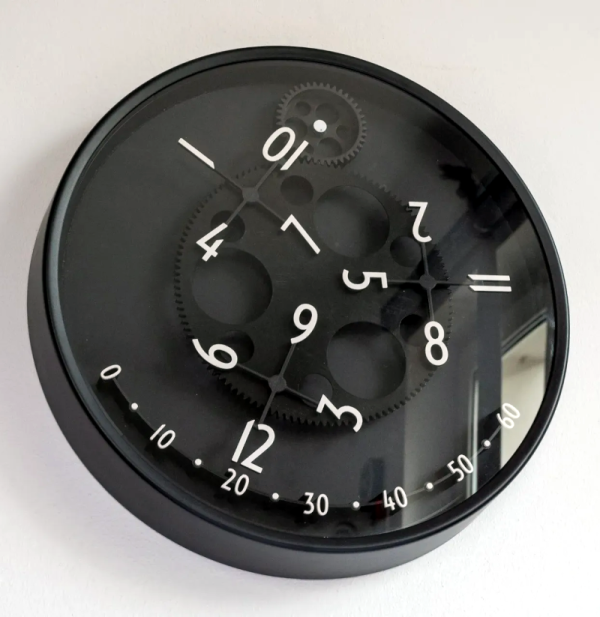
We always enjoy unique clocks, and a recent 3D print from [David Kingsman] caught our eye. It converts an Ikea clock into a very unusual-looking “wandering hour” clock that uses a Geneva drive to show a very dynamic view of the current time. The concept is based on an earlier wandering clock, but [David] utilized a different mechanism.
To read the clock, you note which hour numeral is in range of the “minute arc” and read the time directly. So if the 12 hour is over the 20-minute mark, the time is 12:20. Besides the clock, you need a fair number of printed parts, although they all look like relatively simple prints. You’ll also need 13 bearings and some metric hardware. A piece of cardboard used for the face rounds out the build.
Modifying the clock is more than just taking it apart. There is a template file to print, and you’ll need to align it and drill holes as indicated.
If you haven’t seen a Geneva drive before, it translates a continuous rotation into intermittent rotation. This isn’t the first clock we’ve seen use this kind of drive, although the last one we saw represented time differently. If you want something even more mechanical, try a chain-driven clock.
What is an FDM filament coloring’s purpose but to be an aesthetic choice? As it turns out, the additives that create these changes in coloring and transparency also affect the base properties of the polymer, whether it’s PLA, PETG, or another material. This is where a recent video by [CNC Kitchen] is rather illustrative, using a collection of colored PLA filaments from a single filament manufacturer.
[CNC Kitchen] ran a range of tests including tensile strength, ductility, layer adhesion, impact resistance, and annealing performance. The results showed no clear overall winner between plain PLA polymer and any specific color. Perhaps most fascinating was just how much these color additives change the material’s response to annealing. Baking the PLA at 100°C for 30 minutes generally improves material properties, but also can cause warping and shrinking. The effective warping and shrinking differed wildly between the filament.
The general conclusion would seem to be that the natural polymer isn’t necessarily the optimal choice, but that you should test and pick the filament from a specific manufacturer to fit your project’s needs.
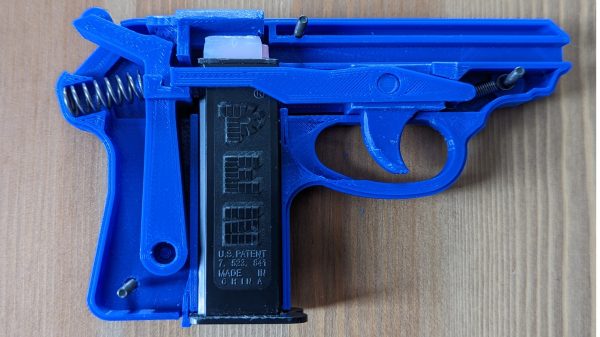
Nerf Blasters are great fun to play with, but you really shouldn’t eat the foam darts. Conversely, Pez dispensers are fussy and kind of boring, but the candy is a tasty treat. [Soloprototype] has presented us the best of both worlds, in the form of a 3D-printed Pez blaster, with a firm note that this toy is for grown-ups only.
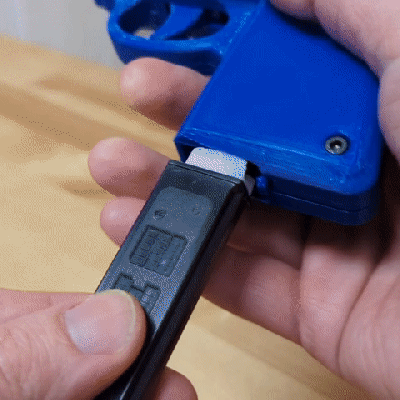
Overall, the design is very similar to the Pez Shooter, a long-discontinued Pez dispenser design. It uses a basic pistol form factor, and accepts a magazine of Pez pellets loaded into the grip. The magazine itself is cut out of a regular Pez dispenser, to avoid reinventing the wheel. Pulling the trigger fires the Pez pellets with spring power, launching candy into the air.
We all love candy propelled at speed, though [Soloprototype] notes that some safety precautions should be observed. To avoid choking risks, it’s not recommended to allow children to play with the toy. Nor should it be fired at the face or mouth. The full list of safety measures is available on the project’s Cults3D page.
The Pez blaster is cool, but we’d love to see more work in this space. The world needs a Twinkie Trebuchet, or a Cadbury Catapult, to say nothing of the Butterfingers Balista. If you can think of other Age of Empires siege weapons that would be ideal for candy delivery, drop them in the comments below. Alternatively, consider the M&M launcher we’ve shared previously!
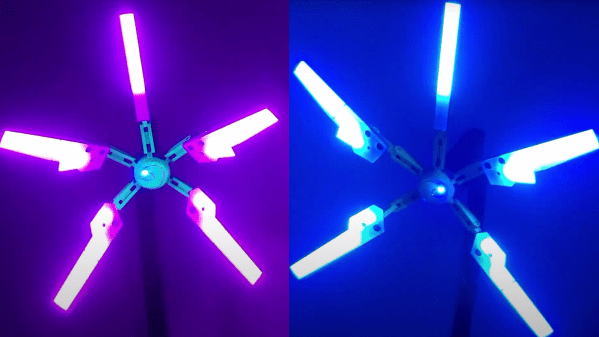
[Pinkman] creates a smart RGB table lamp based off of the “Odradek device” robot arm from the video game “Death Stranding”.
[Pinkman] adds a XIAO BLE nRF52840 Sense device, with Bluetooth support, microphone and TinyML capability. The nRF52840 is used to push data to the five WS2812 strips, one for each “blade” of the lamp, and also connects to a TTP223 capacitive touch controller to add touch input detection. The TinyML portion of the nRF52840 allows for custom keyword training to turn on the lamp with voice commands ([Pinkman] uses “Bling Bling”). [Pinkman] has also provided Bluetooth control, allowing the color and pattern to be changed from a phone application.
The lamp is 3D printed with the build being based off of [Nils Kal]’s Printables files. Each of the five blades has a white 3D-printed diffusor plate to help ease out the hot spots for the LED strip. The lamp is fully adjustable in addition to having cavities, channels and access points for “invisible” wiring. [Pinkman] has also upgraded the original 3D files to allow for the three wires needed to drive the WS2812, instead of the two wires that [Nils] had allotted in the original.
[Pinkman] has all of the code, STL files and training data available for download, so be sure to check it out. Lamps are a favorite of ours and we’ve featured our fair share, including 3D printed Shoji lamps and RGB wall lamps.
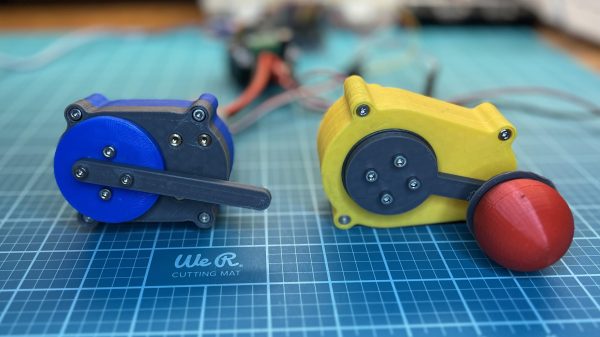
Hobby servos are nifty and useful for a wide range of projects. There’s nothing stopping you from building your own servos though, and you can even give them nifty features like 360-degree rotation In fact, that’s exactly what [Aaed Musa] did!
The servo relies on 3D printed gears in a 3D printed housing. The design makes prodigious use of threaded inserts to hold everything together nice and tight. A DC motor is charged with driving the assembly, as with any regular servo motor. However, in the place of a potentiometer, this design instead uses an AS5600 magnetic rotary position sensor to read the servo’s angle, via a magnet mounted in the servo’s gear. An Arduino is used to determine the servo’s current position versus the desired position, and it turns the motor accordingly with a BTS7960 motor driver.
The result is a sizeable and capable servo with an easily-customizable output, given it’s all 3D printed. If you’d rather just mod some servos instead, we’ve covered some great work in that area, too. Video after the break.
If you own a 3D printer, CNC router, or basically anything else that makes coordinated movements with a bunch of stepper motors, chances are good that it speaks G-code. Do you?
If you were a CNC machinist back in the 1980’s, chances are very good that you’d be fluent in the language, and maybe even a couple different machines’ specialized dialects. But higher level abstractions pretty quickly took over the CAM landscape, and knowing how to navigate GUIs and do CAD became more relevant than knowing how to move the machine around by typing.
Strangely enough, I learned G-code in 2010, as the RepRap Darwin that my hackerspace needed some human wranglers. If you want to print out a 3D design today, you have a wealth of convenient slicers that’ll turn abstract geometry into G-code, but back in the day, all we had was a mess of Python scripts. Given the state of things, it was worth learning a little G-code, because even if you just wanted to print something out, it was far from plug-and-play.
For instance, it was far easier to just edit the M104 value than to change the temperature and re-slice the whole thing, which could take an appreciable amount of time back then. Honestly, we were all working on the printers as much as we were printing. Knowing how to whip up some quick bed-levelling test scripts and/or demo objects in G-code was just plain handy. And of course the people writing or tweaking the slicers had to know how to talk directly to the machine.
Even today, I think it’s useful to be able to speak to the machine in its native language. Case in point: the el-quicko pen-plotter I whipped together two weekends ago was actually to play around with Logo, the turtle language, with my son. It didn’t take me more than an hour or so to whip up a trivial Logo-alike (in Python) for the CNC: pen-up, pen-down, forward, turn, repeat, and subroutine definitions. Translating this all to machine moves was actually super simple, and we had a great time live-drawing with the machine.
So if you want to code for your machine, you’ll need to speak its language. A slicer is great for the one thing it does – turning an STL into G-code, but if you want to do anything a little more bespoke, you should learn G-code. And if you’ve got a 3D printer kicking around, certainly if it runs Marlin or similar firmware, you’ve got the ideal platform for exploration.
Does anyone else still play with G-code?
This article is part of the Hackaday.com newsletter, delivered every seven days for each of the last 200+ weeks. It also includes our favorite articles from the last seven days that you can see on the web version of the newsletter.
Want this type of article to hit your inbox every Friday morning? You should sign up!
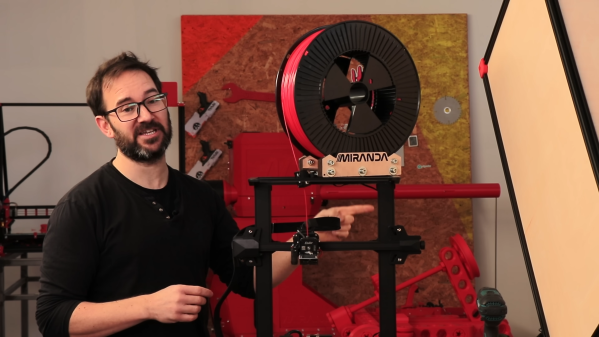
Most 3D printers come with a pretty basic filament holder — often little more than a bar to hang the spool on. [Ivan Miranda]’s 3D printers run bigger spools than most, though, so he had to craft an altogether more serious solution.
Unlike most of [Ivan]’s creations, the spool holder isn’t actually 3D printed. For this job, he turned to a laser cutter instead, cutting the parts out of 5 mm plywood. A handful of layers of wood bolt together to form the frame. The frame holds several bearings for the outer rims of the spool itself to ride on, allowing it to spin freely as the extruder tugs on the filament. Reducing the rolling resistance of the spool is key when working with such large, heavy spools, and reduces the chances of the filament not feeding properly.
 Overall, the design is very similar to the Pez Shooter, a long-discontinued Pez dispenser design. It uses a basic pistol form factor, and accepts a magazine of Pez pellets loaded into the grip. The magazine itself is cut out of a regular Pez dispenser, to avoid reinventing the wheel. Pulling the trigger fires the Pez pellets with spring power, launching candy into the air.