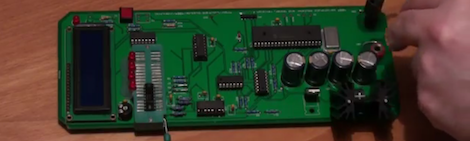
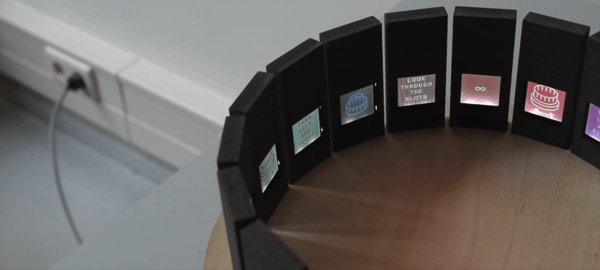
Build An 8-bit TTL Computer

Very rarely do we see an Instructable so complete, and so informative, that it’s a paragon of tutorials that all Instructables should aspire to. [8 Bit Spaghetti]’s How to Build an 8-bit computer is one of those tutorials.

[8 Bit Spaghetti]’s build began on his blog. He originally planned to build a 4-bit computer but decided a computer that could only count to 15 would be too limiting. The build continued by programming an NVRAM as the ROM on a breadboard and finally testing his bundle of wires.

What really makes [8 Bit Spaghetti]’s special is the Instructable – he covers just about all the background information like the definition of a Turing machine, a brief introduction to electronics and logic chips, and binary numbers. Even though he’s doing some fairly complicated work, [8 Bit Spaghetti]’s tutorial makes everything very clear.

The computer isn’t quite done yet – there’s still a few nixie tubes to add – but we couldn’t imagine a better project for the budding electronic hacker.

Using Pinball Score Reels As Wireless Displays

[Scott] put together a system where he can use pinball score reels as a wireless display. As you can see in the video below, the result is really neat. The sound alone makes this shoot pretty high on our “things that are cool” radar. The display required 24V AC to operate the solenoids that actually let the display rotate, but he found that an 18V DC supply would allow him to fire a single solenoid. No problem, he just staggered their operation. This is barely perceptible due to how long it takes for the mechanical part of the spinning to occur.

You can download his Arduino sketch and see more on his site. He has big plans too, he just got 4 more of these to add once they are cleaned up.

[via Adafruit]

Continue reading “Using Pinball Score Reels As Wireless Displays”

Using Incandescent Bulbs To Compensate For A Slow Start Cfl

[Dick], like most of us, likes some pretty strong light in his workshop. He’s using CFL flood lamps to save a little energy. Unfortunately, he found that they gradually become brighter instead of that instant light he was accustomed to with his previous incandescent bulbs.

Not wanting to wait around for the lights to reach full power, but still wanting to save electricity, he devised a plan . He would install an incandescent bulb along side the others and fade it out slowly as the others became brighter. He acknowledges that he could have just put a 5 minute timer on it, but the transition would be abrupt and unpleasant. Instead, he built a circuit to get the exact result he wanted.

Just so you don’t miss it, the actual build is available to download at a link toward the bottom of the page.

[via HackedGadgets]

Pinball Stomp: Part1

Despite my atrociously short attention span, I’ve always loved pinball. Maybe it is something about all the flashing lights and clunking solenoids. Maybe it is just the simple physics at the center of it all. I’m not really sure.  My kids, however, don’t share my enthusiasm. I suspect part of it is that they never wandered through a fog filled arcade in the middle of the night, hopped up on Reese’s Pieces with a shrinking pile of quarters in their pocket. The other part might be the fact that they have gotten used to the Nintendo Wii and the Xbox Kinect (we just got one last week).

Watching them jump up and down playing an extremely simple and repetitive game with the Kinect gave me an idea. I envisioned pinball projected on the side of my house, the kids jumping up and down in front of it to move the paddles. Keep reading to see how I plan to build it and what I’ve done so far. There’s a full video, but also text of the entire thing.
Continue reading “Pinball Stomp: Part1”

Controlling The Power With Bluetooth

[Mike] dropped us a tip to show off a system he has built to control some power sockets based on his proximity.  Initially the project started as a parallel port controlled box to switch the mains power.  Then he got the idea of turning this into a little more interactive of an automation tool. He is utilizing the bluetooth from his cell phone as a locator. When the box senses that he’s in the room, the power is on. When he leaves the area, the power is off.  You can see his ruby code on his web site if you wanted to give it a try or offer improvements.

Building The Mind Of A Robot Overlord

The folks at the Louisville hackerspace LVL1 now have a fabulous piece of wall art that is also a speech synthesizer. The speech synthesizer is over two feet long and is made of nine panels of stripboard connected with right angle headers. An awesome piece of art if there ever was one.

This speech synthesizer is actually 30 years in the making. In the early 1980s, one of the members of LVL1 across a few text-to-speech ICs in a bin in Radio Shack. These ICs sat in a drawer while college got in the way, and in 1990, the project was resurrected. The speech synth chips sat in a drawer for another decade, and it was finally decided to build a wall-mounted speech synth for LVL1.

This speech synthesizer is intended to be the voice box for FATHER, LVL1’s second hackerspace AI. Already the first AI – MOTHER – is already telling people to take out the trash and generally trying to become the AI-gone-amok we all deserve. FATHER will be implemented in a robotic monkey, so right now the only question we have is who has been messing with the Louisville water supply.

Controlling Blinkenlights With Modern Computers

A few old timers may remember that once, long ago, computers didn’t require keyboards. The earliest personal computers such as the Altair 8800 and the server rack-sized minicomputers like the PDP-11 could be controlled with a panel filled with switches and lights, giving us the term blinkenlights. Today, most of these machines have been thrown away or locked up in museums and private collections; even if you were to get your hands on one of these control panels, you’ll have a heck of a time doing something useful with one.

Fear not, because [Jörg] has come up with a great way to control these blinkenlights and simulate the computers of yesteryear. He calls his build BlinkenBone, and it’s able to control the blinkenlight panels from dozens of historical computers and simulate every thrown switch and tiny light bulb.

BlinkenBone is a BeagleBone single board Linux computer running the SimH simulator for antique computers. Right now the BlinkenBone is able to simulate the PDP-1, PDP-8, PDP-11, a lot of old IBM machines, the Altair 8800, and even some HP boxes.

Without a BlinkenBone or similar simulation device, the still-surviving control panels for these computers are just pieces of art to hang on a wall. When they’re running a simulation of their original hardware that was long-lost to the scrap yard, they become the useful devices they once were. Also, it’s much easier to appreciate how far technology has come in the last 40 years.

You can check out a short demo of [Jörg] using his BlinkenBone on a PDP-11/40 after the break. Look at those lights go.

Continue reading “Controlling Blinkenlights With Modern Computers”