Adding Digital Readout To A Non-CNC Mill

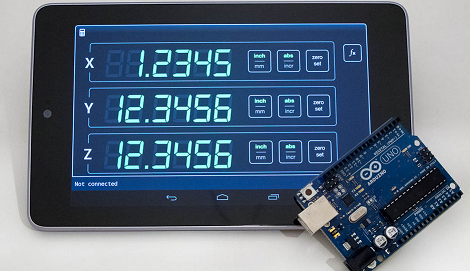
In the quest to add a digital readout to his mill, [Yuriy] has done a lot of homework. He’s sourced a trio of very capable scales, researched what kind of hardware his DRO should be based on, and even built a very cool display using seven-segment LEDs. After nearly a year of work, [Yuriy] finally hit upon something that works well: an Arduino and an Android tablet, perfectly matched for one of the prettiest machine shop displays we’ve ever seen.

[Yuriy] based his build off a trio of digital scales he bought from Grizzly. These scales bolt on to the frame of his mill and send data to their own display. An Arduino was used to pull the data off these scales and sent via Bluetooth to a Nexus 7 Android tablet.

Considering a DRO solely based on an Arduino and a character LCD would look a little chintzy – and the fact Arduinos can’t do floating point arithmetic – we’re really impressed with [Yuriy]’s very elegant solution.

Thanks [Lee] for sending this one in.

Turning A Shipping Container Into A 3D Printer

Built inside a 20-foot shipping container placed on its end, the Kamermaker – ” room maker” in Dutch – is one of the largest 3D printers we’ve ever seen. Able to print objects as big as 2 meter square and 3.5 meters high, the Kamermaker is designed to print huge objects including furniture, architectural elements, and even entire rooms.

The Kamermaker is a collaboration between Architectburo DUS and Utilimaker and the result of wanting to build the world’s largest 3D printer pavilion. Built inside a stainless steel-clad shipping container, the Kamermaker features a scaled-up version of the X, Y, and Z axes you’d find in any other 3D printer. The only change is a scaling up of current designs, allowing it to print small wind turbines covering its surface or, theoretically, a life-size TARDIS.

Because using traditional plastic filament would be prohibitively expensive, the Utilimaker team chose to extrude plastic pellets on the fly as it is used. There’s an excellent video of the filament extruder here along with a walk-through of the machine in operation after the break.

Continue reading “Turning A Shipping Container Into A 3D Printer”

Mechanical Donkey Kong Features Laser Cut Mario

[Martin] just sent in a project he’s been working on that takes Donkey Kong out of the realm of pixels and sprites and puts our hero Mario into a world made of laser cut plywood.

This mechanical version of Donkey Kong uses an Arduino stuffed into an old NES to control Mario jumping over ball bearing ‘barrels.’ The game starts with 12 of these barrels ready to be thrown by our favorite gorilla antagonist, which Mario carefully dodges with the help of a pair of servos.

This is only the first iteration of [Martin]’s mechanical version of Donkey Kong. The next version will keep the clever means of notifying the player if Mario is crushed by a barrel – a simple magnet glued to the back of the Mario piece – and will be shown at the UK Maker Faire next year.

Although [Martin]’s ideas for a mechanical version of Donkey Kong aren’t fully realized with this build, it’s already a build equal to electromechanical Pong.

Turning Video Game Sprites Into 3D Objects

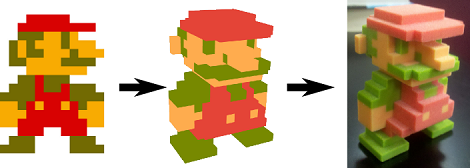
Anyone who has played Minecraftfor a good amount of time should have a good grasp on making 3D objects by placing voxels block by block. A giant voxel art dragon behind your base is cool, but what about the math behind your block based artwork? [mikolalysenko] put together a tutorial for making 3D objects out of video game sprites and covers a lot of the math involved in turning pixels into voxels.

The process of modeling a 3D object from a series of 2D images is a very well-studied computer vision problem called multiview stereo reconstruction. This process has been used to build 3D models of random objects with devices such as the Stanford spherical gantry. Unfortunately the math for this algorithm is a mess, but there is another way: using photo hulls (PDF warning) to find the largest possible object from a series of images showing the top, bottom, left, right, front, and back views.

[mikolaly] put together an algorithm to produce 3D images from a series of images and even went so far as to build a web-based shape carving editor. With this web app, it’s possible to make 3D objects simply by inputting a bunch of colored pixels onto six 2D grids.

Once the models were complete, [mikolaly] sent some of the 3D models off to Shapeways for 3D printing. He’s completed Meat boy, Mario, and Link 3D sprites, all available for sale.

Now the only thing left to do is build a script to turn these objects into Minecraft object schematics.

Thousands Of Physical Pixels Turn These Walls Into A Huge Display

The scale of this project is daunting. Each of the three white walls seen in the image above is made up of thousands of oblong square blocks. The blocks move independently and turn the room into an undulating 3D display.

If it had only been the demonstration video we might have run this as a “Real or Fake” post, but we’re certain this is real. Each pixel is made of what looks like a foam block mounted on a stepper-motor-driven linear actuator. So basically this must have set the world record for the CNC machine with the most axes. The motors make for very accurate and smooth motion, and the control software lets them draw shapes, words, animated objects, and the like. But the one side effects that we absolutely adore is the sound all of these motors make when running. After the break you can see a demo video and a ‘making of’ clip.

The installation is the work of the Jonpasang art collective and is installed as a Hyundai exhibit at an expo in Korea.

Continue reading “Thousands Of Physical Pixels Turn These Walls Into A Huge Display”

Center Pivot Pen Plotter

This center pivot pen plotter is an interesting take on the idea, and manages to somewhat simplify the fabrication when compared to a gantry-style built.

Normally we’d see a gantry that travels on two rails, with a print head that moves along its length. Here the gantry is anchored on just one side, with a chain driven system to rotate it along the plotting surface. The print head uses a fine-point felt-tipped marker. It still travels along the arm as you would expect, and can be tilted away from the paper for repositioning.

What was made easier in hardware ends up adding to software complexity. The benefit of a traditional system is that it uses X and Y coordinates to plot a design. The pivot of this mechanism means that as the print head moves further from the center of the machine, the distance between each pixel is magnified. But the clip after the break proves that this issue has been solved.

Continue reading “Center Pivot Pen Plotter”

Building A Bigger Shapeoko Router

Hackaday alumni [Will O’Brien] sent in a few projects he’s been working on lately while he’s in the process of upgrading his workspace. He’s building a 1200 x 1200 mm CNC router based on the Shapeoko router, and it sure looks like he’s having fun doing it.

The Shapeoko router is based on the Makerslide open source linear bearing system. This system uses common aluminum extrusions as the frame of a very simple, very inexpensive CNC router. The Makerslide system is designed to be expandable; if you want a larger axis, just bolt in a longer piece of aluminum extrusion. We haven’t seen many Makerslide builds take advantage of this fact, a shame as the stock Shapeoko only has a build area of 200 mm square.

[Will] is expanding this build area to 1200 mm square, but of course this means beefing up some parts of the build. He’s already moved up to very hefty 250 oz/in Nema 23 stepper motors (up from the Nema 17s for a standard Shapeoko), as well as beefing up the motor mount a great deal.

[Will] also sourced a few lengths of cable drag chain (yes, that’s what it’s called) to keep all the wires for his huge CNC routers out of the path of a moving gantry and spinning motors. It looks like he’s got a very nice build shaping up, and we can’t wait to see it in action.