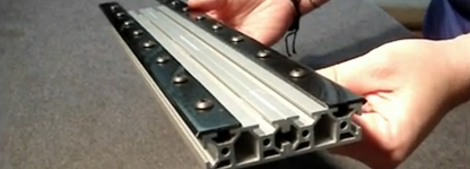
Zen Rock Garden Table Uses Magnets And Sand

[Nick] is working on a prototype of a coffee table sand plotter that draws patterns in sand a lot like a zen rock garden.

[Nick]’s zen rock garden uses a magnet to draw a ball bearing across the sand in interesting patterns. The build uses 3D printed gears and laser cut parts to rotate the table around and move the magnet along a radius of the circle. During the first test of the prototype, the ball bearing jerked around but this problem was solved by adding a piece of foam under the sand. Power is supplied through a slip ring in the base, and the table is controlled through Bluetooth.

Speaking of magnet-and-ball-bearing zen coffee tables, we ran across this video of a more professional-looking prototype that was the basis for a successful Kickstarter campaign. Like [Nick]’s prototype, the entire build relies on magnets and a ball bearing to move sand around in patterns. Because this zen table uses an XY axis instead of [Nick]’s polar setup, drawing logos is a lot easier math-wise, lthough it doesn’t look quite as cool as a circular rock garden.

After the break you can see these zen rock garden coffee tables in action.

Continue reading “Zen Rock Garden Table Uses Magnets And Sand”

Incredible Home Made Miniature Engines

On the heels of a small stirling engine we featured, an astute Hackaday reader sent in a few awesome builds from HMEM, the home model engine machinist forum.

First up is a fantastic looking stirling engine made entirely from scratch. The build is modeled on a Moriya Hot Air Fan, but instead of making a fan spin around, [IronHorse] put a flywheel on the engine. It also uses propane instead of an alcohol or other liquid fuel lamp for the heat source.

Next up is a pee-wee sized V8 engine by [stevehuckss396]. Unlike the model engines we’re used to, this one runs on gasoline. The engine started out as a 3 x 3 x 5 inch block of aluminum. This thread goes on an amazing 85 (!) pages and makes for great afternoon reading, but here’s a video of the engine in action.

Last is [keith5700]’s amazing 1/4 scale V8. Not only is this [keith]’s first project, he also completed this entire project on manual mills and lathes. There’s an electric starter thrown in there, and the pictures are simply incredible.

Thanks to [Norberto] for sending this one in, and if you’ve got an example of amazing machining skill, send it on it to the tip line.

Cheap And Easy Linear Supported Rail

Some of the very largest – and coolest – CNC machines use supported linear rail for their movement axes. For any home tinkerer trying to reproduce these supported rails, the problem of cost comes up very quick; these rails can run over $100 for just a few feet. [Michael] came up with a great way to build his own supported rail so he can build his very large CNC router.

There aren’t many tools needed to build [Michael]’s rail. He put a 90° notch in a 2×4 to support his 25mm rail, and clamped it down with a piece of plywood. After drilling a 5/16″ hole every 12 cm, he tapped these holes out to receive 3/8″ threaded rod. Yes, we also hate the mix of metric and imperial units in that description, but the results speak for themselves.

The now-supported rail was mounted to a piece of MDF with a few bolts and washers. MDF isn’t the most dimensionally stable material, so [Michael] will be covering the whole thing in a coat of epoxy very soon. Now, he’s one step closer to his gigantic CNC gantry router.

You can check out [Michael]’s demo video after the break.

Continue reading “Cheap And Easy Linear Supported Rail”

Automated Bed Leveling With Our 3D Printer

Anyone with a RepRap or other 3D printer knows how much of a pain leveling the bed is. To get a good quality print, the bed – the surface the printer prints on – must be exactingly level, and may the engineering gods help you if your surface has the slightest bump in it. [Atntias] is developing a solution to this problem: an auto leveling platform that shouldn’t require any parts at all if you already have a metal bed.

The idea is incredibly simple: Just ground your metal bed, and apply a small voltage to the tip of your hot end. [Atntias]’ code (available on GitHub) probes the surface of the bed and shoots out a 3D mesh of your current bed profile. This can be used as a GCode offset, so the bottom of your print is always directly on the top of the bed.

Although the utility of leveling a bed down to the micron level is of questionable utility for 3D printers, it’s vitally important if you want to mill a PCB on your printer. [Atntias] says his idea is currently being implemented into the Marlin firmware, so it looks like another firmware update is in our future.

Thanks go to [technodream] for sending this one in. Check out the video after the break to see the bed leveling process in action.

Continue reading “Automated Bed Leveling With Our 3D Printer”

Joinery Sure To Be Useful On Your Next Sheet Goods Enclosure

It’s hard to be an expert at everything, but this collection of wood joinery techniques will make your next project look like you’ve just finished your degree in mechanical engineering. They’re targeted for use in projects where thin sheets of plywood are CNC cut to make enclosures and parts. [Sean Ragan] mentions that these are not new, but we haven’t come across such a large collection of examples as this.

The joints shown above address a series of different needs. You’re probably already familiar with the joint on the bottom right which makes nice corners for a box, providing a lot of surface area for gluing. But just above that is a simple variation on the idea which includes slots for square nuts. This type of mechanical fastener brings strength while keeping the option to take the joint apart again

To the top left you can see a design that includes a snap lock. As the two pieces are slotted together, the barbs flex until they find their mating openings and hold the pieces firmly together. Below that are some bulbed finger joints which don’t need glue to hold themselves together.

[Sean’s] post goes on and on with these designs. He even covers the laser-cut bendable hinges which we are quite fond of.

Putting QR Codes In Copper

Former Hackaday contributor [mikeysklar] has been trying to etch a QR code into a sheet of copper. Although his phone can’t read the CuR codes he’s made so far, he’s still made an impressive piece of milled copper.

The biggest problem [mikey] ran into is getting Inkscape to generate proper cnc tool paths instead of just tracing a bitmap image. He’s got the CNC part of his build under control, but he still can’t find a QR code reader that will register his work.

We’re no stranger to QR codes here at Hack a Day, and it’s very possible the only thing that could be stopping [mikey]’s QR code from being read by a phone is the contrast of the image. We’re thinking a little bit of printer’s ink forced into the non-copper part of the PCB would make the QR code register. Since [mikey] already has a very nice negative etching of his QR code, he could easily use his new board as a printing plate, making infinite paper copies of his copper-based QR code.

If you’ve got any ideas on how [mikey] can get his QR code working, post them in the comments.

A Six-year Adventure Into The World Of CNC Fabrication

Hackaday doesn’t always get the entire back story of a build. The usual assumption is that someone decided to build something, and with just a little bit of effort the project makes it into the Hackaday tip line. This doesn’t do justice to the builder, with skills honed after years of practice and experience. A 200-word summary is deceiving, and makes everything look almost too easy. [Michal] decided to buck that trend and sent in his half-decade long adventure of becoming one of the best micro-scale machinists we’ve ever seen.

In 2006, with years of robots made out of hot glue and cardboard behind him, and the quality of 3D printers not up to his exacting specifications, [Michal] snapped. He sunk the better part of $3000 into a Roland MDX-15 desktop mill. After several months of futzing about with acrylic sheet, [Michal] came across the wonderful machining properties of modeling board.

Determined to do something useful with this modeling board, [Michal] started looking into resin casting. Casting in resin is a common technique in the artist and model maker communities to mass produce small plastic parts. After getting his hands on eight liters of polyurethane resin, [Michal] made a useful part guiding the direction his skill set would grow in the coming years.

After years of experimenting with techniques, materials, and mediums, [Michal] eventually honed his craft and was able to finally start building real robots. These projects were a far cry from the cardboard and milk jug contraptions made earlier in his career. [Michal] was now producing incredibly precise gear assemblies with accuracies within 0.002 mm.

You may remember [Michal] from his robot with pivoting wheels we showcased last week. He got a lot of email from people wanting to know how to start delving into his unique blend of artistry, engineering, and craftsmanship. The good news is you can now learn from his mistakes, so a planetary gearbox shouldn’t take more than a few months to finish.