Simple 3D-Printed Circuitry

One of the problems encountered thus far with 3D-printing circuits with conductive filament is that it doesn’t really bond to anything, let alone solder, so how does one use it?

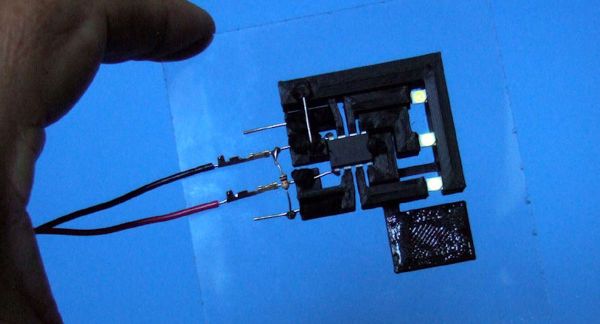
[mikey77] wrote an Instructable showing how to print circuit boards and create simple circuits, using shape of the plastic as a way to control the circuit. We like how he used using the flexible nature of the filament to make buttons, with two layers of conductive material coming together with the press of a finger.

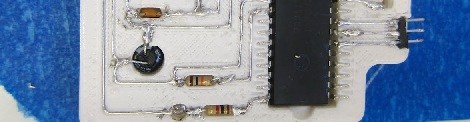
He also created a linear potentiometer with a 3D-printed wiper that increases the ohms of the connection the farther it’s pushed. The filament doesn’t have the same conductivity as copper so [mikey] was able make resistors by stringing pieces of conductive plastic between two leads. There are also some hexagonal touch pads that turned out very nice.

We’ve published a lot of posts about DIY circuitry, including a previous effort of [mikey]’s, 3D-printed solderless circuits, plus another post about printing point-to-point circuits on a 3D printer.

Continue reading “Simple 3D-Printed Circuitry”

The Quest For Mice With Frickin’ Laser Beams (Pointed At Their Brains), Building A Laser Controller

The logo for the field is kind of cute though.

[Scott Harden] is working on a research project involving optogenetics. From what we were able to piece together optogenetics is like this: someone genetically modifies a mouse to have cell behaviors which can activated by light sensitive proteins. The mice then have a frikin’ lasers mounted on their heads, but pointing inwards towards their brains not out towards Mr. Bond’s.

Naturally, to make any guesses about the resulting output behavior from the mouse the input light has to be very controlled and exact. [Scott] had a laser and he had a driver, but he didn’t have a controller to fire the pulses. To make things more difficult, the research was already underway and the controller had to be built

The expensive laser driver had a bizarre output of maybe positive 28 volts or, perhaps, negative 28 volts… at eight amps. It was an industry standard in a very small industry. He didn’t have a really good way to measure or verify this without either destroying his measuring equipment or the laser driver. So he decided to just build a voltage-agnostic input on his controller. As a bonus the opto-isolated input would protect the expensive controller.

The kind of travesty that can occur when [Stefan Kiese] doesn't have access to nice project boxes.
The kind of travesty that can occur when [Scott] doesn’t have access to nice project boxes.
The output is handled by an ATtiny85. He admits that a 555 circuit could generate the signal he needed, but to get a precision pulse it was easier to just hook up a microcontroller to a crystal and know that it’s 100% correct. Otherwise he’d have to spend all day with an oscilloscope fiddling with potentiometers. Only a few Hackaday readers relish the thought as a relaxing Sunday afternoon.

He packaged everything in a nice project box. He keeps them on hand to prevent him from building circuits on whatever he can find. Adding some tricks from the ham-radio hobby made the box look very professional. He was pleased and surprised to find that the box worked on his first try.

Printing Circuitry On A RepRap

Over on the RepRap blog, [Rhys] has been experimenting with molten metal to build circuits with the RepRap.

Last June, [Rhys] found a neat alloy made of Tin, Bismuth, and a little bit of Indium that melts at around 130° C, and has just the right properties to be extruded with a standard RepRap setup. The results were encouraging, but the molten metal quickly dissolved the brass and aluminum nozzles [Rhys] was pushing liquid metal through.

The solution to this problem was solved by anodizing the heck out of a RepRap nozzle to make a hard, protective oxide layer. Already [Rhys] has logged hundreds of hours squirting molten metal out of his RepRap with no signs of any damage to the nozzle.

Since [Rhys] figured out how to print in metal, he whipped up an extremely minimal Sanguino board. You can see this RepRapped PCB running a LED blink program after the break. Now to work on the RepRap pick and place…

Continue reading “Printing Circuitry On A RepRap”