Prusa Mini Gets Custom Heavy Duty Enclosure

Still waiting on your Prusa Mini to arrive? Join the club. Between the incredible amount of interest in the inexpensive 3D printer and the COVID-19 pandemic, it can take months for the machine to arrive at your doorstep. But patient makers are finally taking delivery of their new printers, and as such the hacks and modifications are starting to trickle their way in.

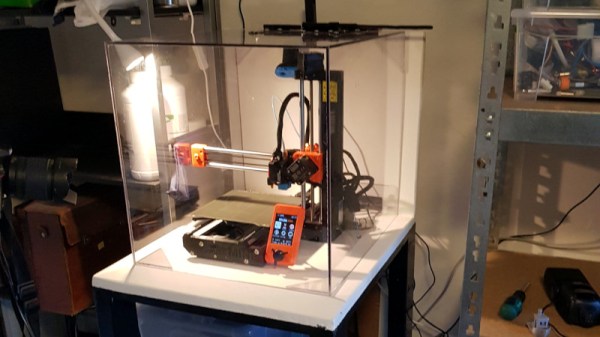
First up is this gloriously over-engineered enclosure from [Build Comics]. While PLA and PETG usually print fine with nothing more exotic than a heated bed, trickier materials like ABS work best when the printer is enclosed as it helps maintain a consistent temperature. Plus it keeps any curious hands and paws a safe distance from the hot moving bits, and if things go really pear-shaped, can help contain smoke and flames.

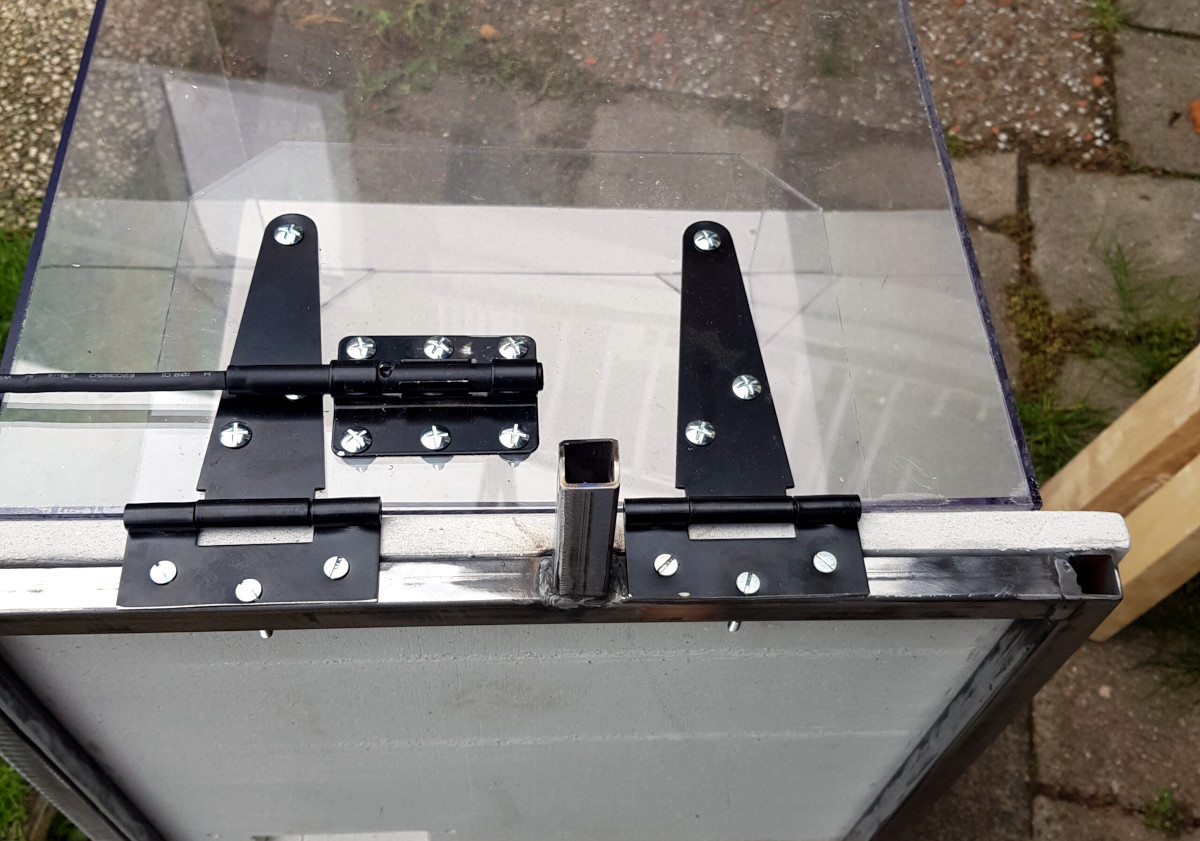
The enclosure is made from welded steel square tube, wood, and fire-retardant fiber board. A hinged polycarbonate cover, taking the form of a four-sided cube, is lowered over the printer with some heavy-duty hinges that look like they were intended for a fence. To keep the cover from slamming back down, [Build Comics] came up with a simple locking mechanism that can easily be operated from the front or side of the enclosure. With the addition of a small temperature and humidity display, the conditions inside the chamber can easily be monitored.

But [Build Comics] didn’t stop there. He also rigged up a relay box that will cut power to the printer should the smoke detector mounted above it trip. While there’s no reason to think the Prusa Mini would suffer the same fate of earlier budget desktop 3D printers, but there’s certainly no harm in taking precautions.

Will you need to build a similar enclosure whenever your Prusa Mini shows up? Maybe not. But if you felt so inclined, at least now you’ve got plenty of images and details that can help you spin up your own solution.

Can A 3D Printer Print Better Filament For Itself?

3D printed parts are generally no way near the strength of an equivalent injection moulded part and techniques such as a sustained heat treatment, though effective usually distort the part beyond use.

[CNC Kitchen] was investigating the results (video, embedded below) of a recent paper, that described a novel ABS filament reinforced by a “star” shaped Polycarbonate core, an arrangement the authors claim is resilient to deformation during the annealing process often necessary to increase part strength. While the researchers had access to specialised equipment needed to manufacture such a composite material, [CNC Kitchen’s] solution of simply using his dual extruder setup to directly print the required hybrid filament is something we feel, strongly resonates with the now old school, RepRap “print your printer” sentiment.

The printed filament seems to have reasonable dimensional accuracy and passing the printed spool through a heater block without the nozzle attached, ensured there would be no obvious clogs. The rest of the video focuses on a very thorough comparison of strength and deformation between the garden variety Polycarbonate, ABS and this new hybrid filament after the annealing process. Although he concludes with mixed results, just being able to combine and print your own hybrid filament is super cool and a success in its own right!

Interested in multi-material filaments? Check out our article on a more conventional approach which does not involve printing it yourself!

Continue reading “Can A 3D Printer Print Better Filament For Itself?”

The Next Best Thing To A Cybertruck

While production of the Tesla Cybertruck won’t start production until 2021 (at the earliest), you can always try to build your own. Unless you have a really big spare parts drawer, though, it probably won’t be full sized, but you can at least build a model if you have a shop as well-stocked as [Emiel]. He took some time to build a model cybertruck out of a single sheet of aluminum. (Video, embedded below. You might want to turn on subtitles.)

This project is a great example of the fact that some projects that seem simple on the surface require some specialized tools to get just right. To start, the aluminum sheet was cut with a laser to get into the appropriate shape and include details like windows, and the bending points were marked with an engraver to help the bending process along. The one tool that [Emiel] was missing was a brake, but he got great results with a set of metal bending pliers.

Finishing the model didn’t go particularly smoothly, either. He had planned to braze the metal together, but the heat required kept warping the body panels. The solution was to epoxy it together and sand down the excess, and the results are hopefully stronger than brazing would have been since he added a cloth to the epoxy for extra strength. The windows are made from polycarbonate (and didn’t break during the durability test), and we hope that when [Emiel] is ready to put in a motor he uses one of his custom-built electric motors. Continue reading “The Next Best Thing To A Cybertruck”

Raspberry Pi Cyberdeck Inspired By Rare MSX

When we see these cyberdeck builds, the goal is usually to just make something retro-futuristic enough to do William Gibson proud. There’s really no set formula, but offset screens coupled with large keyboards and a vague adherence to 1980s design language seem to be the most important tenets.

Granted the recent build by [lewisb42] still leans heavily on those common tropes, but at least there’s a clear lineage: his Raspberry Pi retro all-in-one is styled after a particularly rare bright red variant of the MSX that Sony released in Japan. Known as the HIT-BIT HB-101, some aficionados consider the circa-1984 machine to be the peak of MSX styling. Since getting his hands on a real one to retrofit wasn’t really an option, he had no choice but to attempt recreating some of the computer’s unique design elements from scratch.

The faceted sides were 3D printed in pieces, glued together, and then attached to a 1/4″ thick backplate made out of polycarbonate. For the “nose” piece under the keyboard, [lewisb42] actually used a piece of wood cut at the appropriate angles with a table saw. The top surface of the computer, which he calls the FLIPT-BIT, is actually made of individual pieces of foamed PVC sheet.

If all this sounds like a big jigsaw puzzle, that’s because it basically is. To smooth out the incongruous surfaces, he used a combination of wood putty, body filler, spot putty, and more time sanding then we’d care to think about. For the 3D printed surface details such as the screen bezel and faux cartridge slots, he used a coat of Smooth-On’s XTC-3D and yet more sanding. While [lewisb42] says the overall finish isn’t quite as good as he hoped, we think the overall look is fantastic considering the combination of construction techniques hiding under that glossy red paint job.

As for the electronics, there’s really no surprises there. The FLIPT-BIT uses a keyboard and touchpad from Perixx, a seven inch TFT display, and of course the Raspberry Pi 3. The display runs at 12 V so [lewisb42] used a combination of a generic laptop-style power supply and a 5 V step-down converter to keep everyone happy. While it doesn’t currently have a battery, it seems like there’s more than enough room inside the case to add one if he ever wants to go mobile.

If this build doesn’t properly scratch your Neuromancer itch, never fear. Just take a look at this decidedly less friendly-looking build that even includes a VR headset for properly jacking yourself into the matrix.

Watch The ClearWalker Light Up And Dip Its Toes

[Jeremy Cook]’s latest take on the Strandbeest, the ClearWalker, is ready to roll! He’s been at work on this project for a while, and walks us through the electronics and control system as well as final assembly tweaks. The ClearWalker is fully controllable and includes a pan and tilt camera as well as programmable LED segments, and even a tail.

When we last saw [Jeremy] at work on this design, it wasn’t yet functional. He showed us all the important design and assembly details that went into creating a motorized polycarbonate version of [Theo Jansen’s] classic Strandbeest design; there’s far more to the process than simply scaling parts up or down. Happily, [Jeremy] is able to show off the crystal clear beauty in his photo gallery as well as a new video, embedded below.

Continue reading “Watch The ClearWalker Light Up And Dip Its Toes”

Strandbeest Not Fooling Anyone — We See Right Through It

This Strandbeest is ready for the security line at a security-conscious high school. Like see-though backpacks, its clear polycarbonate parts let you see everything that goes into the quirky locomotion mechanism. Despite having multiple legs, if you analyze the movement of a Strandbeest it actually moves like a wheel.

For us, it’s the narrated fabrication video found below that makes this build really interesting. Hackaday alum [Jeremy Cook] has been building different versions of [Theo Jansen’s] Strandbeest for years now. Strandmaus was a small walker controlled by a tiny quadcopter, and MountainBeest was a huge (and heavy) undertaking. Both were made out of wood. This time around [Jeremy] ordered his polycarbonate parts already cut to match his design. But it’s hardly a walk on the beach to make his way to final assembly.

The holes to accept the hardware weren’t quite large enough and he had to ream them out to bring everything together. We enjoyed seeing him build a jig to hold the spacers for reaming. And his tip on using an offset roll pin to secure the drive gear to the motor shaft is something we’ll keep in mind.

In the end, things don’t go well. He had machined out a motor coupling and it ends up being too weak for the torque driving the legs. Having grown up watching [Norm Abram] build furniture (and houses) without a single blown cut or torn-out end grain this is a nice dose of reality. It’s not how perfect you can be with each step, it’s how able you are to foresee problems and correct them when encountered.

Continue reading “Strandbeest Not Fooling Anyone — We See Right Through It”

White Oak Illuminated Bluetooth Speaker

Besides being common tools available to most hackers and makers out there, 3D printing, CNC machines, and cheap Chinese electronics have one more things in common: they were all used by [Nick] to build a bluetooth speaker system that has some interesting LED effects built into the case.

This is fresh on the heels of another hack that used similar construction methods to build a “magic” wood lamp. [Nick] takes it a step further, though. His case is precisely machined in white oak and stuffed with the latest China has to offer: a bank of lithium-ion batteries, a DC-DC converter to power the amplifier, and a Bluetooth module. After some sanding, the speakers look professional alongside the blue light features hiding behind the polycarbonate rings.

Of course you’ll want to visit the project site for all the details of how [Nick] built his speaker case. He does admit, however, that the electronics are fairly inefficient and need a little work. All in all though, it’s a very refined set of speakers that’ll look great on a bookshelf or on a beach, workshop bench, or anyplace else that you could take them.

Continue reading “White Oak Illuminated Bluetooth Speaker”