The Thunderball Jetpack Becomes A Quadcopter

thunderball

At the beginning of the fourth Bond film, 007 escapes from a French château with a jetpack. While the jetpack has yet to take off for those of us who aren’t secret agents, there is a way for anyone to fly just like Bond. It can’t lift a full-scale human yet, but [Rodger]’s Project Thunderball can let a mannequin hover for several minutes.

The stand in for [Sean Connery] in [Rodger]’s build is a 2.2 lb mannequin – actually an ‘inflatable companion’, if you will – stuffed with styrofoam peanuts. The actual jet pack is a quadcopter souped up with larger motors, propellers, and enough batteries to deliver 1kW. There’s no belt for this quad; the mannequin rides the machine like you would a horse, straddling the electronics while very high-speed props spin just inches away from the tender bits of an inflatable plastic doll.

[Rodger] is able to get about 8 minutes of hover time out of his quadpack, an impressive feat that also allows his flying machine to deliver beer and pizzas.

Continue reading “The Thunderball Jetpack Becomes A Quadcopter”

Giving An Electric RC Plane An Afterburner

RC Afterburner

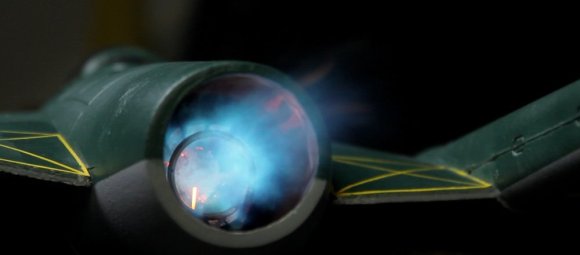
The folks at Flitetest decided to add some extra power to an electric DH.100 Vampire RC plane by adding a butane afterburner. After some testing, and a bit of fire, they were able to make it fly.

Their afterburner uses a small butane canister for fuel. A servo motor actuates the valve on the canister, forcing fuel into a tube. This tube is set up to regulate the flow of butane and ensure it vaporizes before reaching the afterburner.

At the afterburner, a circular piece of tubing with holes is used to dispense fuel, much like a barbecue. This tube is connected to one side of a stun gun’s flyback generator, and the metal surrounding it is connected to the other. The stun gun creates sparks across the gap and ignites the fuel.

With the extra components added, the landing gear was removed to save weight and the plane was given a nice coat of paint. They started it up for a test run, and the plane’s body caught fire. After some rework, they managed to take off, start the afterburner, fly around, and belly land the plane. It achieved some additional thrust, but also sounds and looks awesome.

After the break, check out a video walkthrough and demo. We promise you fire.

Continue reading “Giving An Electric RC Plane An Afterburner”

DIY Arduino Pro Mini Quadcopter

[execUc] took a stock V929 quadcopter and started making some crafty customizations. The main change – the control electronics were replaced by an Arduino Pro Mini (16Mhz model). He soldered all the modules on a prototyping board and, although admittedly a bit heavy, the little guy takes flight with no problem.

Among other details, an HMC5883L (magnetometer) and MPU6050 (accelerometer / gyroscope) are used as sensors. A LiPo 7.4V battery pack supplies the power. The brushed motors are controlled by pulse-width modulation from SI2302 MOSFET with added diodes. He plans to swap out the micro-controller for an ARM7 stm32F103 for extra computing power, and needs to play with the PID values to correct a slight problem he seems to be having when rotating.

Check out a test flight video after the break. [execUc] has a thorough list of all the alterations he made in the video description, so be sure to read it.

[via Hacked Gadgets]

Continue reading “DIY Arduino Pro Mini Quadcopter”

Quadcopter Brain

quadcopter-brain

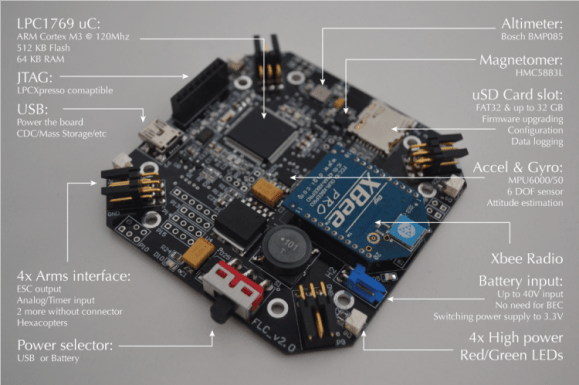
This project is the warm center of [Alan Kharsansky’s] thesis in Electronic Engineering. It’s an all-in-one control board for a quadcopter. This is the second iteration of the board, the first version he actually etched himself. As you can see after the break the firmware is not quite ready for prime-time. But that doesn’t stop us from appreciating the design choices he’s made.

You can see the effort he made to keep the board symmetrical which will help when it comes time to balance the aircraft. At the center of the PCB is the jewel of the sensor array, a combination accelerometer and gyroscope. This location will help easy the trouble of designing PID algorithms to drive the four propellers. Also included in the sensor array is a magnetometer for navigation, and a barometric pressure sensor which can be used as an altimeter. There are four multipurpose connectors used to drive the motors and provide feedback to the boards. He also included two more sets of pads on the board (without their own connectors) in case he wants to add more motors in the future. The quadcopter can be controlled from a base station via the XBee module.

Continue reading “Quadcopter Brain”

The Burrito Bomber

Burrito Bomber

The Burrito Bomber, created by the folks at Darwin Aerospace, claims to be “the world’s first Mexican food delivery system.” The delivery process starts with the customer placing an order through the Flask based Burrito Bomber webapp. The customer’s location is grabbed from their smartphone using the HTML5 Geolocation API and used to generate a waypoint file for the drone. Next, the order is placed into a delivery tube, loaded onto the drone, and the waypoint file is uploaded to the drone. Finally, the drone flies to your location and drops the delivery tube. A parachute deploys to safely deliver the tasty payload.

The drone is based on a Skywalker X-8 airframe and the Quantum RTR Bomb System. The bomb system provides the basic mechanism to hold and drop a payload, but Darwin Airspace designed their own 3D printed parts for the delivery tube. These parts are available on Thingiverse. The drone is controlled autonomously by ArduPilot, which uses the webapp’s waypoint output to guide the drone to the target and release the payload.

Unfortunately, this can’t be a commercial product yet due to FAA regulations, but the FAA is required to figure out commercial drone regulations by 2015. Hopefully in 2015 we’ll all be able to order burritos by air.

For all the source and models, check out the group’s Github. There’s also a video of the bomber in action after the break.

Continue reading “The Burrito Bomber”

Turning Four Smaller Helicopters Into One Larger Quadcopter

copter

There’s a reason we’ve seen a menagerie of quadcopters over the past few years – the key piece of any quadcopter build is an inertial measurement unit. Historically a very complicated and expensive piece of kit, these IMUs came down in price a few years back, allowing anyone with a few dollars in their pocket and a handful of brushless motors to build a four-bladed drone in their workshop.

[Starlino] built a few quadcopters, but he wanted to shy away from IMUs and get most of the mass of his new ‘copter over the center of the chassis. He came up with a design he calls the quadhybrid that can be built out of a quartet of those cheap 3-channel helicopter toys.

Most of the lift for [Starlino]’s quadhybrid comes from a pair of coaxial rotors from a Syma 001 3-channel helicopter toy. Anyone who has played with one of these toy helicopters knows how stable they are; if the tail rotor breaks, you’re left with a helicopter that can only go up and down.

To give his quadhybrid a few degrees of freedom, he attached four tail rotors from 3-channel helis to a few booms laid out in a cross pattern. By taking the receiver out of a 4-channel helicopter and adding his own controller board, [Starlino] made each of the tail rotors control the pitch and roll of the craft.

In the video after the break, you can see the quadhybrid is amazingly stable even without an IMU and surprisingly agile. As [Starlino]’s ‘copter can be made out of replacement parts for cheap 3-channel helis, we’ll expect a rush on these tail motors at your favorite online RC retailer very shortly.

Continue reading “Turning Four Smaller Helicopters Into One Larger Quadcopter”

Raspberry Pi Quadcopter

[youtube=http://www.youtube.com/watch?v=TjXvzMdf8Nk&w=470]

It was bound to happen sooner or later, but that doesn’t diminish the awesomeness of [Matthew]’s Raspberry Pi-powered quadcopter.

[Matthew]’s quadcopter is similar to all the other flying drones we’ve seen before with one important difference – all the processing, from reading the gyroscopes to computing exactly how much power to give each motor – is handled by a Raspberry Pi. This task is usually the domain of a microcontroller, as these calculations need to happen in real-time. The Linux distro [Matt] is running on his Pi has a lot more overhead than a simple AVR or ARM microcontroller, so doing everything that needs to be done in real-time isn’t guaranteed. With a bit of clever programming, [Matthew] managed to make sure all the necessary tasks were taken care of in time. It’s still not a real-time operating system, but for this project at least, it’s good enough.

Since the Raspberry Pi in [Matthew]’s quadcopter is much more powerful than a microcontroller, there’s plenty of head room to SSH into the ‘copter while it’s flying. There may even be enough processing power to stream video to a web server; we honestly can’t wait to see what [Matthew] does with his flying Linux computer in the future.

You can check out [Matthew]’s code over on the git or watch a few flight test videos over on his youtube.