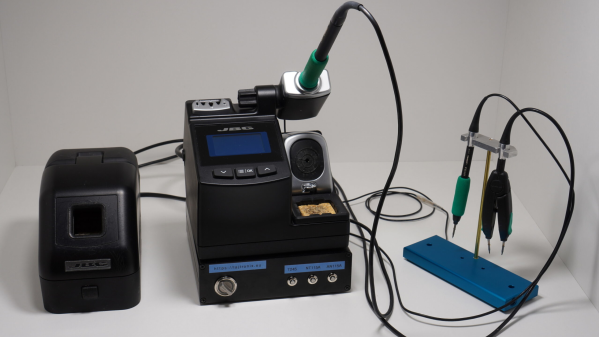
JBC soldering station sitting atop a custom switch box next to a selection of hot ends.

A 3-tool Selector Box For A JBC Soldering Station

Soldering is one of those jobs that are conceptually simple enough, but there’s quite a bit of devil in the detail and having precisely the right tool for the job in hand is essential for speed and quality of results. The higher-quality soldering stations have many options for the hot end, but switching from a simple pencil to hot tweezers often means unplugging one and reattaching the other, and hoping the station recognises the change and does the right thing. [Lajt] had three soldering options and a single output station. Their solution was a custom-built three-way frontend box that provides a push-button selection of the tool to be connected to the station sitting atop.

[Lajt] shows in the blog post how each of their target hot ends is wired and the connectivity the control station expects to determine what is plugged in. Failing to recognise a connected 50 W heating element as if the smaller 25 W unit was still connected would suck, with a huge amount of lag as the temperature of the hot end would fail to keep up with the thermal load during use. When connections are made, it is important to ensure the unit has sufficient time to detect the change in output and configure itself appropriately. An Arduino Pro mini handles the selection between outputs by driving a selection of relays with appropriate timing. An interesting detail here is what [Lajt] calls a ‘sacrificial relay’ in the common ground path, which has a greater contact rating than the others and acts as a secondary switch to save wear on the other relay contacts that would otherwise be hot-switched. All in all, a nicely executed project, which should offer years of service.

We like DIY tools and tool-related hacks. Here’s a DIY Hakko station, a Weller clone unit, and a peek inside TS1C portable unit.

Continue reading “A 3-tool Selector Box For A JBC Soldering Station”

486 Gets Animated Turbo Button Thanks To Arduino

There was a point in time, excruciatingly brief, in which desktop computers often had a large “TURBO” button on their front panel. Some even featured an LED display that would indicate the current CPU frequency, providing visual conformation that your machine had leaped to a blistering 66 MHz.

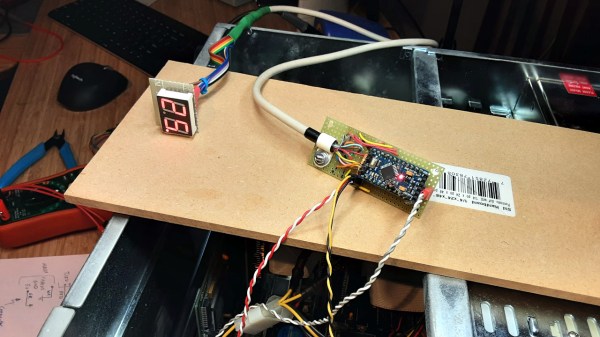
The 486 that [someyob] is restoring had the Turbo button, but sadly there was just a simple LED to show whether or not it was engaged. But thereĀ was a window in the front panel where it seemed like a numerical display was intended to go, so they decided to wire up their own CPU indicator by sensing the state of the Turbo LED with an Arduino Pro Mini.

Now to modern audiences, this might seem like cheating. After all, the Arduino isn’t actually measuring the CPU speed, nor is it directly controlling it (that’s still done by the original Turbo button wiring). But the truth is, even back in the day, the CPU frequency displays faked it — they just toggled between showing two predefined frequencies depending on the state of the button. The arrangement [someyob] has come up with does the same thing, except now there’s some extra processing power in the mix, so the display can show some slick animations as it switches between 33 and 66 Mhz.

In the GitHub repository, [someyob] has provided the Arduino source code and schematics showing how the microcontroller was shoehorned into the existing front panel wiring without compromising its functionality. There’s even a brief video below that shows the display in operation.

Like the idea but don’t have a 486 laying around? Don’t worry. We’ve seen a similar panel built for modern machines thatĀ  just doesn’t look the part, it actually manages to be functional.

Continue reading “486 Gets Animated Turbo Button Thanks To Arduino”

An Interesting Circular Stewart Platform

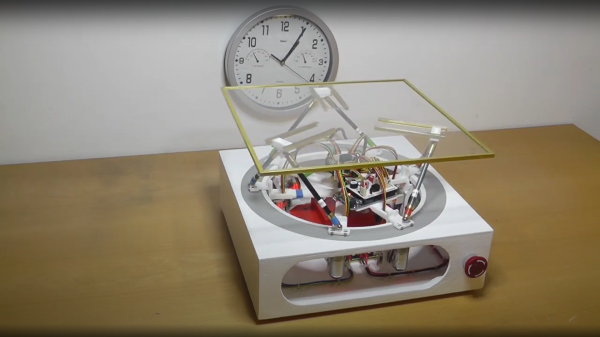
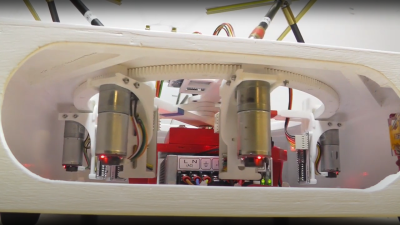
Stewart platforms are pretty neat, and not seen in the wild all that often, perhaps because there aren’t a vast number of hacker-friendly applications that need quite this many degrees of freedom within such a restricted movement range. Anyway, here’s an interesting implementation from the the curiously named [Circular-Base-Stewart-Platform] YouTube channel (no, we can’t find the designer’s actual name) with a series of videos from a few years ago, showing the construction and operation of such a beast. This is a very neat mechanism comprised of six geared motors on the end of arms, engaging with a large internal gear. The common end of each arm rides on the central shaft, each with its own bearing. With the addition of the usual six linkages, twelve ball joints, and a few brackets, a complete platform is realised.

This circular arrangement is so simple that we can’t believe we haven’t come across it before. One interesting deviation from the usual Stewart platform arrangement is the use of a central slip-ring connector to provide power, allowing the whole assembly to rotate continuously, in addition to the usual six degrees of freedom the mechanism allows. Control is courtesy of an Arduino Pro Mini, which drives the motors using a handful of Pololu TB6612 (PDF) dual H-bridge driver modules. Obviously, the sketch running on the Arduino will give the thing a fixed motion, but add in an additional data link over that central slip-ring setup (or maybe a wireless link), and it will be much more useful.

We recently saw another 6-DOF actuator design, using flexures, yet another ball-balancing hack, but if you want an actually useful Stewart platform application, checkout this pool-playing robot!

Continue reading “An Interesting Circular Stewart Platform”

Giant working NERF gun runs on Arduino.

Giant Working NERF Gun Runs On Tiny Arduino

Well, here it is: a shoe-in for the new world’s largest NERF gun. (Video, embedded below.) The Guinness people haven’t shown up yet to award [Michael Pick], but at 12.5 feet, this baby is over twice as long as the current record holder, which belongs to former NASA mechanical engineer Mark Rober and his now-puny six-foot six-shooter.

We have to wonder if it is technically bigger than the six-shooter, because they seem to be roughly the same scale, except that [Michael] chose a much bigger model to start from. The main body is made from wood, and there are a ton of 3D-printed details that make it look fantastically accurate. The whole thing weighs over 200 pounds and takes at least two people to move it around. We especially love the DIY darts that [Michael] came up with, which are made from a PVC tube inside a section of pool noodle, topped off with a 3D printed piece for that distinctive orange cap.

Propelling those darts at around 50 MPH is a 3,000 PSI air tank connected to an Arduino Pro Mini that controls the trigger and the air valves. While [Michael] hasn’t run the thing quite that high, it does plenty of damage in the neighborhood of 40-80 PSI. As you’ll see in the video after the break, this is quite the ranged weapon. Watch it blow a hole clean through a sheet of drywall and much more.

Want to build something with a bit more stealth? Make it death from above with a NERF quadcopter.

Continue reading “Giant Working NERF Gun Runs On Tiny Arduino”

DIY PECS Board Uses Pictures To Communicate

One way of communicating with autistic and non-verbal people is through the use of a Picture Exchange Communication System or PECS board, which they can use to point out what they need or want throughout the day. However, the commercial versions of these boards have their share of problems — they’re expensive, and they’re fairly rigid as far as the pictures go. [Alain Mauer] has created an open-source PECS board that is far more personalized, and has audio to boot.

The number one requisite here is sturdiness, as [Alain]’s son [Scott] has already smashed two smartphones and a tablet. [Alain] went with a laser-cut MDF enclosure that should last quite a while. Inside is an Arduino Pro Mini and a DF Player Mini that plays corresponding clips from a micro SD card whenever [Scott] presses a button on the 16-key copper foil capacitive keypad. This PECS board is smart, too — it will sound a turn-me-off reminder after a few minutes of inactivity, and issue audible low battery warnings.

So far, [Scott] is responding better to photographs of objects than to drawings. Watch him interact with the board after the break.

This is far from the first thing [Alain] has built to help [Scott]. Be sure to check out this Pi-based media player built to engage and not enrage. Continue reading “DIY PECS Board Uses Pictures To Communicate”

Sunlight-Based Life Clock Predicts Your Darkest Hour

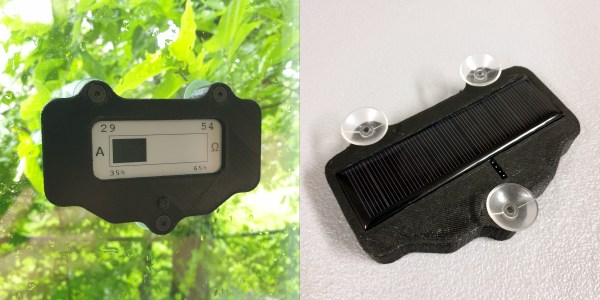
The past year has been quite a ride for everyone on Earth. But you never know which day is going to be your last, so you might as well live a little, eh? This clock doesn’t actually know when you’ll kick off, either. But just for fun, it predicts the number of years remaining until you go to that hackerspace in the sky by hazarding a guess that’s based on your current age and the latest life expectancy tables. Don’t like the outcome? It’s completely randomized, so just push the button and get a set of numbers: the age you might die, and the percentage of life elapsed and remaining.

We love the design of this calculated doom clock, and it’s quite simple inside — an Arduino Pro Mini outputs the graph on an 2.9″ e-paper display, and both are powered with a 5.5 V solar panel. Just suction cup that puppy to the window and you’ll get automatic updates about your impending demise on sunny days, and none on cloudy days.

Want a more realistic picture of your mortality? Here’s a clock that counts down to your 80th birthday.

Auto Strummer Can Plectrum The Whole Flat-Strumming Spectrum

Playing the guitar requires speed, strength, and dexterity in both hands. Depending on your mobility level, rocking out with your axe might be impossible unless you could somehow hold down the strings and have a robot do the strumming for you.

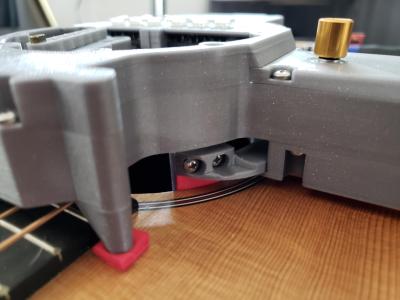
[Jacob Stambaugh]’s Auto Strummer uses six lighted buttons to tell the hidden internal pick which string(s) to strum, which it does with the help of an Arduino Pro Mini and a stepper motor. If two or more buttons are pressed, all the strings between the outermost pair selected will be strummed. That little golden knob near the top is a pot that controls the strumming tempo.

[Jacob]’s impressive 3D-printed enclosure attaches to the guitar with a pair of spring-loaded clamps that grasp the edge of the sound hole. But don’t fret — there’s plenty of foam padding under every point that touches the soundboard.

We were worried that the enclosure would block or muffle the sound, even though it sits about an inch above the hole. But as you can hear in the video after the break, that doesn’t seem to be the case — it sounds fantastic.

Never touched a real guitar, but love to play Guitar Hero? There’s a robot for that, too.

Continue reading “Auto Strummer Can Plectrum The Whole Flat-Strumming Spectrum”