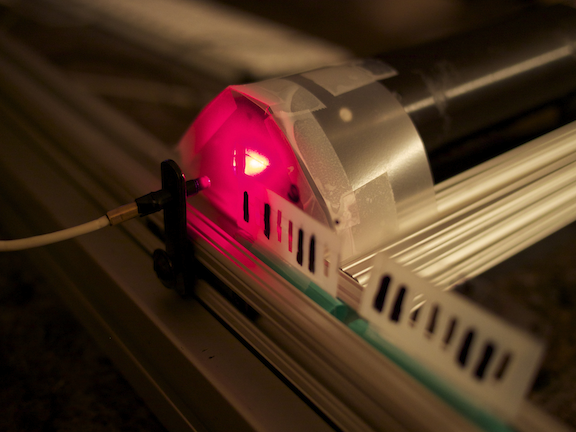
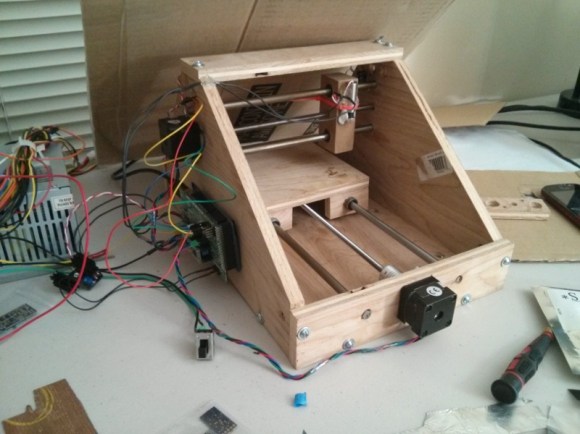
Design A Gingerbread House In CAD, Then Cut Pieces With A Laser

This is one of those ideas that’s so simple we can’t believe we haven’t heard of it before now. [Johan von Konow] is upping his holiday decorating game this year by designing his Gingerbread House in CAD and cutting it out on a laser cutter. If designed well this will easily allow you to increase the complexity of your design by orders of magnitude.

We remember making Gingerbread Houses with mom when we were little. She would bake a sheet of gingerbread, then pull out stencils she had made from file folders to carefully cut the walls and roof of the houses. But these were the homesteading equivalent of candy construction — one room consisting of four walls and two roof pieces. [Johan’s] design uses roofs with multiple pitches, dormers, and an entryway off the front of the main building. Quite impressive!

He mentions a few things to keep in mind. The gingerbread should be an even thickness for best results. You’re also going to want to plan for ventilation during cutting and give up the idea that you might eat the house when the holidays are over. The cutting process creates quite a stink and leaves a horribly burnt taste in the baked goods. Of course you could always cut out templates and use a knife when working with food.

Laser Charged Glowing Display

Here’s one of the best takes on a glowing display that we’ve ever seen. Currently [H] is using his creation as a fuzzy clock, but it is certainly capable of displaying just about any messages.

The project uses a wheel of luminous paper as the display surface. This has a glow-in-the-dark quality to it which can be charged up using a bright light source. In this case a UV laser diode was used. This is perhaps the best possible source as its intensity will allow for very quick charging. The innovation here is the use of a second disk as a stencil. Look closely in the image above and you will see that the laser diode is mounted perpendicular to the display surface itself. A mirror reflects — and we believe slightly spreads — the laser dot. It then passes through a cut-out on the black wheel which is shaped as the desired character. As you can see in the video after the break, this results in a crisp and clear glowing letter.

Compare this project to the one that moves the diode itself like a plotter and we think you’ll agree this is a simpler implementation which still looks great!

Continue reading “Laser Charged Glowing Display”

Laser Power System Keeps UAVs Flying Indefinitely

Drone technology is driving the aerospace industry as companies trip over each other trying to develop the next big thing. Here’s a good example of what we’re talking about. Lasers can no be used to keep a UAV in the air indefinitely. The trick is to add an array of photovoltaic cells specifically tuned to an IR laser’s wavelength. A ground system then directs a high-intensity laser beam onto the aircraft’s cell array to transfer energy while in flight.

After the break you can catch a video from a trade show where a Lockheed Martin employee describes the successful testing of such a system. But there’s a lot more information available in the white paper (PDF) which Laser Motive has released. They’re the folks behind the technology who have teamed up with LM to implement the system. The laser unit on the ground can track a UAV visually, but there is also a method of using GPS coordinates to do so in the case of overcast skies.

Continue reading “Laser Power System Keeps UAVs Flying Indefinitely”

NES Light Gun Gets A Burning Laser Upgrade

The Nintendo Light Gun makes a perfect burning laser. Of course it’s been gutted to make this happen. Nonetheless, the retro look can’t be beat, and the gun form factor is just what you need in a laser weapon.

This will literally burn your eye out of your head, so [Justin] and his buddies over a North Street Labs are all wearing protective goggles designed for this laser’s wavelength. But they also built a safety into the zapper itself. At the beginning of the video clip (embedded after the break) you will see there’s a key lock mounted in the butt. This lock completes the circuit between the battery and driver board. The 2W output is achieved by a 445nm M140 diode. A lot went into the heat sink and mounting cylinder to make sure the diode doesn’t just burn up after a few seconds of use.

Continue reading “NES Light Gun Gets A Burning Laser Upgrade”

Variable Frequency Laser Using Shaken Ball Bearings

Lasers normally emit only one color, or frequency of light. This is true for laser pointers or the laser diodes in a DVD player. [Kevin] caught wind of state-of-the-art research into making variable wavelength lasers using shaken grains of metal and decided to build his own.

When [Kevin] read a NewScientist blog post on building variable frequency lasers built with shaken metallic grains, he knew he had to build on. He dug up the arxiv article and realized the experimental setup was fairly simple and easily achievable with a bit of home engineering.

[Kevin]’s device works by taking thousands of small ball bearings and putting them in a small vial with Rodamine B laser dye. To vibrate the particles in the dye, [Kevin] mounted his container of dye and bearings on an audio speaker and used a frequency generator to shake the ball bearings.

When a small 30mW green laser shines through the vial of ball bearings and dye, the laser changes color to a very bright yellow. By vibrating the vial at 35 to 45 Hz, [Kevin] can change the frequency, or color of the laser.

[Kevin] can only alter the frequency of the laser by about 30 nm, or about the same color change as a reddish-orange and an orangish-yellow. Still, it’s pretty amazing that [Kevin] was able to do state-of-the-art physics research at home.

Sadly, we couldn’t find any videos of [Kevin]’s variable frequency laser. If you can find one send it in to the tip line and we’ll update this post.

16×8 Pixel Laser Projector

[Michiel] gave us a little shout-out by drawing the Hackaday logo with his recently completed 16×8 pixel laser projector. It uses a spinning set of mirrors mounted at slightly different angles to redirect the path of the red laser diode.

The projector is driven by an Arduino. To give it more than just a hard-coded existence [Michiel] included an Xbee module. This lets him connect to it with a computer in order to stream messages. One of the demo videos linked in his project log shows the web interface he coded which will push a message typed in the submission form out to the projector where it is scrolled like a marquee.

This type of spinning display is one of a few common methods for making laser projectors. In the image above you can see the optical sensor which is used to sync the diode with the spinning mirrors, each of which is responsible for a different row of pixels. He lists off several things that he learned when working on the project. We think the most important is the timing issues which go into something like this.

DIY Laser Cutter From Non-DIY Parts

[Jerry] missed the laser cutters he had been using at the local TechShop. It closed down and after seeing some hardware in a surplus store he decided to build a laser cutter to call his own. You won’t be disappointed by his build log. It’s got a ton of hi-res images and plenty of explanation.

Often, cost is the key consideration in these types of builds. [Jerry] spent a little more than average, but look what he got back out of it. This started as a CNC machine aimed at loading silicon wafers for a company making electron microscopes. It’s barely been used, and the light-duty specs will work just fine with a laser cutter as the gantry won’t be moving much weight or fighting the rotational force of a mill motor. He tore out the stock controllers and built his own, adding a q-switched 355nm Frequency Tripled DPSS laser along the way. We’re not quite sure what that means… but in laymen’s terms it’s an ultraviolet laser source. See the finished unit cutting out some Kapton in the clip after the break.

Continue reading “DIY Laser Cutter From Non-DIY Parts”