When Stranger Things premiered in 2016, it was a cultural force. Foreign DJs gushed over the lush 80s soundtrack, fashionistas loved the clothing, and the world became obsessed with the idea of using Christmas lights to communicate across material planes. [kyjohnso] has recreated that experience with the technology of today.
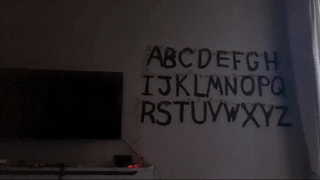 If you haven’t watched the show — Joyce Byers is trying to communicate with her son Will, who just so happens to be stuck in another plane of existence called the Upside Down. She screams questions at her living room wall, upon which hangs a series of Christmas lights, marked with the letters A to Z. Will is able to communicate back by causing the lights to flash, one letter at a time.
This build works a little differently. You basically type a message into a terminal on a Raspberry Pi, and it gets sent to a large language model—namely, the Claude API. The response from Claude (or Will Byers, if you’re imagining) is then flashed out on a WS2812B set of LED Christmas lights on the wall. [kyjohnso] added dramatic pauses whenever there’s a space in the output, somewhat replicating the dramatic elements of the show itself. Files are on GitHub for the spooky and curious.
It’s a neat build that would be a hit at any Halloween party. We can’t imagine how much more immersive it would be if paired with a speech-to-text engine so you could actually scream at the thing like a distraught Midwestern parent who has just lost her youngest child. It’s all about committing to the bit; if you build such a thing, don’t hesitate to notify the tipsline!

![[Gerry] holding up a DIP IC](https://hackaday.com/wp-content/uploads/2025/11/Behind-The-Code-with-Gerry-Altera-CPLD-banner.jpg?w=600&h=450)