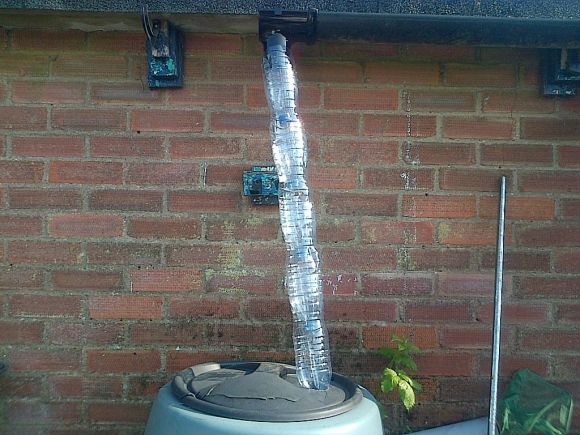
OCR Automatically Reads A Power Meter

ocr-used-to-read-a-power-meter

[Chris] tried his hand at using Optical Character Recognition in his server power monitoring rig. The image above is what the IP camera used in the setup sees. He’s included a bright light to ensure that the contrast is as great as possible. After applying a threshold filter to the captured still, he is able to process the image to test all seven segments of every digit.

He uses Mathematica for the processing. We’re not familiar with the particulars of the language, but it’s easy enough to see the main parts of the program. Line six of his source code applies the image filters and then the program loops through the assigned location of each digit, testing segment combinations to ascertain what number is shown. Things get hairy when it comes to the decimal point. We gather that the meter can show varying degrees of precision based on the total number of digits needed (like a Digital Multimeter). But [Chris’] setup has a difficult time reliably detecting that decimal point because of its size. He uses a shortcut to get around this, knowing that his server never pulls less than 300W so he corrects the output (by multiplying it by ten) if the reading is below that benchmark.

Of course it would be easier to crack open the monitor and glean data electronically (that’s how the Tweet-A-Watt does it) but then [Chris] wouldn’t have had the fun of playing with OCR.

That’s Not Beer! A Biofuel Fermentation Controller Project

biofuel-fermentation-controller

Any home brewer will recognize the setup pictured above as a temperature controlled fermentation chamber. They wouldn’t be wrong either. But you’re not going to drink what results. This project is aimed at providing a temperature controlled environment for fermenting biofuel.

[Benjamin Havey] and [Michael Abed] built the controller as their final project in his microprocessor class. The idea is to monitor and control the mini-refrigerator so that the strain of Saccharomyces Cerevisiae yeast produce as much ethanol as possible. An MSP430 microcontroller was used. It monitors a thermister with its analog to digital converter and drives a solid state relay to switch mains power to the fridge. At 41 degrees Fahrenheit this is down below what most lager yeasts want (which is usually in the low fifties). But the nice thing about using a microcontroller is you can set a schedule with different stages if you find a program that gives the yeast the best environment but requires more than one temperature level.

Who knew all that beer making was getting you ready to produce alternative fuels?

Standalone Air Quality Monitor Based Around Raspberry Pi

rpi-air-quality-monitor

You can have a lot of fun tinkering with the Raspberry Pi. But in addition to the low-cost hobby potential it is actually a great choice for serious data harvesting. This air quality monitor is a great example of that. The standalone package can be taped, screwed, bolted, or bungeed at the target location with a minimum of effort and will immediately start generating sample data.

The enclosure is a weather proof electrical box. The RPi board is easy to spot mounted to the base of the case. On the lid there is an 8 Ah battery meant to top off an iPhone. It works perfectly as it provides a USB port and enough current to operate the Pi. On top of that battery is a 3G modem used to access the data remotely — although it can log to the SD card for collection at a later time if you’d rather not mess with a cell network.

Look closely at the GPIO header and you’ll notice that an ADC add-on board has been plugged in. This is used to take the readings from the gas sensor which is monitoring for air pollutants in Paris.

Gadgeteer Plant Monitor Wants It Wet And Photogenic

gadgeteer-plant-monitor

[Christian] is growing a tomato plant on his desk and wanted to capture some time-lapse images of its progress. To that end he built a rig that monitors moisture levels and snaps images at regular intervals.

The hardware he’s using is part of the Gadgeteer family. These run a .NET micro framework and are modular which makes for easy assembly. A laser-cut plywood stand helps to position the camera module for the best shots. Its takes a picture of the seedling once every ten minutes. There is a quartet of RGB LEDs surrounding the lens. They help illuminate the subject for each picture. But [Christian] also mentions that the red LEDs provide light the plant needs to grow (we raise an eyebrow at that claim, but in truth we have no idea if red LEDs make plants grow or not). There is also a moisture sensor which you can see inserted in the soil.

The images and moisture readings are all pushed to a server. There is an Ethernet board near the base of the rig. It uses POST to send the image, which is saved by a server-side script. The moisture data is sent via a GET command.

Open Source Capactive Charger Resurrects An Electric Skateboard

mikey-sklar-on-electric-skateboard

Here’s [Mikey Sklar] posing on his new electric skateboard. Well, it’s new to him at any rate. He bought it used on eBay for $250. That may not sound like much of a deal, but these will run more like $800 retail. The savings comes because the thing would no longer charge. But it took him just an hour and a half with his capacitive charger to resurrect the flat lithium cells.

The first thing he did in trouble shooting the situation was to measure the voltage of the battery pack. It registered 5V, which is a far cry from the 36V it should supply. The built-in charger does nothing, as it’s circuitry isn’t designed to work in a situation like this one. But [Mikey] has a tool perfect for this purpose. Da Pimp is a capacitive charger which we’ve seen before. It succeeds where the other failed because it is able to adapt itself to the internal resistance of the battery, no matter what voltage level it starts at.

[Mikey] shows off the use of his charger in the clip after the break. His first test run was more than two miles without issue.

Continue reading “Open Source Capactive Charger Resurrects An Electric Skateboard”

Building A Thermal Imaging Sensor From Scratch

[youtube=http://www.youtube.com/watch?v=pIb1scnD67o&w=470]

[Rob] lives in a 100-year-old house, and with these antique lath and plaster walls and old window frames comes a terrible amount of drafts. The usual way to combat this energy inefficiency is with a thermal imaging camera, a device that overlays the temperature of an object with a video image. These cameras are hideously expensive so [Rob] did what any of us would do and built his own.

The build centers around a Melexis MLX90620 far infrared thermopile that can be had for about $80. Basically, this sensor is a very, very low resolution camera (16×4 pixels) that senses heat instead of light. By sticking this sensor on a breadboard with an Arduino Mini and WiFly network adapter, [Rob] is able to pull the data down from the IR sensor to his iPhone and overlay it on the feed from the camera.

The result, as seen in the video above, is a low-resolution but still very useful thermal imaging camera, perfect for looking for cold drafts in an old house or tracking down [Arnie] just like a Predator.

Tip ‘o the hat to [Ronald] for sending this one in.

Optimus Prime Keeps A Vigilant Watch Over The Hen-house

[shOOter—]  and his family are just starting to keep chickens and need a coop in which the hens could roost. He wanted it to be mobile and protective and what is more mobile and protective and the leader of the Transformers? As you can see, his chicken coop is modeled after Optimus Prime.

The cab of the truck serves as the hen-house. It’s made of marine grade plywood held together with glue and galvanized nails. The exhaust stacks, which are made of PVC pipe, are not just decorative. They are chutes for the feed trays to either side of the blue ramp (you can’t really see the trays in this image). To give the chickens a way to stretch their legs he brought his welding skills to bear. The trailer portion of the build is a welded metal frame covered in mesh which provides a rather large exercise yard. Since the habitat is enclosed there’s really no need for an intricate motorized door.

[Thanks James]