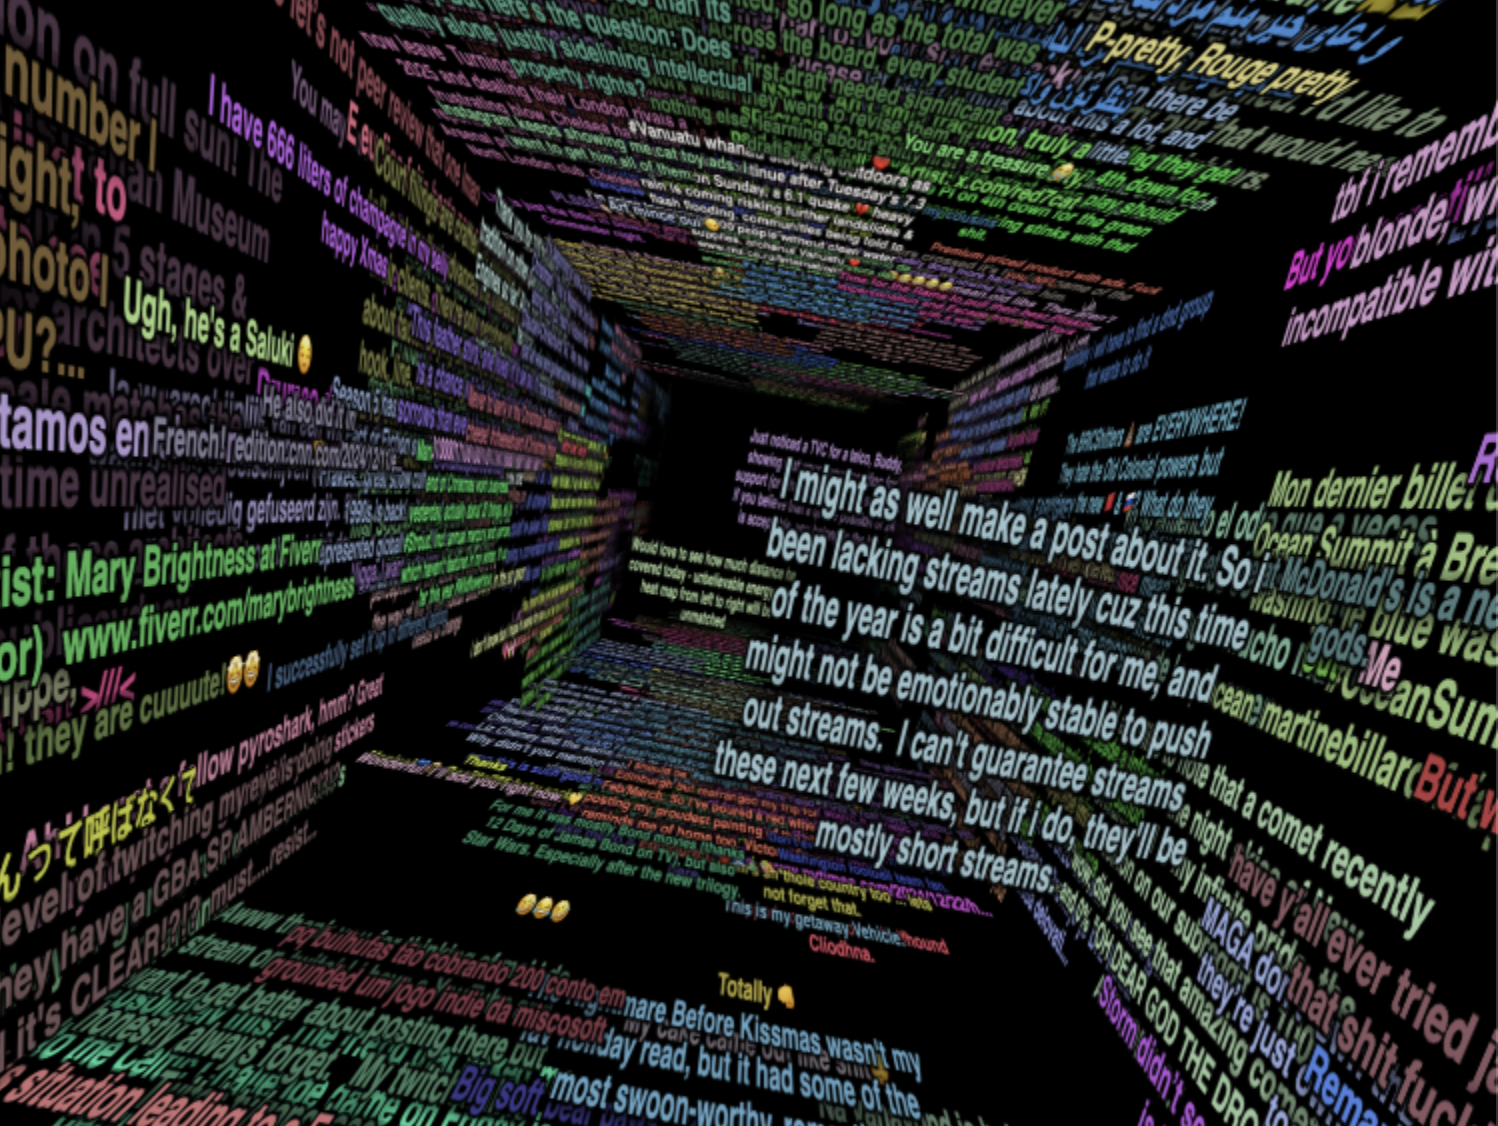
Using Four Rolls Of Film To Make One Big Photo

Typically, if you’re shooting 35 mm film, you’re using it in an old point-and-shoot or maybe a nice SLR. You might even make some sizeable prints if you take a particularly good shot. But you can get altogether weirder with 35 mm if you like, as [Socialmocracy] demonstrates with his “extreme sprocket hole photography” project (via Petapixel).

The concept is simple enough. [Socialmocracy] wanted to expose four entire rolls of 35 mm film all at the same time in one single shot. To be absolutely clear, we’re not talking about exposing a frame on each of four rolls at once. We’re talking about a single exposure covering the entire length of all four films, stacked one on top of the other.

To achieve this, an old-school Cirkut No.6 Outfit camera was pressed into service. It’s a large format camera, originally intended for shooting panoramas. As the camera rotated around under the drive of a clockwork motor, it would spool out more film to capture an image.

[Socialmocracy] outfitted the 100-year-old camera with a custom 3D-printed spool that could handle four rolls of film at once, rather than its usual wide single sheet of large format film. This let the camera shoot its characteristic panoramas, albeit spread out over multiple rolls of film, covering the sprocket holes and all. Hence the name—”extreme sprocket hole photography.”

It’s a neat build, and one that lets [Socialmocracy] use more readily available film to shoot fun panoramas with this old rig. We’ve featured some other great film camera hacks over the years, too, like this self-pack Polaroid-style film. Video after the break.

Continue reading “Using Four Rolls Of Film To Make One Big Photo”

Convert A Cheap Tube Preamp Into A Headphone Amp With Jenny

Big-name tube amplifiers often don’t come cheap. Being the preserve of dedicated audiophiles, those delicate hi-fis put their glass components on show to tell you just how pricy they really ought to be. If you just want to dip your toe in the tube world, though, there’s a cheaper and more accessible way to get started. [Jenny List] shows us the way with her neat headphone amp build.

The build starts with an off-the-shelf preamp kit based around two common 6J1 tubes. These Chinese pentode valves come cheap and you can usually get yours hands on this kit for $10 or so. You can use the kit as-is if you just want a pre-amp, but it’s not suitable for headphone use out of the box due to its high-impedance output. That’s where [Jenny] steps in.

You can turn these kits into a pleasing headphone amp with the addition of a few choice components. As per the schematic on Github, a cheap transformer and a handful of passives will get it in the “good enough” range to work. The transformer isn’t perfect, and bass response is a compromise, but it’s a place to start your tinkering journey. Future work from [Jenny] will demonstrate using a MOSFET follower to achieve much the same result.

We’ve seen a great number of headphone amplifiers over the years, including one particularly attractive resin-encased example. Video after the break.

Continue reading “Convert A Cheap Tube Preamp Into A Headphone Amp With Jenny”

Flow chart containing directions on how to determine if you should use this toolkit as a resident, business owner, civic activist, or government official

Hackable Cities

There are many ways to hack the world. Graduate students at Parsons The New School for Design developed a guide for hacking the biggest piece of technology humans have developed – the city.

One of the things we love here at Hackaday is how hacking gives us a tool to make the world a better place for ourselves and those around us. Even if it’s a simple Arduino-based project, we’re (usually) trying to make something better or less painful.

Taking that same approach of identifying a problem, talking to the end user, and then going through design and execution can also apply to projects at a larger scale. Even if you live in an already great neighborhood, there’s likely some abandoned nook or epic vista that could use some love to bring people out from behind their screens to enjoy each other’s company. This guide walks us through the steps of improving public space, and some of the various ways to interact with and collate data from the people and organizations that makeup a community. This could work as a framework for growing any nascent hacker or makerspaces as well.

Hacking your neighborhood can include anything: a roving playground, a light up seesaw, or a recycling game. If you’ve seen any cool projects in this regard, send them to the tipsline!

3D Print Yourself A Split Flap Display

Split flap displays! They’re mechanical, clickety-clackity, and largely commercially irrelevant in our screen-obsessed age. That doesn’t mean you can’t have a ball making one of your own, though! [Morgan Manly] did just that, with tidy results.

An ESP32 C3 SuperMini serves as the boss of the operation, running the whole display. The display is designed to be modular, so you can daisy chain multiple characters together to spell longer words. Each module has 37 characters, so it can display the alphabet, numerals 0 to 9, and a blank. Each module contains a 28BYJ-48 stepper motor for controlling the flaps, and a ULN2003 driver board to run it and a PCF8575 IO expander to handle communciation. An A3144 hall effect sensor is also used for positional feedback to ensure the display always shows the right character. The flap mechanism itself is relatively straightforward—a drum with all 37 flaps is until the correct character is reached, with the blank flaps hosting a magnet to trigger the aforementioned hall effect sensor. The flaps themselves are 3D-printed, with filament changes used to color the characters against the background.

If you’ve ever dreamed of building a flap-display clock or ticker, you needn’t dream of finding the perfect vintage example. You can just build your own! The added bonus is that you can make it as big or as small as you like. We’ve seen some interesting variations on the split flap concept recently, too. If you’re cooking up your own kooky electromechanical displays, don’t hesitate to let us know!

Microwave Motion Detector Notifies Your Smart Phone

Your garden variety motion detector uses IR, but these days, there are fancier technologies for achieving similar goals. If so desired, you can source yourself a microwave-based presence sensor instead. Indeed, like [N-08 Labs], you might like to whip one up into a basic intrusion detection system.

The idea is simple enough—take a RCWL-0516 microwave presence sensor, and set it up to detect motion and warn you when it happens. It’s a simple part to use—it simply drives a 3.3 volt logic output high if it detects someone or something. It basically just emits a microwave signal and detects a change in phase when someone or something—usually something fleshy—is in front of it. [N-08 Labs] simply hooked one up to an IO pin on an ESP8266, with the microcontroller board set up to communicate wirelessly with a Blynk IoT app, which then in turn fires off a smartphone notification that the sensor picked something up. The whole thing is built inside the shell of an AC adapter that provides power and let it easily hide in plain sight.

A project like this doesn’t just have to be for security purposes. You might even just use it to determine when your pet (or a racoon) is using the cat door, or similar. Indeed, we’ve seen great solutions to that particular problem, too. Video after the break.

Continue reading “Microwave Motion Detector Notifies Your Smart Phone”

A Unique Linear Position Sensor Using Magnetostriction

To the extent that you’re familiar with magnetostriction, you probably know that it’s what makes big transformers hum, or that it’s what tips you off if you happen to walk out of a store without paying for something. But magnetostriction has other uses, too, such as in this clever linear position sensor.

Magnetostriction is just the tendency for magnetic materials to change size or shape slightly while undergoing magnetization, thanks to the tiny magnetic domains shifting within the material while they’re aligning. [Florian B.]’s sensor uses a side effect of magnetostriction known as the Wiedenmann effect, which causes a wire to experience a twisting force if a current pulse is applied to it in a magnetic field. When the current pulse is turned off, a mechanical wave travels along the wire to a coil, creating a signal. The difference in time between sending the pulse and receiving the reflection can be used to calculate the position of the magnet along the wire.

To turn that principle into a practical linear sensor, [Florian B.] used nickel wire stretched tightly down the middle of a PVC tube. At one end is a coil of copper magnet wire, while the other end has a damper to prevent reflections. Around the tube is a ring-shaped cursor magnet, which can move up and down the tube. An exciter circuit applies the current pulse to the wire, and an oscilloscope is used to receive the signal from the wire.

This project still appears to be in the prototype phase, as evidenced by the Fischertechnik test rig. [Florian] has been working on the exciter circuit most recently, but he’s done quite a bit of work on optimizing the cursor magnet and the coil configuration, as well as designs for the signal amplifier. It’s a pretty neat project, and we’re looking forward to updates.

If you need a deeper dive into magnetostriction, [Ben Krasnow] points the way.

Scrapyard Vacuum Dehydrator Sucks The Water From Hydraulic Oil

Anyone who has ever had the misfortune of a blown head gasket knows that the old saying “oil and water don’t mix” is only partially true. When what’s coming out of the drain plug looks like a mocha latte, you know you’re about to have a very bad day.

[SpankRanch Garage] recently found himself in such a situation, and the result was this clever vacuum dehydrator, which he used to clean a huge amount of contaminated hydraulic fluid from some heavy equipment. The machine is made from a retired gas cylinder welded to a steel frame with the neck pointing down. He added a fill port to the bottom (now top) of the tank; as an aside, we had no idea the steel on those tanks was so thick. The side of the tank was drilled and threaded for things like pressure and temperature gauges as well as sight glasses to monitor the process and most importantly, a fitting for a vacuum pump. Some valves and a filter were added to the outlet, and a band heater was wrapped around the tank.

To process the contaminated oil, [Spank] glugged a bucket of forbidden milkshake into the chamber and pulled a vacuum. The low pressure lets the relatively gentle heat boil off the water without cooking the oil too badly. It took him a couple of hours to treat a 10-gallon batch, but the results were pretty stark. The treated oil looked far better than the starting material, and while it still may have some water in it, it’s probably just fine for excavator use now. The downside is that the vacuum pump oil gets contaminated with water vapor, but that’s far easier and cheaper to replace that a couple hundred gallons of hydraulic oil.

Never doubt the hacking abilities of farmers. Getting things done with what’s on hand is a big part of farm life, be it building a mower from scrap or tapping the power of the wind.

Continue reading “Scrapyard Vacuum Dehydrator Sucks The Water From Hydraulic Oil”