Game Boy Communicates Directly With An SD Card

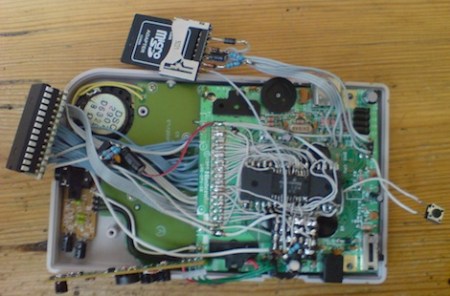
[kgsws] just finished his Game Boy upgrade that allows him to load games from an SD card. Loading a game off an SD card has been done before, but [kgsws] decided to not to use a cartridge-based device. In the end, he threw out all the stops and finished his project by having the Game Boy access an SD card directly.

[kgsws] his project trying to figure out how to put some GPIO pins on a game cartridge, but figured that this would take too much hardware. After looking at the specs of the link port, he realized that it was the wrong polarity. Not to be deterred, [kgsws] realized that there was something like a general-purpose I/O on the Game Boy – the joypad input.

Continue reading “Game Boy Communicates Directly With An SD Card”

AVR Gameboy Dumper

[Kevan] has been hard at work latley developing a Gameboy cart dumper, and while there are a few loose ends to tie up, the device is functioning fine to build up his collection. Running an AVR (mega 16?) and a FTDI chip for the usb connection, the device reads the game’s ROM and SRAM, and can also write the SRAM if you want to load your save games on to the real cart.

On the pc side of things, the device is communicated with using a generic HID protocol and can hit speeds from 16Kbps (currently) to around 64Kbps (soon). A python script currently handles the data stream, but for the rest of us there is a GUI version in the works for both *x and windows.

Also in the works is a redesigned PCB. There were a couple issues and you can see the jumpers, and though we think it adds a little character, it would be good to have fixed in the future.

Solar-powered GameBoy Color Never Runs Out Of Juice

solar_gbc

Instructables user [Andrew] was given a free, but damaged GameBoy color by a friend. The friend’s dog had done quite a number on the outside of the handheld, but it was definitely usable.  After replacing some of the outer shell, [Andrew] decided that he would try tweaking the GameBoy to utilize a solar cell in order to keep the batteries topped off.

He bought a solar garden light for $5 and disassembled it, being careful not to damage the heavily-glued solar panel in the process. The GameBoy was pulled apart next, and the solar panel was soldered to the handheld’s battery leads. Once the wires were properly routed through the case, he reassembled the handheld and picked up a pair of rechargeable AA batteries to test things out.

[Andrew] tells us that the solar panel works nicely, and that simply setting it out face-down keeps his batteries charged and ready to go.

Stick around for a quick video demo of his solar-powered GameBoy.

Continue reading “Solar-powered GameBoy Color Never Runs Out Of Juice”

Gameboy ROM Backups Using An Arduino

gameboy_cart_reader

[Alex] collects retro gaming consoles. One day while playing a SNES title, his save games got wiped when he powered off the system. It turned out that the battery inside the game cartridge got disconnected somehow, and it got him thinking. He decided he wanted to find a way to back up his save games from the cartridges for safe keeping.

While cart readers exist, he says that they are hard to find nowadays, so he decided to construct his own using an Arduino. SNES cartridges are relatively complex, so he opted to focus on Gameboy cartridges for the time being. Before attempting to back up save games, he first chose to learn how to communicate with the cartridges in general, by reading the ROM.

He breaks the cartridges down in detail, discussing how they are constructed as well as how they can be addressed and read using the Arduino. He was ultimately successful, and offers up code as well as schematics on his site for any of you interested in doing the same. We imagine that save game reading (and perhaps editing) will likely happen in the near future.

Check out the video below to see his cart reader in action.

Continue reading “Gameboy ROM Backups Using An Arduino”

NintendOscope

[Craig] has taken his gameboy hackery to the next step, using an oscilloscope as an external display. Back in November of 2010 [Craig] showed us how to extract the video data from a classic gameboy’s screen, armed with that information, and a pretty powerful XMega128A1 controller it seems straightforward to process that data and output it onto a oscilloscope that is in XY(z) mode, especially since he has done all of the hard work for us.

Scopes that feature XY mode typically have a Z input on the back, X controls where the beam is positioned from left to right, Y controls the beam from top to bottom, and Z controls the intensity of the beam. By sweeping the X and Y to act as lines, and Z to control the shade of the beam, its fairly easy to reuse your typically vector display as a raster display similar to televisions or computer monitors (as long as you have your math and timing right), making scopes very useful as output displays for devices like the gameboy, which do not have “standards” friendly display systems.

Join us after the break for a short video, and also check out the scope terminal, or the VGA-to Sope converter for more examples of how to use your oscilloscope as a raster display.

Continue reading “NintendOscope”

Game Boy VGA Using An FPGA

[ViDAR] was looking for a project to keep him occupied and settled on creating a VGA converter for his Game Boy. He had some difficulty finding pinouts for the LCD and CPU but working with what was known, and an oscilloscope, he found the necessary signal. Tap into just a few lines using those thin blue wires; Vsync, Hsync, clock, and two data pins. From there a development board with an Altera Cyclone II field-programmable gate array takes care of the heavy lifting. The board already has hardware for a VGA connection so it was just a matter of processing the incoming signals into the VGA standard. His demo video is embedded after the page break.

Want a dedicated solution? Check out this Game Boy video adapter inside a VHS cassette.

Continue reading “Game Boy VGA Using An FPGA”

Original Shell Houses A Game Boy Advance SP

[Jackson] decided he wanted to give his original Game Boy a bit more power so he replace the internals with those from a Game Boy Advance SP. This keeps the case work to a minimum, as the original was larger than the SP. He kept the buttons, speaker, headphone jack, and power switch but modified the enclosure to use the volume, charger, and battery from the newer hardware. The cartridge connector was relocated to match the slot in the back half of the case, with the color screen being the biggest giveaway that someone’s monkeyed with the device. Not a bad use for a dead Game Boy, as least you’ll be playing this one instead of dedicating it to virtual storage.