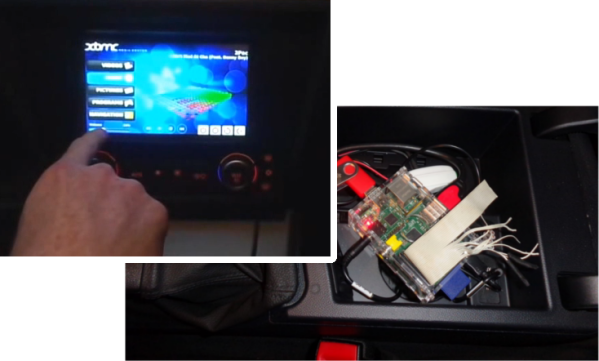
Standalone Air Quality Monitor Based Around Raspberry Pi

rpi-air-quality-monitor

You can have a lot of fun tinkering with the Raspberry Pi. But in addition to the low-cost hobby potential it is actually a great choice for serious data harvesting. This air quality monitor is a great example of that. The standalone package can be taped, screwed, bolted, or bungeed at the target location with a minimum of effort and will immediately start generating sample data.

The enclosure is a weather proof electrical box. The RPi board is easy to spot mounted to the base of the case. On the lid there is an 8 Ah battery meant to top off an iPhone. It works perfectly as it provides a USB port and enough current to operate the Pi. On top of that battery is a 3G modem used to access the data remotely — although it can log to the SD card for collection at a later time if you’d rather not mess with a cell network.

Look closely at the GPIO header and you’ll notice that an ADC add-on board has been plugged in. This is used to take the readings from the gas sensor which is monitoring for air pollutants in Paris.

Transmit FM Using Raspberry Pi And No Additional Hardware

Now here’s a project that actually hacks the Rapsberry Pi rather than just using it as an embedded computer. [Londons Explorer] figured out how to turn the RPi into an FM transmitter. For now it’s done entirely in the user space, but we’re sure it could be improved if someone wanted to drill down further into the hardware. For those wanting to give it a try he’s rolled everything into a simple python package.

The technique requires nothing additional except a 20cm wire to serve as an antenna. The trick is to map GPIO pin number 4 to a position in memory. The clock generator is then used to toggle this pin at 100 MHz, which is the frequency to which your radio should be tuned. A fractional divider adjusts the frequency based on the sound file being transmitted.

The proof of concept for this was able to reliably transmit at a distance of about fifty meters through several walls. The problem is that this technique is limited in the amount of data which can be sent. Right now it’s only about 6-bit audio. But descending deeper through the abstraction layers to put DMA (Direct Memory Access) to use may be able to improve upon this.

[Thanks Owen via Reddit]

Raspberry Pi Model A Coming Soon

A

[Liz] over at the Raspberry Pi foundation took a trip over to the manufacturing facility in Wales and found some of the very first Model A Raspi samples. They’re just samples, but this means we should be seeing a few Model A Raspberry Pis pop up on Element 14 sometime very soon.

As the lower-cost model of the Raspberry Pi, the Model A lacks a few features of the more complete Model B. For starters, there is no Ethernet port or controller, and only one USB port, This greatly reduces the power requirements for the Model A, measured by the Raspi Foundation at about 1/3rd of the power draw of the Model B.

To save costs, the Model A is using the same PCB as the Model B – the Ethernet controller and port simply aren’t populated. It may seem like a downgrade, but if you’re planning on building a Raspi-powered autonomous drone, high-altitude balloon, or other robotics project, the reduced power draw will be a great feature.

Plan 9 On The Raspberry Pi

Yet another operating system has been ported to the Raspberry Pi. No, it’s not Haiku, sadly, but it is something just as weird and interesting. This time it’s Plan 9 from Bell Labs, an 80’s era OS from the same company that brought you C and Unix.

As a research operating system, Plan 9 has a bunch of really weird, but useful features. For one, everything about a computer running Plan 9 is distributed; the memory can be running on one machine, the processor on another, and the display can run on yet another machine. This modularity gives Plan 9 the honorable title of, ‘more Unix than Unix’.

Another great feature, although somewhat of a historical note, is that Plan 9’s graphics capabilities are written into the kernel, unlike Linux and X where the display manager is floating around in user space.

It’s an interesting system, and if you’ve got enough Raspis to build your own supercomputer you might want to install Plan 9 on a few of your nodes, just to see what the future computer of ages past looked like.

Raspberry Pi Quadcopter

[youtube=http://www.youtube.com/watch?v=TjXvzMdf8Nk&w=470]

It was bound to happen sooner or later, but that doesn’t diminish the awesomeness of [Matthew]’s Raspberry Pi-powered quadcopter.

[Matthew]’s quadcopter is similar to all the other flying drones we’ve seen before with one important difference – all the processing, from reading the gyroscopes to computing exactly how much power to give each motor – is handled by a Raspberry Pi. This task is usually the domain of a microcontroller, as these calculations need to happen in real-time. The Linux distro [Matt] is running on his Pi has a lot more overhead than a simple AVR or ARM microcontroller, so doing everything that needs to be done in real-time isn’t guaranteed. With a bit of clever programming, [Matthew] managed to make sure all the necessary tasks were taken care of in time. It’s still not a real-time operating system, but for this project at least, it’s good enough.

Since the Raspberry Pi in [Matthew]’s quadcopter is much more powerful than a microcontroller, there’s plenty of head room to SSH into the ‘copter while it’s flying. There may even be enough processing power to stream video to a web server; we honestly can’t wait to see what [Matthew] does with his flying Linux computer in the future.

You can check out [Matthew]’s code over on the git or watch a few flight test videos over on his youtube.


Injecting Power Into A WiFi Dongle For The Raspberry Pi

So the Raspberry Pi sometimes doesn’t have the juice needed to run power-hungry USB dongles. The most common issue is with WiFi adapters. The solution has long been to use a powered USB hub, but [Mike Worth] didn’t want to take up that much extra space. The solution he worked out injects power directly into the dongle itself.

The red and white wires coming out of the side provide the 5V source. This is coming from the same USB mains power adapter that supplies the RPi board itself. To connect the wires to the dongle he made an adapter out of some strip board and the shielding from the dongle. The end of the strip board pokes out of the shielding far enough for him to solder on some wire, which is then soldered to the traces on the dongle’s PCB.

You can just plug this in and get down to business. But while he was at it [Mike] added an improvised antenna for better reception. It’s the same type of hack we saw him use for a Bluetooth dongle in this links post.


Android VOIP Phone And Raspberry Pi Mate For An Intriguing PBX Setup

[Ward Mundy] has found something great by combining a GXP-2200 phone with Raspberry Pi to create a private branch exchange. So the idea behind a PBX setup is kind of like a company intranet. All of the phones in the system are assigned an extension number and have access to the internal system functions like voice mail, and sharing phone lines to the outside world. We’ve talked about using an RPi as a PBX before, but the high-tech phone he’s using this time around pulls everything together remarkably well.

The GXP-2200 is available for under $200. It runs Android and has a full color touch screen pictured above. It is marketed as a multimedia phone and indeed it brings Skype and Google Voice to the party. But it also offers six SIP lines. The hardware even seems to be planned for this type of use as the phone offers a second Ethernet port to which the RPi board can be connected. In this example [Ward] simply screws the RPi to the phone’s plastic stand and connects the two using a six-inch cable. From there the PBX can be configured with the phone’s browser. How’s that for slick?