Homemade Tank Joins The Battle In Syria

syrian-home-made-tank

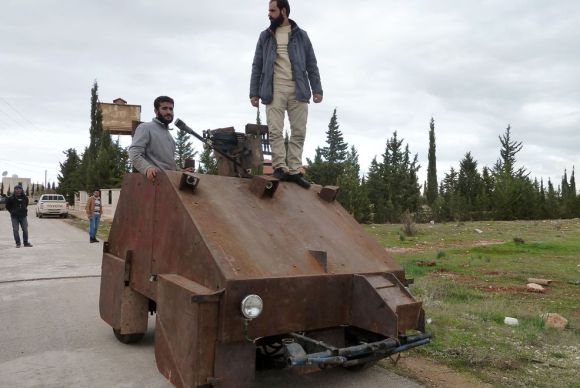
What does a hacker do when going into battle for the freedom of their country? He builds a tank from scratch, of course. It’s a little bit of a stretch calling it a tank as it lacks treads. But it’s got a high-caliber gun mounted on top and has been heavily armored.

There is room enough inside for two people. What may look low tech in this picture is a different story from the cockpit. A pair of LCD monitors display images from five different cameras. You can see the shrouds that protect three of them on the front of the vehicle with a fourth acting as the rear view. A fifth camera mounted on the gun gives the passenger a look at where he’s aiming. A PS1 controller can rotate it and we assume has a fire feature as well. Check out the demonstration video embedded after the break.

Continue reading “Homemade Tank Joins The Battle In Syria”

Web Scraping Tutorial

Web scraping is the act of programmatically harvesting data from a webpage. It consists of finding a way to format the URLs to pages containing useful information, and then parsing the DOM tree to get at the data. It’s a bit finicky, but our experience is that this is easier than it sounds. That’s especially true if you take some of the tips from this web scraping tutorial.

It is more of an intermediate tutorial as it doesn’t feature any code. But if you can bring yourself up to speed on using BeautifulSoup and Python the rest is not hard to implement by trial and error. [Hartley Brody] discusses investigating how the GET requests are formed on your webpage of choice. Once that URL syntax has been figured out just look through the source code for tags (css or otherwise) that can be used as hooks to get at your target data.

So what can this be used for? A lot of things. We’d suggest reading the Reddit comments as there are several real world uses discussed there. But one that immediately pops to mind is the picture harvesting [Mark Zuckerburg] used when he created Facemash.

OLED Name Badge With Rechargeable LiPo Cell

oleduino-name-badge

Here’s a project that let [Rick Pannen] try his hand with an OLED display and a rechargeable power source. He calls it OLEDuino which is a mashup of the display type and the Arduino compatible chip running the whole thing. He figures it will serve nicely as a geeky name badge but also ported a Breakout type game to play when he’s bored.

The project is an inexpensive way to attempt a more permanent trinket than simply using Arduino and a breadboard. [Rick] sourced the OLED display and USB LiPo charging cable on eBay. The ATmega328 hiding below the display is being driven from the 3.7V LiPo cell without any power regulation. The four buttons at the bottom provide the only user input but it should be more than enough for a few simple tricks.

Head over to his code repo for a bit more information. The schematic and board are both Eagle files. We generated an image of the schematic and embedded it after the break if you want to take a quick look at how simple the hardware really is.

Continue reading “OLED Name Badge With Rechargeable LiPo Cell”

Simulating CRT Or Vector Displays For More Realistic Emulation

simulated-crt-monitor-for-emulatorsScaled down it’s not as obvious that this image isn’t a crystal clear rendering of Mortal Kombat gameplay. But we’ve linked it to the full size version (just click on the image) so that you can get a better look. Notice the scan lines? This is the result of an effort to more accurately mimic the original hardware displays used in classic games. [Jason Scott] takes a look at the initiative by describing what he thinks is missing with the picture perfect quality of modern emulators.

One such effort is being mounted for MAME (Multiple Arcade Machine Emulator). There is a series of filters available — each with their own collection of settings — that will make your modern LCD display look like it’s a run-of-the-mill CRT. This is a novelty if you’re a casual gamer who dusts off the coin-op favorites twice a year. But if you’re building a standalone game cabinet this may be a suitable alternative to sourcing a working display that’s already decades old.

Transmit FM Using Raspberry Pi And No Additional Hardware

Now here’s a project that actually hacks the Rapsberry Pi rather than just using it as an embedded computer. [Londons Explorer] figured out how to turn the RPi into an FM transmitter. For now it’s done entirely in the user space, but we’re sure it could be improved if someone wanted to drill down further into the hardware. For those wanting to give it a try he’s rolled everything into a simple python package.

The technique requires nothing additional except a 20cm wire to serve as an antenna. The trick is to map GPIO pin number 4 to a position in memory. The clock generator is then used to toggle this pin at 100 MHz, which is the frequency to which your radio should be tuned. A fractional divider adjusts the frequency based on the sound file being transmitted.

The proof of concept for this was able to reliably transmit at a distance of about fifty meters through several walls. The problem is that this technique is limited in the amount of data which can be sent. Right now it’s only about 6-bit audio. But descending deeper through the abstraction layers to put DMA (Direct Memory Access) to use may be able to improve upon this.

[Thanks Owen via Reddit]

Morse Code Transceiver Based On Gameboy Color Camera

Morse Code IR Transceivers

For their final project in a microcontrollers course, [Trudy] and [Josh] designed a pair of morse code transceivers. To send the message, they used an array of IR LEDs. The message is received using a Gameboy Color Camera, which takes care of basic image processing. This allows a 8-bit ATMega1284p microcontroller to handle transmitting and receiving messages.

The transmission LEDs form a square pattern with one LED in the center. The four outside LEDs are used to help the receiver locate the center LED, and the center LED is used for transmitting the message.

The Gameboy Color Camera is based on a M64282FP image sensor. This sensor uses an SPI-like protocol, which they implemented on the ATMega. It allows them to grab frames from the camera, and get the value of specific pixels. From this data they find the center LED and process the message.

The result can transmit messages of 200 letters at a time, but the speed is limited by the frame rate of the camera. If you have a Gameboy Color Camera lying around, their detailed write up might provide some inspiration and information on how to use it in a hack.

An Automat Of Wireless 3D Printers

vending

There’s a lot of really cool 3D printer stuff happening in the fashion district of NYC this month. It’s called 3DEA, and shows off  the awesomeness of Shapeways, Ultimaker, and the Up! 3D printer to all the fashionistas, trend setters, and the caliphate of coolness that is midtown Manhattan. The folks at Ultimaker wanted to bring something awesome to this exposition and came up with the Vendingwall: a wall of 3D printers connected into a vending machine able to print multiple objects at once.

Ultimaker has made a name for themselves as the top open source 3D printer manufacturer with absolutely impressive build quality and even a 20-foot-high printer able to manufacture entire rooms. The Vendingwall is their next step in the commercialization of 3D printers; all you need to do to create your own 3D printed object is walk up to the Vendingwall, order a print, and later retrieve from one of the many Ultimakers.

To control these ranks of Ultimakers, a piece of software runs on a wireless router loaded up with OpenWRT. From there, the router serves up a website powered by JQuery-mobile for all the Android and iDevices at the 3DEA open house, turning a wall of 3D printers into a vending machine reminiscent of the automats of yore.

Continue reading “An Automat Of Wireless 3D Printers”