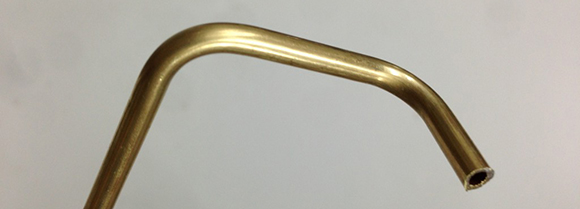
On-the-go Tool Wallet

Whether you’re off to the local Hackerspace, or headed to a friend’s house to lend a hand with the latest project it’s nice to have your favorite tools in a handy package. [Mário Saleiro] decided to take the concept one step further than a toolbox by making his own zipper wallet with cutouts for his favorite tools.

The enclosure is a CD wallet, but who carries those plastic discs around with them anymore? After removing the CD sleeves [Mário] positioned his tools — in this case a pen, angle cutters, and pliers — on one side of the case to make a template. The tracings were then used to cut out pieces from an exercise carpet (we think this is like a rubber yoga mat). The square was glued to the side of the wallet, and some elastic band was sewn in to hold them in place. On the other side is a small components bin, and a little box to hold a tiny multimeter.

[Thanks Nuno]

Turning A 1942 Lathe Into A Functional Piece Of Art

A couple of years ago, [macona] picked up a 1943 Monarch 10EE lathe. This monstrous machine is not only an amazing piece of engineering but an awesome work of art; not only can this lathe manufacture parts with exacting precision, it’s also a wonderful piece of machine age design.

The Monarch 10EE lathe was extremely high-tech for its time, and the War Dept Detroit Ordinance District tag on the cooling pump bears this machines lineage: this lathe was most likely used to make very precise military equipment such as the Norden bombsight.

After 60 years of faithful service, [macona]’s lathe picked up several coats of paint in different colors and generally fell into a state of disrepair. [macona] spent a great deal of time overhauling this lathe by replacing a bent feed rod, troubleshooting the motor problems, and eventually replacing the whole motor with a modern AC brushless servo. You can check out the improvement the AC servo made in a video after the break.

Of course no post about a rebuilt lathe would be complete without a few beauty shots. We’re extremely thankful for [macona] for not only restoring this machine, but also for sharing it with us. Thanks to [macona]’s restoration, this machine will hopefully be around for another 60 years.

Continue reading “Turning A 1942 Lathe Into A Functional Piece Of Art”

Soldering From The Hip

You can be the Sheriff around these parts, but only if you have a solder gun and holster to boot. [Mikasaurus’] latest build is certainly fun, even if it’s not so practical. We’re not giving up our Weller knock-off any time soon, but this quick-heat repackage will certainly be a conversation starter at your next Hackerspace event.

The business end of the build is taken from a cheap four-battery soldering iron. [Mike] separated each of the components, then grabbed a toy gun to see where each of them might fit. The batteries are just the right size to fit into the gun’s magazine. All he had to do to make that happen is add contacts to the gun and springs to the magazine. A momentary push switch was positioned behind the trigger and used to connect the battery pack to the solder tip.

After the break you’ll find a little over-the-top modeling, and some solder melting. This will go great with that 9mm Bluetooth headset you built. Just don’t stick the wrong one in your ear.

Continue reading “Soldering From The Hip”

Measuring Projectiles With OpenChronometer

[Spork] over on the Netduino forums wanted to push the limits of what his little board could do. He put together a chronometer to measure the velocity of rifle rounds and Nerf darts using an Arduino-compatable CPLD shield.

The project is built around a pair of commercial CED M2 chronograph sensors; because people have the tendency to shoot through these sensors, they’re available as replacement units for much less than the cost of a complete chronograph setup. [Spork] couldn’t figure out a way for his Arduino clone to read pins with a resolution of 1 microsecond, so a Amani GTX CLPD shield was added to the build. This programmable logic chip takes the output from a chronometer sensor, starts a timer, waits for the second sensor to trigger, and stops the timer. From that, the velocity of just about any projectile can be calculated.

Of course, [Spork] needed to test his new device, so he took it out to the range and fired 25 rifle rounds through his chronometer. The result was a very nice, normal distribution centered around 2400 feet per second, exactly as would be expected. Although [Spork] didn’t test out low-velocity projectiles such as Nerf darts, we expect the same reliable results.

via majolsurf

3d Printing A Mini Lathe

While browsing on one of our regularly visited sites, RobotsDreams, we found this interesting little video. Here, [Sublime] is showing off his 3d printed mini lathe. In the video he mentions that all the files are available for download so you could make one for yourself, but there were unfortunately no links. A quick bit of googling and we found some more information.  We found the project on Thiniverse, though reading through the comments it seems that [Sublime] no longer uses Thingiverse. You can now find the files on his GitHub account to make your own.

The design seems very solid and looks like it could handle some basic jobs. As [Sublime] points out in the video below, you already know what parts are going to wear out fast and can simply print a few extras to have on hand.  While that may seem somewhat wasteful, he also points out that he’s using PLA which is compostable and much easier to recycle.

Continue reading “3d Printing A Mini Lathe”

Geeks Living Off The Grid Are Hard On Batteries

Many of you will remember [Mikey Sklar] from the multitude of times he’s been on hackaday. What you may not have noticed is that he is an ubergeek, living off the grid.

He has Solar PV battery bank, three electric vehicles, a shipping container loaded with battery powered tools and a small army of iRobot Roomba’s for cleaning. Getting the maximum lifetime out of a battery by removing sulfation is essential to keep expenses down.

Keeping expenses down is nearly a full time job when trying to live the homestead lifestyle. Our current culture makes it extremely difficult to survive completely on self made/grown things and bartering. They seem to be doing pretty well though. One way he can reduce his costs while still getting to enjoy some modern gadgets is to get longer life out of his batteries.  He does this by using a capacitive battery charger and desolfator that he designed and affectionately calls “Da Pimp”. He also brings in a little bit of income by selling kits!

 A capacitive charger behaves like a constant current power supply dynamically adjusting the voltage to get over the batteries internal resistance. Plus there is a pulse from the AC/DC conversion. This allows for old batteries to last longer and for dumpster dived to be used as replacements. Capacitive chargers are small, silent and super efficent (up to 60% more so than cheap transformer based chargers).

Of course, [Mikey] is a supporter of sharing information so you can also go to his site and download the schematics,bill of materials, gerber files, and files for the housing,  to build one yourself.

Mixing Colors On The Reprap

3d printing has come huge strides in ability to construct detailed objects. Unfortunately, color is still a considerable limitation. Here, some people at the Reprap blog are having fun coming up with an extruder head that actually mixes two colors as it deposits them. Don’t confuse this with the dual head that Makerbot is touting that allows you to switch colors on the fly, this is a single head that actually has a cavity where the material is melted, then stirred to create a combination of the two. It is an interesting method of overcoming a limited supply of colors.

Having this extra stirring chamber means that there would be a small amount of material wasted any time that you wanted to make a change to the color, as it would have to be purged. There are some interesting thoughts in their comments on how to use this extra material most efficiently.