If you know that most soda bottles are made from PET plastic, you’ve probably thought about how you could make filament from them and have an endless supply of cheap printing material. [Mr3DPrint] says he has a method and shares a few videos that make it look easy. We wonder if the quality of the filament is up to par with commercial products, but assuming the videos are accurate, it appears that the resulting filament gets the job done.
The details are a little sketchy, but it looks simple enough. THe first step is to get any indentations out of the bottle. He has several demonstrations of this some using pressurized air in the bottle and some without. In each case, though, a drill holds the bottle through the cap and spins it over a flame until the surface is smooth.
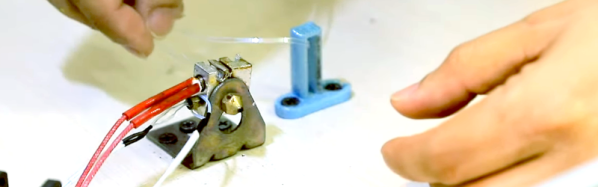
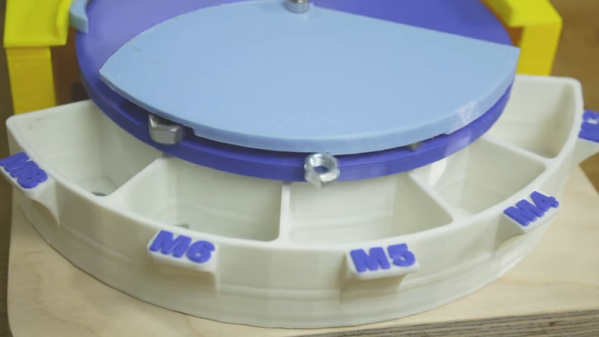
We all have that one drawer or box full of random hardware. You don’t want to get rid of anything because as soon as you do, that’s the one thing you’ll need. But, honestly, you’ll be lucky to find what you need in there, anyway. Enter [Mr. Innovative’s] nut sorting machine. As you can see in the video below, it will make order out of the chaos, at least for nuts.
You might think the device would need optical recognition software or some other high-tech mechanism. But, in fact, it is nothing more than a motor with a speed controller. The sorting is done by a plastic piece built like stairs. When a nut is too tall to fit under the next step, it slides out into the output hopper. You could probably turn the whole thing with a crank and no electricity at all if you wanted to.
Drilling out the shaft required a bit of machine tool usage, so this might not be a great weekend project without a lathe. Like many of the commenters on the video mentioned, we probably wouldn’t have used a rod holder as a rotating bearing, either, but for as little as something like this would probably operate, it is likely to last a fair amount of time. It would be easy to replace it or even affix a shaft to the motor with a coupler, sidestepping several issues.
Apparently, the device isn’t perfect. You do get some missorts. We imagine that’s from a larger nut pushing a smaller nut on the way to the hopper. The Thingiverse files seem to be missing, but this is something you’d probably adapt to your own design, anyway.
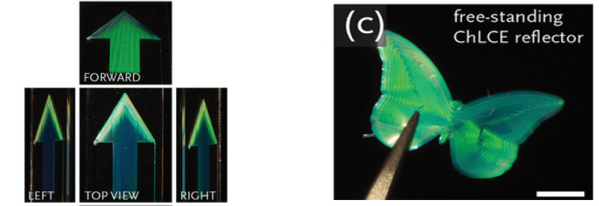
If you think at all about liquid crystals, you probably think of display technology. However, researchers have worked out a way to use an ink-jet-like process to 3D print iridescent colors using a liquid crystal elastomer. The process can mimic iridescent coloring found in nature and may have applications in things as diverse as antitheft tags, art objects, or materials with very special optical properties.
For example, one item created by the team is an arrow that only appears totally green when viewed from a certain angle. The optical properties depend on the thickness of the material which, being crystalline, self-organizes. Controlling the speed of deposition changes the thickness of the material which allows the printer to tune its optical properties.
The ink doesn’t sound too exotic to create, although the chemicals in it are an alphabet soup of unpronounceable organic compounds. At least they appeared available if you know where to shop for exotic chemicals.
The iridescent coloring is common in nature, so art objects like butterfly wings are natural with this method. While inkjet printers aren’t common in the hacker community, they aren’t that hard to create, so this seems like it would be repeatable in a garage lab.
Liquid crystals have all kinds of interesting properties and we wonder if this material would help you print those sorts of things. If you want to experiment, we have seen a few hacked inkjet printers.
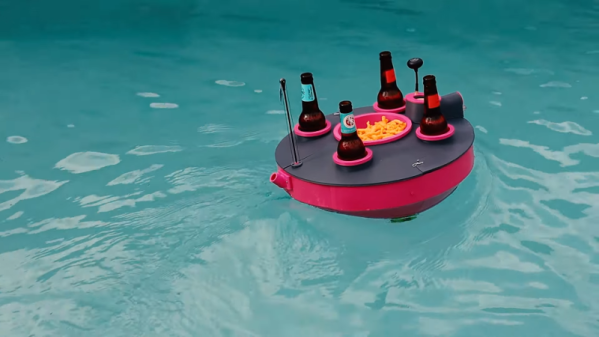
Chilling in the pool is great, but what a drag to have to get out to grab a cold brew. [Alister] had his eye on a commercial drink float, but the company was out of business. But 3D printing, of course, comes to the rescue in this video, also embedded below.
The payload amounts to four bottles and some snacks. Brushless thrusters allow the bartender to steer the little robot around the pool to deliver libations.
Since the very beginning, the prevailing wisdom regarding consumer desktop 3D printers was that they were excellent tools for producing prototypes or one-off creations, but anything more than that was simply asking too much. After all, they were too slow, expensive, and finicky to be useful in a production setting. Once you needed more than a few copies of a plastic part, you were better off biting the bullet and moving over to injection molding.
But of course, things have changed a lot since then. Who could have imagined that one day you’d be able to buy five 3D printers for the cost of the crappiest Harbor Freight mini lathe? Modern 3D printers aren’t just cheaper either, they’re also more reliable and produce higher quality parts. Plus with software like OctoPrint, managing them is a breeze. Today, setting up a small print farm and affordably producing parts in mass quantities is well within the means of the average hobbyist.
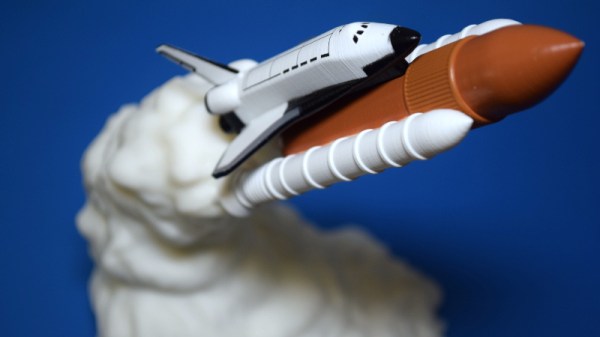
Flickering LEDs provide a sense of motion
So perhaps I shouldn’t have been so surprised when I started seeing listings for these 3D printed rocket lamps popping up on eBay. Available from various sellers at a wide array of price points depending on how long you’re willing to wait for shipping, the lamps come in several shapes and sizes, and usually feature either the Space Shuttle or mighty Saturn V perched atop a “exhaust plume” of white PLA plastic. With a few orange LEDs blinking away on the inside, the lamp promises to produce an impressive flame effect that will delight space enthusiasts both young and old.
As a space enthusiast that fits somewhere in between those extremes, I decided it was worth risking $30 USD to see what one of these things looked like in real life. After waiting a month, a crushed up box arrived at my door which I was positive would contain a tiny mangled version of the majestic lamp I was promised — like the sad excuse for a hamburger that McBurgerLand actually gives you compared to what they advertise on TV.
But in person, it really does look fantastic. Using internally lit 3D printed structures to simulate smoke and flame is something we’ve seen done in the DIY scene, but pulling it off in a comparatively cheap production piece is impressive enough that I thought it deserved a closer look.
Now it’s always been my opinion that the best way to see how something was built is to take it apart, so I’ll admit that the following deviates a bit from the rest of the teardowns in this series. There’s no great mystery around flickering a couple LEDs among Hackaday readers, so we already know the electronics will be simplistic in the extreme. This time around the interesting part isn’t what’s on the inside, but how the object itself was produced in the first place.
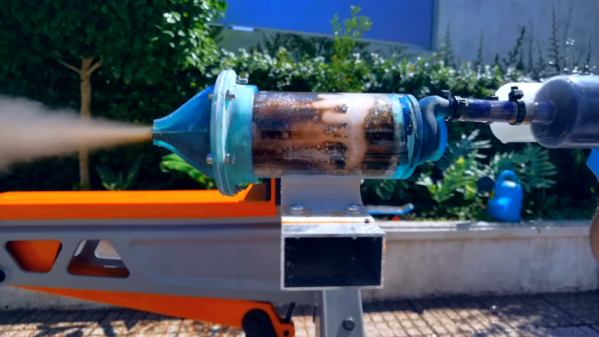
[Integza] was reading about a World War II-era rocket plane created near the end of the war by the Germans. The Heinkel He-176 wasn’t very practical, but he was intrigued when he read the rocket was cold and combustionless. He did a little research and found the engine was a monopropellent engine using hydrogen peroxide. This led to some interesting experiments and a 3D printed rocket engine, as you can see in the video below.
Usually, liquid-fueled rocket engines have a fuel and an oxidizer that mix and are either ignited or, in a hypergolic rocket, spontaneously combust on contact. With a monopropellent, the thrust comes from a chemical reaction between the propellant — hydrogen peroxide, in this case, and a catalyst.
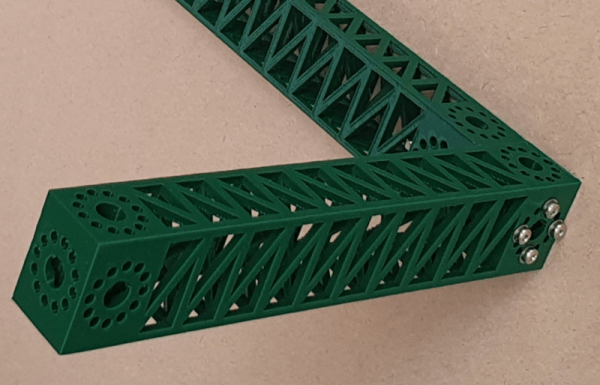
Need a steel beam? You can 3D print PLA beams that are as strong as a steel beam of equivalent weight according to [RepRap]. The Python code for FreeCAD generates a repeating structure especially well suited for belt printers that can print a beam of any length. Keep in mind, of course, given two things that weigh the same, if one is made of steel and the other PLA, the steel one will be physically smaller.
The beams are repeating tetrahedrons which are quite strong with a lot of material on the outer faces to resist bending. Each beam end has a neat block with a wiring hole and a ring of small holes that allow you to mount the beams to things or each other with 30 degree increments of rotation.