Squid-Con Brings Joy To All

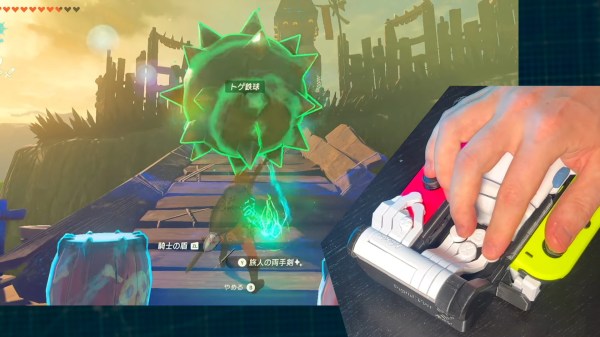
While we’re always happy to see accessibility aids come into fruition, most of them focus on daily tasks, not that there’s anything wrong with that. But what about having some fun? That’s the idea behind [Akaki Kuumeri]’s accessibly-awesome Joy-Con controller, the Squid-Con, which provides access to every button with just one hand. It even has tripod and AMPS mounts.

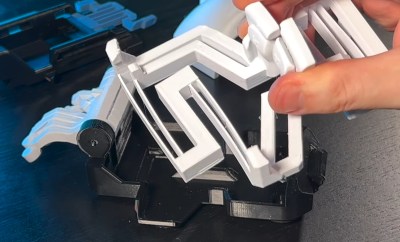
The joysticks themselves are controlled with the thumb and pinky, although some of [Akaki]’s beta testers changed it up a bit. That’s okay, because it’s designed to be comfortable in a variety of positions for either hand. As for the ABXY buttons, those are actuated using 3D-printed arms that connect to a central piece which [Akaki] calls the turbine.

But perhaps the coolest part of this project is the flexures that actuate the shoulder buttons (L, R, zL, and zR) on the controllers. It’s a series of four arms that are actuated by bringing the fingers back toward the palm. If all of this sounds confusing, just check out the video after the break.

We love flexures around here, and we’ve seen them in everything from cat feeding calendars to 6-DOF positioners to completely new kinds of joysticks.

Continue reading “Squid-Con Brings Joy To All”

A crown ornament made from PCB material

Clever Design Technique Makes Flexible PCB Fit For A Queen

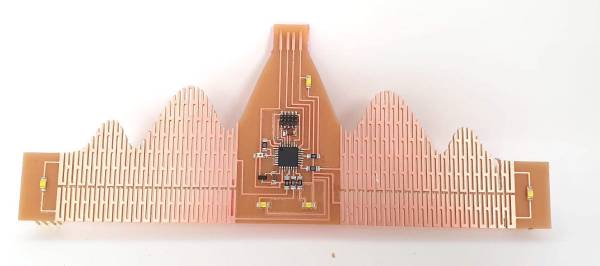
Printed circuit boards can be square, round, octagonal, or whatever shape you desire. But there’s little choice when it comes to the third dimension: most PCBs are flat and rigid. Sure, you can make flexible PCBs like the kapton-backed ones you find inside electronic gadgets, but those are complicated to work with. As it turns out however, you can also make flexible boards using regular PCB material: check out [Rehana Al-Soltane]’s Flexible Crown PCB, a project she did as part of [Neil Gershenfeld]’s “How To Make (Almost) Anything” class at MIT.

The basic idea is to create flexures in the PCB by milling out several long slots with thin pieces connecting the two sides. [Rehana] got this idea from [Quentin Bolsée]’s flexible capacitive sensor project and applied it to make a crown-shaped PCB with sparkly LEDs. The crown can bend through 180 degrees and can actually be worn as a head ornament, with pin headers to clamp it down on the wearer’s hair.

[Rehana] used a tool called svg-pcb to design the board. This is an open source toolkit that lets you design PCBs by describing them in code, rather than drawing shapes by hand. Although this might look a bit odd if you’re used to working with traditional PCB design software, it’s ideal for making repetitive structures like the flexures in the crown: simply write a for loop and let the tool generate a perfect array of identical slots.

Fabricating the Flexible Crown posed a few difficulties of its own, because the PCB began to flex and wiggle itself loose before the milling process was finished. As it turned out, the trick was to cut all the slots on the interior first and only mill the board’s outline as the very last step.

Adding flexures to a PCB like this looks like a promising technique and we’ll keep an eye on further developments in this field. There are other ways of making bendy boards though: researchers at the University of Maryland used a laser engraver to make foldable PCBs. Our 2019 Flexible PCB Contest also yielded several impressive implementations.

Continue reading “Clever Design Technique Makes Flexible PCB Fit For A Queen”

Trigger Your Home Automation Routines With Home Buttons

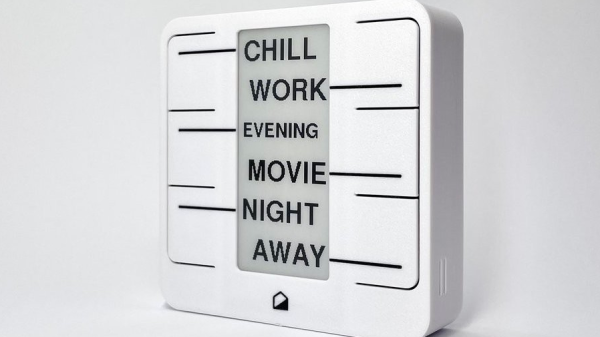
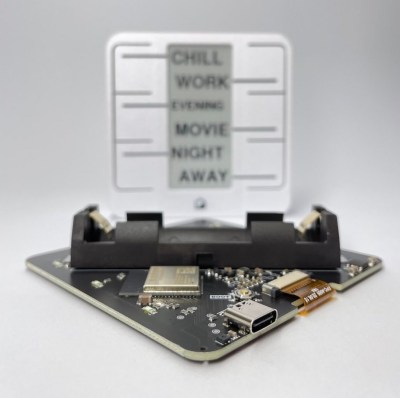
Home automation systems are all well and good, so long as the person who built it all is around to drive it. Let’s face it, they’re quite often a complex web of interconnected systems, all tied to the specifics of one’s home — and someone less familiar with it all could get a little irritated if, on a chilly day, the interface to the boiler is via a Python script, and something won’t work. Just saying. Home Buttons by [Matej Planinšek] over on Hackaday.IO is a nicely polished project, which aims to take some of the hackiness out of such automation by providing a sleek front end to those automation routines, enabling anyone to rock on over and set one in action without hassle.

Internal PCB shown in the foreground, with the complete unit behind.The PCB is based around the ESP32-S2-mini which deals with WiFi connectivity and integration with Home Assistant using the usual MQTT protocol. We expect integration with other flavors of home automation would not be difficult to achieve. The center of the unit holds a simple E-Ink display, for that low-standby power. Specifically, the unit chosen is a Good Display GDEY029T94 2.9″ which this scribe can confirm is easy to interface and pretty cheap to purchase from the usual Chinese online vendors. This was matched up with six clicky Alps SKRB-series low-profile tact switches, which sit on either side of the display, and corresponds to a flexure-type affair on the 3D printed front casing. Neat and simple.

The PCB design was provided in Altium format, which you can find on the project GitHub page. This shows a straightforward design, with a few nice little details here and there. The internally mounted 18650 cell is reportedly good for at least a year of operation, but when time, it can be charged via USB. A Xysemi XB8608AF (PDF) protection chip provides appropriate limiting for the 18650 cell, shielding it from the perils of overcharging, discharging, and whatnot. Not that that is likely in this current setup. A Sensiron SHTC3 humidity and temperature sensor is also in there, hanging off the I2C bus, which makes sense for this application.

Home Automation hacks are plenty on these pages, like this scroll-wheel interface, for instance. If all this stuff is looking quite overbearingly complicated to get into, how about starting with a Pico W?

Fabulous Flexure Mechanism Makes For Resetting Cat Calendar

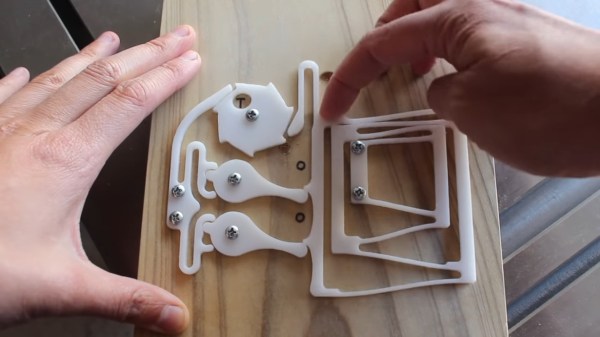
When we met [Amy Makes Stuff] at the 2019 Hackaday Superconference, we were immediately impressed with the array of flexure mechanisms displayed on a board hanging around her neck. That must be where we saw [Amy]’s original version of the cat calendar — a simple way to know for sure whether the shared house’s cat has been fed once, twice, or not at all on a given day.

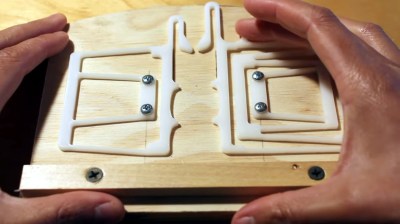
Left: a simple flexure that gets heavily stressed when actuated. Right: a slightly more complicated flexure that uses less force.

Awesome as it is, the flexure mechanism doesn’t reset the yes/no indicators when the day clicks over — that has to be done manually. So when [Amy] was offered to try a small desktop CNC, she decided it was time to make a new version that resets automatically. Check it out in the video after the break, which also includes an exploration of [Amy]’s choice of flexure design as well as a bonus review of the CNC.

This is just an all-around great video, especially after [Amy] neglected to mill out the check marks and circles, sending her down a rabbit hole of attempting to make branding bits for these that could be chucked into a soldering iron. Unfortunately, the mill stops short of having the necessary mettle for milling metal.

Although [Amy] is likely known for her flexures, she has a ton of skills. Remember when she resurrected that burned and bubbled laser cutter? Or the time she machined a honing jig for hand-sharpening chisels and planes?

Continue reading “Fabulous Flexure Mechanism Makes For Resetting Cat Calendar”

Print Your Own Flexures

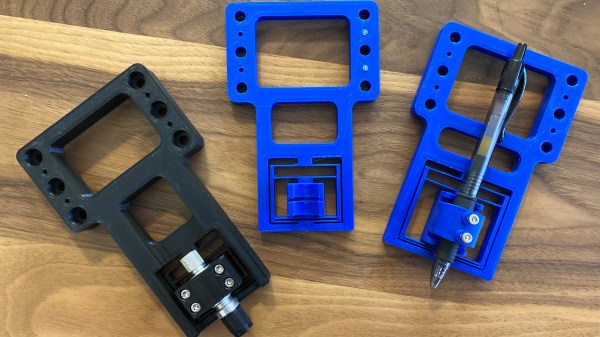
Game developer and eternal learner [David Tucker] just posted a project where he’s making linear flexures on a 3D printer. Tinkerer [Tucker] wanted something that would be rigid in five of the six degrees of freedom, but would provide linear motion along one axis. In this case, it is for a pen or knife on a CNC flatbed device. [David]’s design combines the properties of a 1-dimensional flexure and a spring to give a constant downward force. Not only is this an interesting build in and of itself, but he gives a good explanation and examples of more traditional flexible constructs. He also points out this site by MIT Precision Compliant Systems Lab engineer [Marcel Thomas] which provides a wealth of information on flexures.

Continue reading “Print Your Own Flexures”