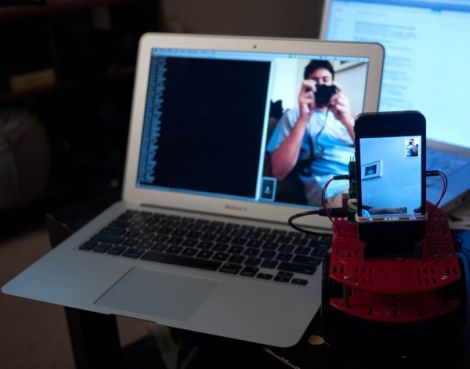
Small Tabletop Telepresence Robot

iphone_tabletop_telepresence

When [Peter] saw the Sparkfun Magician robot chassis in a recent new product post, he knew instantly that he had to have one for a telepresence project that had been kicking around in his head for a while.

Onto the robot chassis, he added an Arduino to provide the brains of the bot, an Adafruit motor shield for controlling the wheels, and a Pololu Wixel for wireless communications. An iPhone is mounted on the top of the robot, which communicates with his laptop using Apple’s Facetime app. The robot is controlled from his laptop as well using the Wixel, which enables him to direct the Magician chassis as if it was attached via USB.

While he thinks the robot is pretty neat and that it works well, [Peter] already has improvements in mind. The robot chassis is a bit weak on anything but smooth surfaces, so a new set of motors and wheels are likely the first changes he’ll make. He wants to add a servo-based aiming mechanism for the phone’s camera, as well as some sensors to prevent the bot from taking a nosedive off his table.

iPhone aside, this is probably one of the cheaper mobile telepresence setups we’ve seen, so we can’t wait to hear how the improvements work out, and how much they add to the robot’s cost.

Join The Pen15 Club With A Vibrator Shield

For all you teledildonics enthusiasts, there’s a new Vibrator shield for the Arduino. It gets better: you can use the Pen15 shield with a Kinect for wholesome and natural fun at home.

Decency and a ‘safe for work’ style prevents us from putting everything we know on the front page, so keep reading after the break.

Continue reading “Join The Pen15 Club With A Vibrator Shield”

Christmasqualizer Is The Next Light Switch Rave

[youtube=http://www.youtube.com/watch?v=la1OuczS_wM&w=470]

[Kyle] was looking for a way to spice up his boring brick-wall dorm room. The Christmasqualizer he came up with brightens up his room and would make an awesome place for a rave.

The strings of lights in [Kyle]’s Christmasqualizer are off-the-shelf Christmas lights. A simple circuit for the 7-band equalizer was built following this article. The build uses an MSGEQ7 equalizer chip takes audio from any source. The volume level of the seven EQ bands are output to an Arduino over a serial connection.

After the EQ chip was connected to the Arduino, [Kyle] needed a way to switch the strings of Christmas lights on and off. A few solid state relays later, and he was in business.

All the code for the Christmasqualizer is up on github. The sketch is pretty simple – connect the EQ chip as per the article, then connect the relays to the output pins on the Arduino. It’s a fun and easy project that really livens up a dorm room.

Building Your Own Replacement Refrigerator Thermostat

refrigerator_thermostat_repair

[Ron’s] refrigerator broke shortly after he came home from his weekly grocery trip, and since this was his second dead fridge in three years, he wanted to fix it rather than buy a new one…again. It turns out that the thermostat was toast, and a replacement would cost him $80. That was well more than he was willing to pay, but his groceries were starting to get warm, so he had to do something.

Being the tinkerer he is, he figured he could rig up his own thermostat that would work at least as well as the one that died on him. He scavenged an ATmega328 from a failed project, and after digging around online, put together the most barebones Arduino setup he could find. The microcontroller is tucked away in the back of the refrigerator where the old thermostat used to live, and takes input from a TMP36 temperature sensor, triggering a relay to start the refrigerator’s compressor whenever the the temp goes above 4°C.

[Ron] says his fix is just about the “worst kludge ever”, but as he saved $80 in parts and $150 in labor, we’re inclined to think it’s a job well done.

Build A Binary Wall Clock For Just A Few Bucks

The weekend is almost here and if you’re looking for an afternoon project consider building your own binary wall clock. [Emihackr97] built the one you see above using parts on hand, but even if you put in an order for everything, it won’t cost you much.

He used a cardboard box as the housing for the clock, marking a grid for the LEDs on the face and drilling holes to house them. Two columns for hours and another two for minutes let the clock display 24-hour time with alternate firmware for 12 hour time. Since there are two buttons – one to set hours, the other to set minutes – a little coding would make it possible to select between the two either by clicking both buttons at once, or holding down one button.

[Emihackr97] is driving the display with an ATmega48, which is a pin-compatible replacement for the ATmega168/328. Those chips are the type most commonly found on Arduino boards an indeed this project is running the Arduino bootloader, but uses an ISP programmer and breadboarded circuit to keep the costs low. There are plenty of pins to drive the 13 LEDs directly, making the soldering quick and painless. Check out a demo clip after the break.

If you’re successful at this build and get the itch for something with more style, there’s a ton of ways to spice up the look of a binary clock.

Continue reading “Build A Binary Wall Clock For Just A Few Bucks”

Simple Hack Reuses An Air Freshener PIR Sensor

pir_sensor_room_greeter

A year ago [Lochie] bought an Airwick automatic air freshener, and while he thought it was a cool gadget, the freshening spray and the novelty ran out in short order. The device collected dust in his room for some a while until he recently unearthed it, and noticed that a perfectly good PIR sensor was looking him in the face all this time.

He disassembled the air freshener, then set out to figure out how he could interface with the PIR sensor. After finding a helpful Instructable on the topic, he had full access to the sensor’s signals, allowing him to easily wire it up to an Arduino. He decided it would be fun to trigger some simple music any time someone entered his room, so he encoded a short bit of the Super Mario Brothers theme in RTTTL, as he explains in the video below.

It’s a simple little hack, but [Lochie] is pleased with it, and we imagine that he likely has a long list of other creative ideas in mind for his newly discovered PIR sensor.

Continue reading “Simple Hack Reuses An Air Freshener PIR Sensor”

Electric Mountain Board With Glove Control

Last summer, we saw [Andres Guzman]’s electric mountain board tearing around the University of Illinois campus. He’s back again, only this time the board isn’t controlled with a PlayStation controller. [Andres] built a wireless glove to control his mountain board.

An Arduino and power supply is mounted to the glove. A 2.4GHz transceiver serves as the comm link between the glove and board. The speed control is handled by this flex sensor from Sparkfun. With the flex sensor held between the middle and ring fingers, all [Andres] needs to do to apply power is slightly bend his fingers.

There’s also a number of safety features built into the board. To enable power to the boards motor, there’s a dead man switch on the glove underneath the thumb. If [Andres] were to take a nasty spill, he would release the switch and the board would come to a stop. [Andres] also made sure the board would shut down if the wireless link was interrupted. The build seems pretty safe, even if he is tearing around his campus in the video below.

Continue reading “Electric Mountain Board With Glove Control”