A Steam Box For Not A Lot

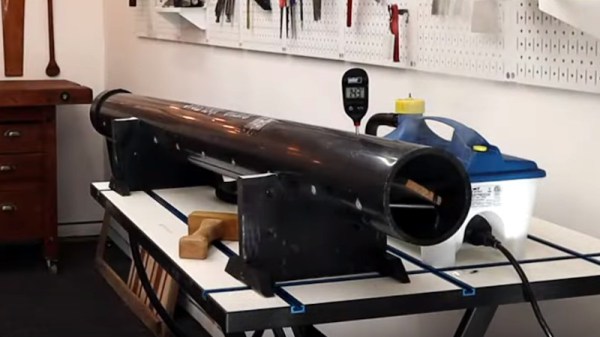
If you have ever marveled at the complex wooden curves used by shipbuilders or some furniture makers, then you have probably at some point hankered after a steam box. This is as its name suggests, a chamber in which a piece of wood is steamed until it becomes flexible, at which point it can be pressed into a new shape that it will retain once cooled. The ever-resourceful [Xyla Foxlin] shows us how to make a steam box using easy-to-find parts, as can be seen in the video below the break.

The steam supply comes from a commercial steam boiler of the type used by decorators for wallpaper stripping, and the steam box itself is made from a length of PVC pipe. Inside the pipe are a series of aluminium dowels that form a rack upon which the wood sits away from any condensation, and the whole things sits at a slant with the steam inlet and a condensation drain at the bottom end.

In use, a piece of wood is loaded into the tube and steamed, before being bent using a set of forms in a vice.  The process looks straightforward enough that even we could give it a go, so we’re sure Hackaday readers will find it interesting.

We think this may be the first steam box we’ve brought you, but it’s not the first time we’ve discussed bending wood.

Continue reading “A Steam Box For Not A Lot”

Print A Plywood Bending Jig

Ever wanted to bend plywood but don’t have the equipment or the space to use it? Whatever the issue, dust off those project ideas and take a look at [Ryo Kosaka]’s experimental bending jig.All you need are some boards, a couple of fasteners, and [Ryo]’s 3-D printed connectors.

This is quite the elegant solution for bending in a small space with little noise. The main departure from standard bending methods is that instead of making the bend by clamping the veneers between a pair of positive and negative mold halves, most of the clamping pressure comes from air pumped into a rubber ball. That’s not even the best part: not only is the mold reconfigurable, it’s modular. Want another bend in your thing? Just print another connector and grab another piece of wood.

[Ryo]’s pivoting connectors screw into the end of one board and move freely along the length of a second board. Once the bend angle is dialed up, he locks it in place with a bolt. For the first test, [Ryo] made a lamp base with two bends.The jig worked great except for a small gap that didn’t get enough clamping pressure from the ball. We wonder if rotating the jig during the process would have let gravity address the issue. For the second test, [Ryo] added another piece to make the jig rectangular and made a floating wall shelf. Bend your way past the break for the video version.

In making the lamp base, [Ryo] found it easier to pre-bend the veneers with a heat gun. If the project were smaller, he could have softened up the wood in a microwave.

Continue reading “Print A Plywood Bending Jig”

Jewelry Meets Carpentry With Bentwood Rings

[Dorkyducks] is a bit of a jeweler, a bit of a carpenter, and a bit of a hacker.  They’ve taken some time to document their technique for making bentwood rings. Bentwood is technique of wetting or steaming wood, then bending or forming it into new shapes. While the technique is centuries old, this version gets a bit of help from a modern heat source: The microwave oven. [Dorkyducks] starts with strips of veneer, either 1/36″ or 1/42″ thick. The veneer is cut into strips 1/2″ wide by about 12″ long, wrapped in a wet paper towel, and microwaved. The microwaveglue-roll 
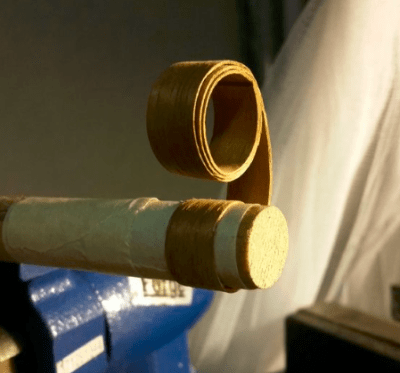
heats the water in the towel, steaming it into the wood. This softens the wood fibers, making the entire strip flexible. The softened wood is then wrapped around a wooden preform dowel and allowed to dry for a day or two.

Once dry, the wood will hold the circular shape of the dowel. [Dorkyducks] then uses masking tape to tack the wood down to a new dowel which is the proper ring size for the wearer. Then it’s a superglue and wrapping game. The glue holds the laminated veneer together, and gives the ring it’s strength. From there it’s sanding, sanding, sanding. At this point, the ring can be shaped, and inlays added. [Dorkyducks] shows how to carve a ring and insert a gemstone in this gallery. The final finish is beeswax and walnut oil, though we’d probably go for something a bit longer lasting – like polyurethane.