A Deeper Dive Into Reverse Engineering With A CT Scanner

We’ve recently got a look at how [Ken Shirriff] used an industrial CT scanner as a reverse engineering tool. The results were spectacular, with pictures that clearly showed the internal arrangement of parts that haven’t seen the light of day since the module was potted back in the 60s. And now, [Ken]’s cohort [Curious Marc] has dropped a video with more detail on the wonderful machine, plus deep dives into more Apollo-era hardware

If you liked seeing the stills [Ken] used to reverse engineer the obscure flip-flop module, you’re going to love seeing [Marc] using the Lumafield scanner’s 3D software to non-destructively examine several Apollo artifacts. First to enter the sample chamber of the CT scanner was a sealed module called the Central Timing Equipment, which served as the master clock for the Apollo Command Module. The box’s magnesium case proved to be no barrier to the CT scanner’s beam, and the 3D model that was built up from a series of 2D images was astonishingly detailed. The best part about the virtual models is the ability to slice through them in any plane — [Marc] used this feature to hunt down the clock’s quartz crystal. Continue reading “A Deeper Dive Into Reverse Engineering With A CT Scanner”

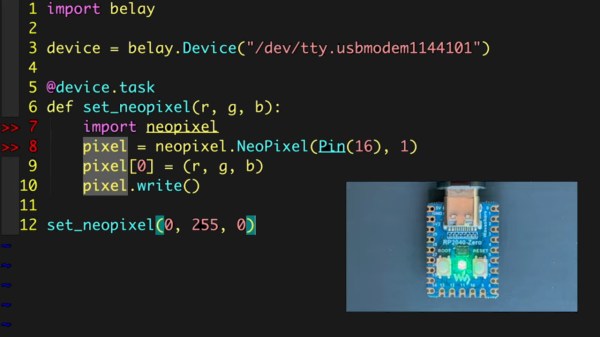
screenshot from the video linked, showing example code that lights up an LED, and in a small window, also shows the LED lit up on a small Pi Pico board connected over USB

Your MicroPython Board Can Be Your Tinkering Peripheral

[Brian Pugh] has shared a cool new project that simultaneously runs on desktop Python and MicroPython – the Belay library. This library lets you control a MicroPython device seamlessly from your Python code – interacting with real-world things like analog/digital trinkets, servos, Neopixels and displays, without having to create your own firmware or APIs.

You need a serial-connected MicroPython board – even an ESP8266 should do. Then, you can intersperse your Python code with MicroPython-written functions, and call them whenever you need your connected device to do something – keeping the entire logic of your project within a single device. [Brian] provides quite a few examples, even for more complex things like displays. No doubt, there are limitations, but this looks to be a powerful tool in a hacker’s arsenal.

Readers might be reminded of an Arduino library called Firmata – an old-time way to do such connectivity. We’ve also previously covered a Pi Pico firmware that does a similar thing, and even features a breakout board for all your experimentation needs!
Continue reading “Your MicroPython Board Can Be Your Tinkering Peripheral”

A Fast Linear Actuator Entirely In One PCB

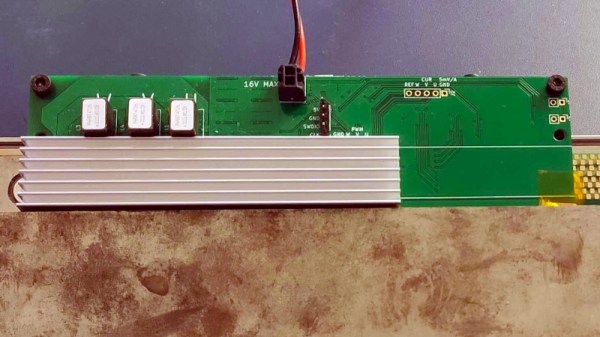
There are many ways to make a linear actuator, a device for moving something is a straight line. Most of the easier to make ones use a conventional motor and a mechanical linkage such as a rack and pinion or a lead screw, but [Ben Wang] has gone for something far more elegant. His linear actuator uses a linear motor, a linear array of coils for the motor phases, working against a line of magnets. Even better than that, he’s managed to make the whole motor out of a single PCB. And it’s fast!

This represents something of an engineering challenge, because achieving the required magnetic field from the relatively few turns possible on a PCB is no easy task. He’s done it by using a four-layer board to gather enough turns for the required magnetic field, and a simple view of the board doesn’t quite convey what lies beneath.

PCB motors are perhaps one of those areas where the state of the art is still evolving, and the exciting part is that their limits are being pushed right there in our community. And this isn’t the only linear motor we’ve seen recently either, here’s one used in a model train.

The keyboard, fully assembled, with black 3D printed body.

From Product To Burnout To Open-Source: The Ergo S-1 Keyboard Story

[Andrew] from [Wizard Keyboards] emailed us and asked if we were interested in his story of developing an ergonomic keyboard as a product. Many of us can relate to trying to bring one of our ideas to market. [Andrew], being a mechanical keyboard geek, knew a niche with no product to satisfy it, and had a vision he wanted to implement. He started meticulously going through steps for bringing his keyboard idea into life as a manufacturable product, and gave himself six months to get it done.

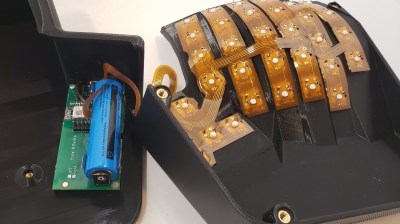
 Internals of the keyboard, showing the lower half with the mainboard on the left, and upper half of the keyboard with an FPC connecting keyswitches together on the right

After evaluating competing products and setting a price point, he designed the case, the keyboard’s mainboard, and even flexible circuit boards for wiring the keys up. The mechanical design alone had him go through many iterations and decisions, and he walks us through the different paths he’s faced. Whether it’s these insights, a story of a module with fraudulent FCC certification, or an approach to electronics design that led to him passing EMC tests with flying colors, there’s plenty to learn from [Andrew]’s journey.

Sadly, at some point, the project quickly outgrew the intended goal and became a drain. For instance, tuning the 3D printing processes alone took three months instead of one as planned. As the design was done, he got stuck on marketing material production – a field that turned out to be unexpectedly hostile to a hacker like him. After a year of work and five thousand hours of work spent on the project, he took a break, and afterwards, as he was trying to come back, [Andrew] realized that he has burned out. He took a few month long hiatus, and having recovered a bit, revisited the project. Still not thrilled about the product route, he decided that open-sourcing the keyboard would be the best outcome – doing justice to the time and effort spent working on it.

This is where the story ends – for now. [Andrew] has open-sourced everything one would need to create such a keyboard by yourself, designed assembly instructions, and even sells kit parts for those who’d like to take a shortcut. This wasn’t what he aimed for, but it’s a honorable ending – most commercial projects never get open-sourced even if they utterly fail to launch. Thanks to [Andrew], we got an insightful journey, a postmortem, and an open-source ergonomic keyboard project. Product stories grace our pages every now and then – here’s a similarly swerving story about a MIDI controller.

A Merciless Environmental Monitoring System

We’ve seen plenty of environmental monitoring setups here on Hackaday — wireless sensors dotted around the house, all uploading their temperature and humidity data to a central server hidden away in some closet. The system put together by [Andy] from Workshopshed is much the same, except this time the server has been designed to be as bright and bold as possible.

The use of Mosquitto, InfluxDB, Node Red, and Grafana (M.I.N.G) made [Andy] think of Ming the Merciless from Flash Gordon, which in turn inspired the enclosure that holds the Raspberry Pi, hard drive, and power supply. Some 3D printed details help sell the look, and painted metal mesh panels make sure there’s plenty of airflow.

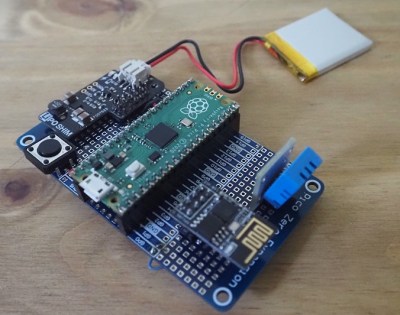
While the server is certainly eye-catching, the sensors themselves are also worth a close look. You might expect the sensors to be based on some member of the ESP family, but in this case, [Andy] has opted to go with the Raspberry Pi Pico. As this project pre-dates the release of the wireless variant of the board, he had to add on an ESP-01 for communications as well as the DTH11 temperature and humidity sensor.

For power each sensor includes a 1200 mAh pouch cell and a Pimoroni LiPo SHIM, though he does note working with the Pico’s energy saving modes posed something of a challenge. A perfboard holds all the components together, and the whole thing fits into an understated 3D printed enclosure.

Should you go the ESP8266/ESP32 route for your wireless sensors, we’ve seen some pretty tidy packages that are worth checking out. Or if you’d rather use something off-the-shelf, we’re big fans of the custom firmware developed for Xiaomi Bluetooth thermometers.

Continue reading “A Merciless Environmental Monitoring System”

What Goes Into A Hacker Camp

Long-time readers of Hackaday will know that we attend quite a few events, including summer hacker camps. Here in Europe this year there are two large events, the British Electromagnetic Field, and the Dutch MCH, or May Contain Hackers. These events are put together by volunteers from within the community, and as part of the MCH setup I noticed they needed drivers for their off-site logistics. I have a licence to drive medium-sized trucks in Europe so it seemed like a perfect fit. I traveled early on the first set-up day to the Dutch city of Utrecht, and found myself behind the wheel of a large Volkswagen box van. My brief career as a trucker had begun!

An Empty Field Of Dreams

A field with a few tents and a blue sky
The tents stand in isolation at the end of day one.

The Netherlands is a relatively small country and the MCH site at Zeewolde is roughly in its centre, so while the traffic could be heavy the distances weren’t large by American or even British standards. There were however a wide variety of loads waiting for me and my fellow driver, and a few obstacles such as the hottest days of the year and angry Dutch farmers blockading the roads. If you’re interested in the logistics behind a large hacker camp then our journeys provided an insight that maybe wandering around the field doesn’t quite deliver.

Arriving on site on the first day gives a perspective on how much of the infrastructure comes from specialist contractors and thus isn’t delivered by the hackers. Articulated trucks from the marquee company were disgorging the main tents, with their crews expertly assembling them in record time. The toilets and showers were arriving as self-contained hook lift container units, and yet more contractors were delivering fencing or tables and chairs. I can add the power infrastructure to this list, but due I’m told to delays at another event this wasn’t on site on the first day. Continue reading “What Goes Into A Hacker Camp”

Here’s The World’s Smallest Wood Plane…Probably

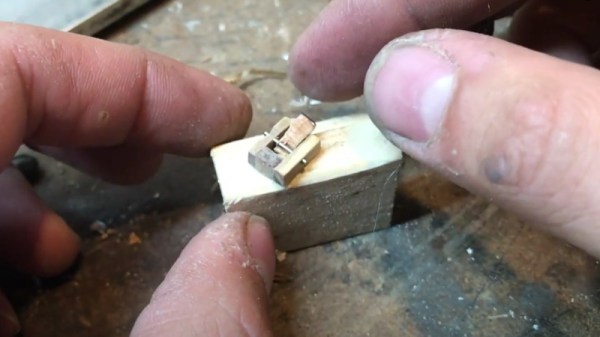
Admittedly, we aren’t really in a position to confirm whether or not the miniature wood plane put together by [Daniel d’Entremont] is actually the smallest in the world, but we’re willing to take his word for it. At the very least, we certainly haven’t seen a smaller one.

In the video below, [Daniel] crafts the diminutive tool from a small block of wood by first slicing off a square using a band saw and then switching over to a small hand saw to cut out the individual pieces. These are glued together to make the body of the plane, and the shank of a small drill bit is used to hold down the wedge and blade. All told it’s about 1/2 of an inch long, and is fully functional…or at least, as functional as a 1/2 inch wood plane can be.

Interested in more miniature tools? Believe it or not, we’ve got you covered.

Continue reading “Here’s The World’s Smallest Wood Plane…Probably”