One Game Controller Connects To Many Consoles

multi-controller-for-several-gaming-consoles2

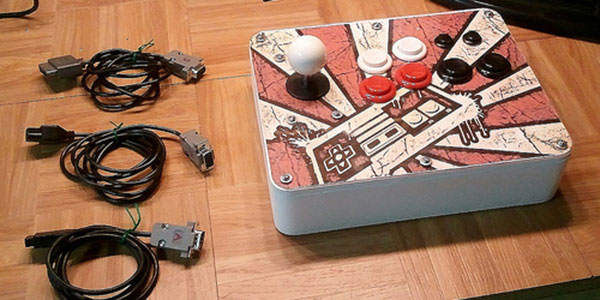
[Dave Nunez] wanted arcade quality controls when gaming at home. The problem was he couldn’t decide on just one console to target with his build, so he targeted them all. What you see above is a single controller that connects to many different gaming rigs.

He took a simple-is-best approach, keeping the main goal of high-quality inputs at the forefront. To start, he built the face plate out of thick MDF to ensure it wouldn’t flex or bounce as he mashed the buttons. To keep the electronics as simple as possible he soldered connections to actual controller PCBs (well, reproductions of controllers), breaking each out to a separate DB9 connector on the back of the case. These connectors interface with one of the three adapter cables seen to the right. This lets the controller work with NES, SNES, and an Atari 2600 system.

To pull the enclosure together [Dave] designed the rounded corner pieces and cut them out with a CNC mill. These connect with flat MDF to make up the sides. To give it that professional look he filled the joints with Bondo and sanded them smooth before painting.

CNC Tic Tac Toe

cnc-tic-tac-toe

This computer controlled physical Tic Tac Toe game is built from parts scavenged from common consumer goods. Specifically, the sled is made up of a combination of printer and DVD drive parts.

The build is delightful, and you can’t move on to the next feature until you watch it play a game in the clip after the break. The game board can move along two axes. It’s obvious from the image above that the printer ink cartridge sled has been reused to let the board move left and right. But the DVD lens sled hidden under the board lets it move forward and back. The piece of protoboard seen on the left is an IR reflectance scanner. The board moves systematically under this sensor. Whenever a black square (placed by the human player) is in play it prevents the IR beam from reflecting back. What you can’t see in this image is the yellow disc dispenser which is just out of the frame. It uses the DVD disc tray motor to place the computer’s pieces. We think this build is just begging to be turned into a Turing Machine demonstration.

If you liked this one we’re sure you’ll also appreciate CNC chess.

Continue reading “CNC Tic Tac Toe”

The Perils Of Buying A Stereo Microscope Without A Stand

scope

[Steve] has wanted a stereo microscope in his lab for years now. Since his eyesight is becoming progressively worse, he figured it was time to look around on ebay and see what he could dig up. He ended up buying a very cheap microscope without a stand, figuring he could build one rather easily. Well, the articulated stand was rather easy to put together, but it did take a whole lot of time to build.

The main goal of [Steve]’s project was to have his microscope at the end of an articulated arm. With this setup, he could easily tuck the ‘scope against the back of his workbench when not in use and easily bring it out when necessary. This meant building a custom arm, though, and in the building process [Steve] used just about every machine tool he had at his disposal.

The end result is a fully articulated arm that can be moved to just about any point on his workbench and adjusted up and down for those really weird project. [Steve] says this may be a great introduction to home powder coating, and he really should build a small LED light source, but we’re loving the project so far.

Continue reading “The Perils Of Buying A Stereo Microscope Without A Stand”

Building A Tool To Bend Small Metal Tubes

tube

[Joel] is setting up a really nice workshop. Included in his list of machinery are the staples of any workshop; a lathe, miter saw, containers full of organized screws, and a manual mill converted to a CNC machine. [Joel] wanted an oiling system for his mill, and like any good maker decided to fabricate his own. This required bending very small diameter brass tubes, something doable by hand (or without sand, at least). He decided to solve this problem with a DIY tube bending tool that allows him to bend tiny brass tubing without the walls collapsing.

[Joel] broke out his lathe and machined two brass rollers with a groove to hold his 3/16″ tubing. One of these brass rollers is attached to a handle, while the other is attached to a block that gets clamped into [Joel]’s bench vise. After threading some tubing through the rollers, [Joel] is able to bend it precisely with only a tiny bit of collapsing on small-radius bends.

A Portable CNC Mill

Proxxon

Second only to a lathe, a mill is one of the most useful tools to have in a shop. For [juppiter], though, a proper multi-ton mill would take up too much space and be a considerable investment. His solution to his space problem is actually very clever: he converted a small, inexpensive benchtop mill to CNC control, and put everything in a nice box that can be tucked away easily (Italian, here’s the translation).

The mill [juppiter] chose for the conversion was a Proxxon MF70, a very small mill made for jewelers and modelers. After buying a CNC conversion kit that included a few NEMA 17 motors, bearings, and mounting plates, [juppiter] set to work on driving these motors and controlling them with a computer. For the stepper drivers, a few industrial motor drivers were sourced on eBay, driven by an i3 miniITX computer built into the mill’s box. Control is through a touchscreen LCD and a Bluetooth keyboard and mouse.

So far, [juppiter] has crafted a very elegant wood and brass CNC controller that allows him to jog the axes around and set the home position. It’s an excellent build that really shows off the power and ability of these inexpensive desktop mills.

Olin College Penny Press

Olin Penny Press

Inspired by souvenir penny presses, [Robert] built the Olin College penny press. This machine stamps out coins with the school’s name and a variety of other patterns. He built it as part of a mechanical structures course, with the goal of designing something that used large forces.

Crushing a penny takes about five tons of force. To deliver that force, [Robert] used a 1 horsepower motor coupled to a custom 1190:1 reduction drive train, which consisted of sprockets, gears, and chains. The aluminium frame supporting the drive train also had to be designed to withstand large forces.

This required of a lot of custom parts, which were made using a CNC mill, a water jet cutter and a mill. All of the CAD drawings are available for anyone who wants to replicate the design.

This beast of a machine weighs about 90 pounds and can squish 12 pennies every minute. Olin College installed the penny press on their campus for anyone to use for free.

Converting A Chinese Laser Cutter To Work With Mach3

laser

Like most of us, [Chris] has pined over the very, very inexpensive Chinese laser cutters available on eBay for a while now. When most of us disregarded these machines due to their inability to work with the file formats commonly used with laser cutters, [Chris] took the plunge. He was a might disappointed the included software didn’t allow him to use his machine with Mach3 CNC software, so he replaced the included electronics board with one of his own design, giving him all the features of a more expensive laser cutter at a low, low Chinese eBay auction price.

The laser cutter [Chris] bought came with the moshidraw software and controller board that according to one auction can only use BMP, JPEG, WMF, EMF, and PLT files.Wanting a board that can use more common file formats such as PDF and DWG, [Chris] built his own board to communicate with his Mach3 software.

From what we can tell, the new board works with off-the-shelf Pololu stepper drivers and is a complete drop in replacement for the moshidraw board. He’s still finalizing the design, but when the layout, BOM, and schematic are finalized, [Chris] will be putting the files up for everyone to copy. Wonderful piece of work, [Chris].

Continue reading “Converting A Chinese Laser Cutter To Work With Mach3”