A Dead Photographic Format Rises From The Ashes

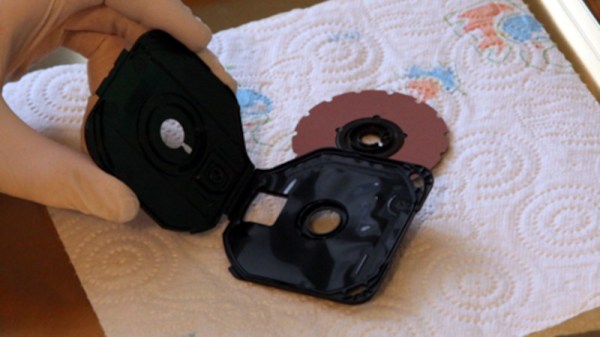
Sometimes we stumble upon a hack that’s not entirely new but which is still pretty exceptional. So it is with [Hèrm Hofmeyer]’s guide to recreating a film cartridge for the Kodak Disc photographic format. It’s written in 2020, but describing a project around a decade old.

The disc format was Kodak’s great hope in the 1980s, the ultimate in photographic convenience in which the film was a 16-shot circular disc in a thin cartridge. Though the cameras were at the consumer end of the market they were more sophisticated than met the eye, with the latest electronics for the time and some innovative plastic multi-element aspherical lenses. It failed in the face of better compact 35 mm cameras because the convenience of the disc wasn’t enough to make up for the relatively small negative and that few labs had the specialized printing equipment to get the best results from the format. The cameras faded from view, and the film ceased manufacture at the end of the 1990s.

The biggest hurdle to creating a Disc cartridge comes in the cartridge shells themselves. It’s solved by sourcing them second-hand from Film Rescue International, a specialist in developing expired photographic film. The stages follow the cutting of a film disc, perforating its edges, and fitting it into the cartridge. It’s an exact enough process in the pictures, and it’s worth remembering that in the real cartridges it must be done in the dark.

This is an interesting piece of work for anyone with an interest in photography, and while the Disc cameras were always a consumer snapshot camera we can see that it would appeal to those influenced by Lomography. We wish we could get our hands on a Disc cartridge, an maybe CAD up a 3D printable version to make it more accessible.

Raspberry Pi Crammed Into Old Film Camera

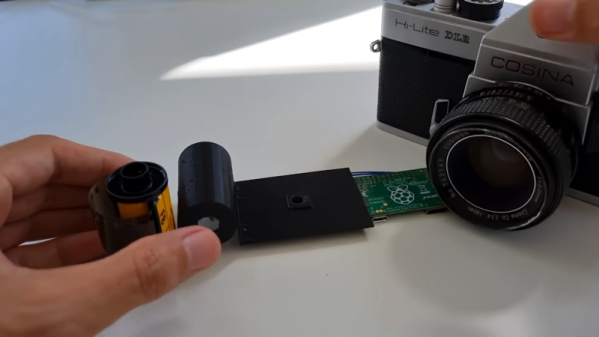
If you wanted an expensive film camera when you were a kid, you are in luck. Used film SLRs are super cheap now that everyone wants digital cameras. Of course, in reality, you want a digital camera, too. So do what [befinitiv] did. Make a film cartridge out of a Raspberry Pi that can convert your camera to digital. (Video, embedded below.)

In theory, this sounds like a genius idea. The practical aspect isn’t perfect, though. For one thing, the small image sensor used means that the camera is zoomed in quite a bit. Also, the shutter button isn’t integrated, so the shutter is open all the time. You may think that doesn’t matter, but don’t forget that the way an SLR works means if the shutter is open, there’s no viewfinder.

Continue reading “Raspberry Pi Crammed Into Old Film Camera”

Large Format Lego Camera Is A Bit Near-Sighted

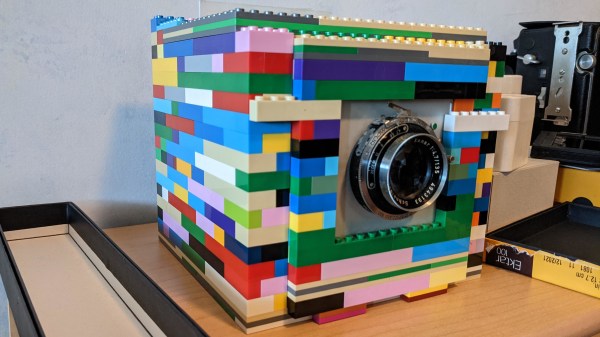
Photography doesn’t have to be expensive, something that’s especially true in the realm of film photography, where the imperfections of the medium can be half the appeal. There are many DIY plans and kits available for analog cameras, but [bhiga143] had couple spare components and a pile of small, colorful bricks lying around, so he decided to build a functional 4×5″ film camera out of Lego.

Details are light for this build, but with a little knowledge about camera structure we can guess at what’s going on inside. Simplicity makes for robust design, and what we have here is in effect a box with a lens on one side and photographic film on the other. The center section of the front, which actually supports the lens, is capable of sliding in and out to adjust focus. On the far side (not pictured) is a slot just wide enough to insert a standard film holder.

The camera really is a hack. [bhiga143] stayed true to the “Lego” part of Lego camera, so there is no glue, no black paper lining, and no frills. The tripod is whatever stack of books lay underneath it. The lens is, quote, “barely functional”. There are light leaks galore, and it can’t focus beyond about 3 feet (1 meter). But every one of those points just makes us love it more. Every nugget of imperfection is a few words added to the story each picture tells. And we honestly can’t wait to see more pictures.

Other Lego cameras we’ve seen have been smaller and less colorful, but using a simple pinhole lens can reduce the overall cost. Of course, you’re not limited to Lego if you want to build your own pinhole camera. Although, the ubiquitous plastic bricks can also be useful in later stages of the film photography process.

Converting Film Camera To Digital The Hard Way

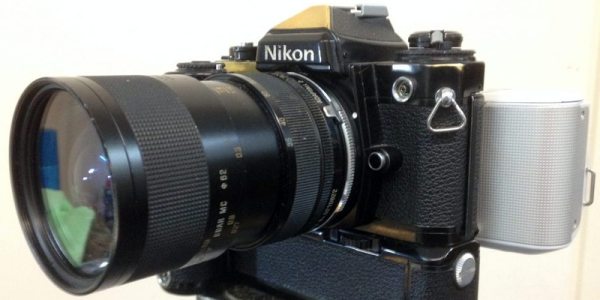
[Robin] is a hobby photographer with some very nice old film camera gear. But who has the money or patience for developing film these days? (Well, lots of people, especially artists, but that’s a different Hackaday article.) So to update his old gear without breaking the bank, he glommed a Sony Nex digital camera onto the back of a nice old Nikon, and documented the process for us.

A friend of mine once said, “never underestimate what a good engineer can do with a file and patience.” [Robin]’s hack essentially consists of grinding the Sony’s CMOS sensor to fit exactly where the film plane would be in the old Nikon. For him, this meant relocating the IR filter glass, because it wouldn’t fit with the shutter, and then slowly and accurately trimming down the edges of the CMOS sensor’s retaining frame until it was just right.

Continue reading “Converting Film Camera To Digital The Hard Way”

A 3D Printed Camera (Including The Lens)

Barring the RepRap project, we usually see 3D printers make either replacement parts or small assemblies, not an entire finished product. [Amos] is the exception to this rule with his entirely 3D-printed camera. Everything in this camera is 3D printed, from the shutter to the lightproof box to the lens itself. It’s an amazing piece of engineering, and a testament to how far 3D printing has come in just a few short years.

35mm film is the most common film by far, and the only one that’s still easy to get and have developed at a reasonable price. This 3D-printed camera is based on that standard, making most of the guts extremely similar to the millions of film cameras that have been produced over the years. There’s a film cartridge, a few gears, a film takeup spool, and a lightproof box. So far, this really isn’t a challenge for any 3D printer.

The fun starts with the lens. We’ve seen 3D printers used for lens making before, starting with a 3D print used to create a silicone mold where a lens is cast in clear acrylic, 3D printed tools used to grind glass, and an experiment from FormLabs to 3D print a lens. All of these techniques require some surface finishing, and [Amos]’ lens is no different. He printed a lens on his Form 2 printer, and started polishing with 400 grit sandpaper. After working up to 12000 grit, the image was still a bit blurry, revealing microscopic grooves that wouldn’t polish out. This led him to build a tool to mechanically polish the lens. This tool was, of course, 3D printed. After polishing, the lens was ‘dip polished’ in a vat of uncured resin.

The shutter was the next challenge, and for this [Amos] couldn’t rely on the usual mechanisms found in film cameras. he did find a shutter mechanism from 1885 that didn’t take up a lot of depth, and after modeling the movement in Blender, designed a reasonable shutter system.

Building an entire camera in a 3D printer is a challenge, but how are the pictures? Not bad, actually. There’s a weird vignetting, and everything’s a little bit blurry. It’s hip, trendy, and lomo, and basically amazing that it works at all.

Hack Your Own Analog Camera

We remember making pinhole cameras as kids out of cigar boxes. The Focal Camera website wants to enable you to make sophisticated cameras from a selection of building blocks. We’re talking cameras with film, not digital cameras (although we wondered if you could mount an image sensor… but that’s another hack).

The modules do require access to a laser cutter, and you’ll need to scrounge or otherwise acquire things like mirrors and lenses. The site has advice on how to hack things like first surface mirrors out of cheap items like acrylic mirrors.

The intent is to be able to build up your own cameras from the modules. They do have a pinhole camera, in case you are nostalgic, but you could also build SLRs, large format cameras, or even stereo cameras. Not all the modules are ready yet, but there are several example cameras and pictures taken with them on the site. Like most building blocks, the real treat will be when users begin to combine them in unexpected ways.

Continue reading “Hack Your Own Analog Camera”

Hackaday Links: January 12, 2014

hackaday-links-chain

[Kyle] teaches photography and after being dismayed at the shuttering of film and darkroom programs at schools the world over decided to create a resource for film photography. There’s a lot of cool stuff on here like mixing up a batch of Rodinal developer with Tylenol, lye, and sodium sulphite, and assessing flea market film cameras. There are more tutorials coming that will include setting up a dark room, developing prints, and playing around with large format cameras.

[hifatpeople] built a binary calculator out of LEGO® bricks or toys. It started off as a series of logic gates built out of LEGO® bricks or toys in the LEGO® Digital Designer. These logic gates were combined into half adders, the half adders combined into full adders, and the full adders combined into a huge plastic calculator. Unfortunately, buying the LEGO® bricks or toys necessary to turn this digital design into a physical model would cost about $1000 using the LEGO® Pick-A-Brick service. Does anyone have a ton of LEGO® Technic® bricks or toys sitting around? We’d love to see this built.

Think you need a PID controller and fancy electronics to do reflow soldering in a toaster oven? Not so, it seems. [Sivan] is just using a meter with a thermocouple, a kitchen timer, and a little bit of patience to reflow solder very easily.

The folks at DreamSourceLabs realized a lot of electronic test equipment – from oscilloscopes and logic analyzers to protocol and RF analyzers were all included a sampling circuit. They designed the DSLogic that puts a sampler and USB plug on one board, with a whole bunch of different tools connected to a pin header. It’s a pretty cool idea for a modular approach to test equipment.

Adafruit just released an iDevice game. It’s a resistor color code game and much more educational than Candy Crush. With a $0.99 coupon for the Adafruit store, it’s effectively free if you’re buying anything at Adafruit anytime soon. Check out the video and the awesome adorable component “muppets”.