Take Control Of Your DSLR With PiXPi

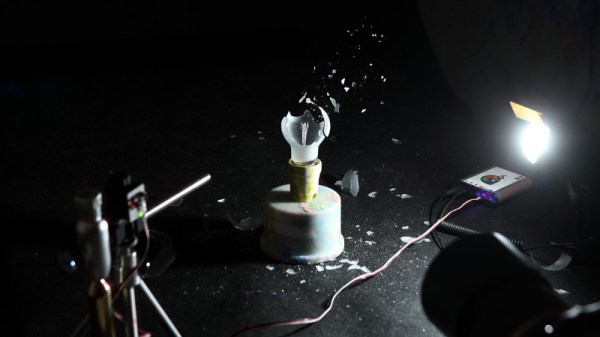
If you’ve ever tried to take a picture of a fast moving object, you know how important timing is. You might only have one chance, and if you hit the shutter a bit too early or too late, the shot could be ruined. Past a certain point, no human camera operator can react quickly enough. Which is exactly why [Krzysztof Krześlak] created PiXPi.

In the past we’ve seen high-speed flashes designed to “freeze time” by illuminating the scene at the precise moment, and while PiXPi can technically do that, it also offers a few alternate methods of capturing that perfect moment. The idea here is to give the photographer the best chance of getting the shot they’re after by offering them as many tools as possible.

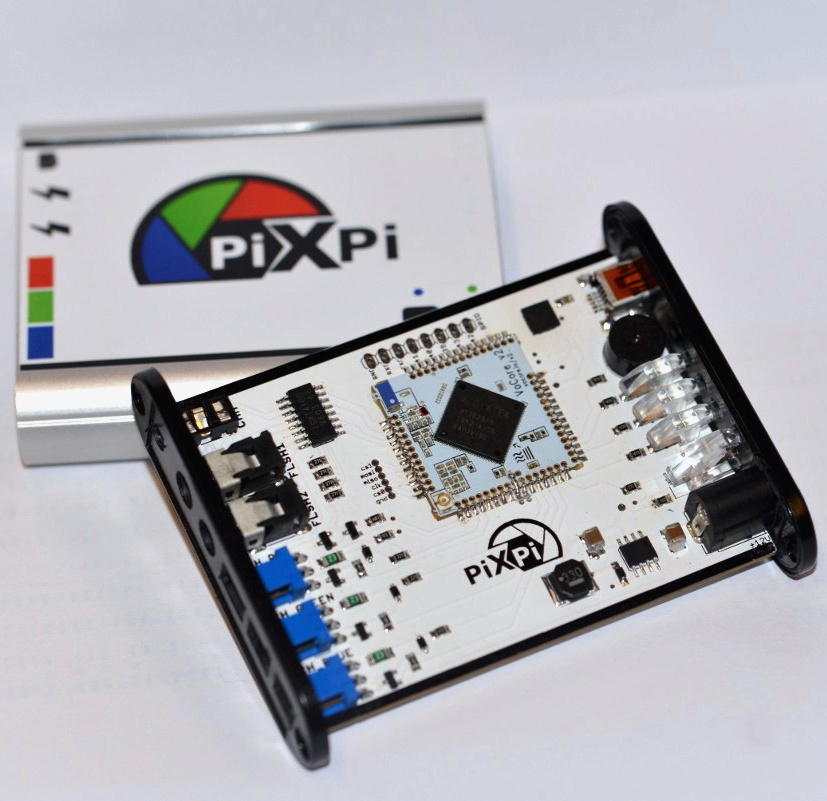
Essentially, PiXPi is a microcontroller that allows you to orchestrate your DSLR’s trigger, external flashes, and various other sensors and devices using an easy to use graphical programming interface from your smartphone. So for example, you could program the PiXPi to trigger your camera when it detected a loud enough noise.

But the device also allows you to be a bit more proactive. Rather than sitting back and waiting for a signal to fire off the camera, the PiXPi can directly take control of the action. As an example, [Krzysztof] has created an electronically triggered valve which can release a drop of liquid on command. Using PiXPi, the photographer can quickly put together a routine that triggers a drop, waits the few milliseconds it takes for it to hit the target, and then snaps a picture.

The goal of the 2019 Hackaday Prize is to develop a product fit for production, and naturally a huge part of that is having a well thought-out design. But if you’re ultimately looking to sell said product, it’s also very important to keep the needs of the end user in mind. To that end, we think [Krzysztof] has done a great job by not only making the system very flexible, but keeping it easy to use.

Continue reading “Take Control Of Your DSLR With PiXPi”

High Speed Photography With Friggin’ Lasers

[Bruce] built his own high-speed photography equipment for a fraction of the price it would have cost him to purchase it. He was inspired by a friend who showed him some example images. He headed into his shop and built an Arduino-based high-speed flash controller.

To capture an image like this one the camera is placed in a dark room and set for a long exposure. At just the right instant the flash is activating, capturing the image. In this case [Bruce] used an infrared laser diode pointed at a phototransistor to trigger the flash. When the droplet breaks the laser beam the Arduino triggers the flash after a calculated delay. It’s not specifically covered in his guide, but [Bruce] also mentions that this can be modified to use sound as a trigger. Here’s another sound-activated flash controller if you need inspiration.

The image at the top was made by dropping dye from a pipette into a pool of water. If you don’t have a pipette on hand you can head over to our LIFE blog to make one out of heat shrink tubing.

Flash Controller Works With Point And Shoot Cameras

Needless to say, there’s a world of difference between the expensive DSLR cameras professional photographers use and the point-and-shoot models carried by commoners. One such difference is the ability to use slave flashes – a second flash set off to the side of the subject for better illumination. Most of these slave flash units are triggered when they see a bright light, or when the on-camera flash goes off. Point and shoot models usually have a ‘pre-flash’ that cause a slave flash to trigger prematurely. [Kerry] built a really neat slave flash that is able to work with these point-and-shoot cameras, and is pretty easy to build as well.

There are two options when it comes to building a flash that can work with a point-and-shoot: First, measure the time between the pre-flash and real flash, and then simply delay the slave flash. This option has a few problems. Even when [Kerry] tested this technique on the same camera, the delay between the flashes were never consistant.

The second option is to simply ignore the pre flash and synchronize with the main flash. This is a little harder, but if done right this technique is nearly foolproof.

[Kerry] ended up building a small circuit out of a 556 timer chip and an LM339n comparator that turns itself ‘on’ just a little bit after it sees the pre flash. From there, the device looks for the main flash and triggers itself whenever it sees another bright source of light.

The finished product works beautifully, and is simple enough for just about anyone to build on a piece of perf board.