Do you happen to have any 15,000 volt capacitors sitting around? [Ludic Science] didn’t so he did the next best thing. He built some.
If you understand the physics behind a capacitor (two parallel conductors separated by a dielectric) you won’t find the build process very surprising. [Ludic] uses transparency film as an insulator and aluminum foil for the conductive plates. Then he wraps them into a tube. He did throw in a few interesting tips about keeping the sheets smooth and how to attach the wires to the foil. The brown paper wrapper reminded us of old caps you might find in an antique radio.
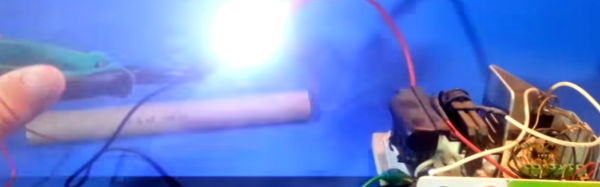
The best part by far, though, was the demonstration of drawing an arc from a high voltage power supply with and without the capacitor in the circuit. As you might expect, playing with a few thousand volts charged into a capacitor requires a certain amount of caution, so be careful!
[Ludic] measured the capacitance value with a standard meter, but it wasn’t clear where the 15,000 volt rating came from. Maybe it was the power supply he used in the video and the capacitor could actually go higher.