Dodge, The Weird Tripod Robot

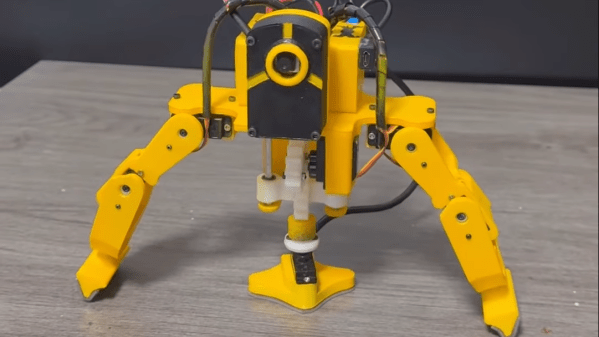
[hannu_hell] created Dodge as a “novel design of tripod.” It’s a small robotic device quite unlike anything else we’ve seen of late. It’s intended to be a self-mobile camera platform that can move itself around to capture footage as needed.

Dodge is essentially a two-legged robot with a large flat “foot” in the center. When stationary, it rests on this flat foot. When it needs to move, it can raise this center foot and rest on its two outside legs. If Dodge needs to move, it can crab back and forth in a line with these two legs. If it wants to turn, it can return to resting on its center foot, and pivot about its central axis. It can thus rotate itself and use its two outer legs to move further as needed.

Dodge does all this while carrying an ESP32 Cam module. The idea is that it’s a small mobile tripod platform with a live camera feed. It reminds us of various small monitoring robots from cartoons and anime.

Ultimately, it’s an interesting take on robot locomotion. Rather than walking with two legs or four legs and dynamic stability, it takes full advantage of static stability instead.

We’ve seen some wild roboticized camera rigs over the years. Video after the break.

Continue reading “Dodge, The Weird Tripod Robot”

A Concrete Solution To Balance And Protect Camera Gear

Knocking over expensive camera equipment is an unfortunate occupational hazard when filming projects in a workshop. [Dane Kouttron] wanted to stop sacrificing lights to the cause, so he came up with a practical use for a weeble: A self-stabilizing monopod.

Inspired by a giant scale weeble built by [Colin Furze], [Dane] first did the math to determine the parameters for the build. It’s all about achieving torque equilibrium with a hemisphere of concrete, and [Dane] walks us through the equations, arriving at the conclusion that a 2 lb. camera on 4 foot pole, one needs a hemisphere with a mass of 28 lbs. and a radius of just under 4 inches. To achieve this weight in the given volume would require extra dense concrete with steel shot added.

After some CAD work and 3D printing the 4-part mold was assembled, with RTV silicone sealant acting as both adhesive between the parts and mold release agent. [Dane] first did a test mold with concrete he had laying around. With success achieved, he pursued the real mix but had issues with an error in the concrete-water ratio and the difficulty of mixing in the steel shot. On the second attempt he managed to extract a functional hemisphere from the mold, with the pole held in position during curing by a 3D printed bracket.

The hemisphere bottom of the hemisphere has a flat spot to keep it stable when bumped lightly. [Dane] added a Manfroto quick-release mount to the end of the pole to allow easy attachment of lights and cameras. It might be a bit hefty to carry around, but it’s takes up less floor space than a tripod and is sure to save [Dane] from expensive bumps-turned-crashes.

Camera cranes, small and large, are another great tool for workshop cinematography. For sheer overkill it would be hard to beat an 8-axis workshop-sized motion control robot.

3D Printed Camera Crane For The Workshop

When you make a living building stuff and documenting the process camera setups take up a lot of time, breaking expensive equipment is an occupational hazard. [Ivan Miranda] knows this all too well, so he built a fully-featured camera crane to save his time and camera equipment. Video after the break.

The basic design is a vertical mast with a pivoting camera mounted to the end. The aluminum mast telescopes for increased vertical adjustability, and rides on a plywood base with caster wheels. The aluminum pivoting arm is counterweighed to offset the camera head, and a parallel bar mechanism allows the camera to hold a constant vertical angle with the ground. Thanks to the explosion of home gyms during the pandemic, gym weights were hard to find, so [Ivan] used an ammo can filled with sand and screws instead. A smaller sliding counterweight on top of the arm allows for fine-tuning. [Ivan] also wanted to be able to do horizontal sliding shots, so he added a pulley system that can be engaged with a clutch mechanism to keep a constant horizontal angle with the camera. Most of the fittings and brackets are 3D printed, some of them no doubt on his giant 3D printer.

We can certainly see this crane meeting its design objectives, and we can’t help but want one ourselves. [Alexandre Chappel] also built a camera crane a while back which utilized a completely different arm mechanism. As cool as these are, they still pale in comparison to [mingul]’s workshop-sized 8-axis CNC camera crane. Continue reading “3D Printed Camera Crane For The Workshop”

DIYing A High End Camera Arm

One of the first purchases for anyone looking to shoot video should be a tripod. Key to getting clean and stable shots, they can nevertheless be limiting in their range of motion. Wanting something a little more high-end, but dissatisfied with the high cost of commercial options, [Alexandre Chappel] decided to build his own camera arm.

The build is based around square alumiunium tubing, with the high-tolerance material acting as the arm’s vertical and horizontal rails. 3D printed brackets and adapters are used to bolt everything together, along with several printed components used as drilling guides to help accurately machine the aluminium tubes. Adjustment is built into the carriages that travel along the rails, to help account for any slop in the 3D printed parts. A counterweight system is then installed to ensure the camera doesn’t hit the floor when not in the locked position.

It’s a tidy build, and one that has given [Alexandre] far more flexibility to shoot than his existing tripods. Additionally, adjusting the camera position is much quicker than before. Of course, when you’re building your own rigs, the sky is the limit. Video after the break.

Continue reading “DIYing A High End Camera Arm”

Giant Bearing Is At The Heart Of A Camera Mount

We bet you have all some cool part in your bin that is just gnawing at you to build something cool. That doodad, possibly from a garage sale, surplus store, or clearance rack deserves a project fitting of its near-infinite potential. [isaac879] finally marries a giant ball bearing with his passion for photography in the form of a pan-tilt camera mount for his Canon DSLR. The problem with tossing your golden-ticket part into a project is that not everyone has a MacGuffin, or a brand new one might be bank-breakingly expensive, so he does us a favor and makes a drop-in replacement that you can print and fill with 6mm brass bbs. This sort of thing is why we love hackers.

The camera mount has the features we expect to see in a robust stepper mount, such as infinite spinning, time delay, and an Xbox controller interface. Inside the base is the industrial bearing or its plastic replica, and that wide base won’t be tipping over anytime soon. Gearing all around is of the herringbone style, of the type you find in classroom pencil sharpeners because they transfer power smoothly. Speaking of things going smoothly, we enjoyed his assembly montage where every part fits together perfectly and there is not a naughty word to be uttered. Just like real life.

If you like homemade bearings, check out this slew bearing that looks like it was made with Perler beads, and we have a self-aligning camera tripod mount for the photography buffs.

Continue reading “Giant Bearing Is At The Heart Of A Camera Mount”

A Modular Mounting System Via 3D Printing

When working with cameras or other tools, it can often be useful to have some manner of stand or tripod to hold things in position, freeing up one’s hands for other tasks. Unfortunately, when it comes to smaller cameras and devices like smartphones and tablets, there are few standardized solutions. [yyh1002] has skirted the problem by creating a customizable modular mounting system, and it’s taken the 3D-printing world by storm.

The system was inspired by GoPro mounts, which are a system of plastic arms and screws that can effectively position the small devices in all manner of orientations. [yyh1002]’s system is GoPro-compatible, using the same fasteners and similar geometry, and tons of other modelers have added on.

The parts are 3D printed and consist of a series of arms, clamps and joints that can be configured to suit the task at hand. Source files are available, which allows custom version to be made. This is useful for modifying parts like phone holders to suit different models, to avoid fouling buttons or interfering with camera placement. Thus far, the community has contributed parts as diverse as G-clamps, camera mounts, and parts to mate to Playstation controllers. (Editor’s note: I’m actually printing out a Pi Zero case from this series as I edit this post. Coincidence!)

It’s a useful system, and we look forward to seeing more parts uploaded in future. Meanwhile, don’t forget – it’s remarkably easy to tripod mount just about anything.

A 3D Printed Kinematic Camera Mount

[Enginoor] is on a quest. He wants to get into the world of 3D printing, but isn’t content to run off little toys and trinkets. If he’s going to print something, he wants it to be something practical and ideally be something he couldn’t have made quickly and easily with more traditional methods. Accordingly, he’s come out the gate with a fairly strong showing: a magnetic Maxwell kinematic coupling camera mount.

If you only recognized some of those terms, don’t feel bad. Named for its creator James Clerk Maxwell who came up with the design in 1871, the Maxwell kinematic coupling is self-orienting connection that lends itself to applications that need a positive connection while still being quick and easy to remove. Certainly that sounds like a good way to stick a camera on a tripod to us.

But the Maxwell design, which consists of three groves and matching hemispheres, is only half of the equation. It allows [enginoor] to accurately and repeatably line the camera up, but it doesn’t have any holding power of its own. That’s where the magnets come in. By designing pockets into both parts, he was able to install strong magnets in the mating faces. This gives the mount a satisfying “snap” when attaching that he trusts it enough to hold his Canon EOS 70D and lens.

[enginoor] says he could have made the holes a bit tighter for the magnets (thereby skipping the glue he’s using currently), but otherwise his first 3D printed design was a complete success. He sent this one off to Shapeways to be printed, but in the future he’s considering taking the reins himself if he can keep coming up with ideas worth committing to plastic.

Of course we’ve seen plenty of magnetic camera mounts in the past, but we really like the self-aligning aspect of this design. It definitely seems to fit the criterion for something that would otherwise have been difficult to fabricate if not for 3D printing.