DIY Mini Helical Antennas From Salvaged Co-ax Cable

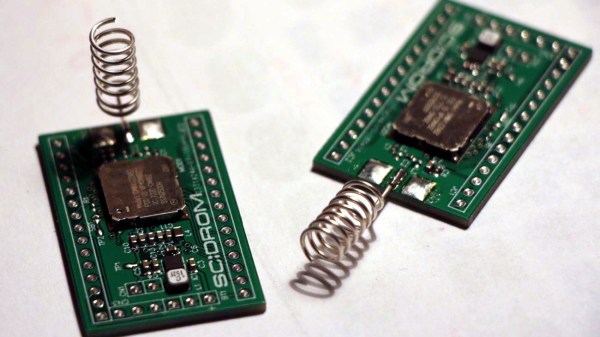
[Mare] has a visual guide and simple instructions for making DIY mini helical 868 MHz antennas for LoRa applications. 868 MHz is a license-free band in Europe, and this method yields a perfectly serviceable antenna that’s useful where space is constrained.

A metric 5 mm drill bit makes a convenient core.

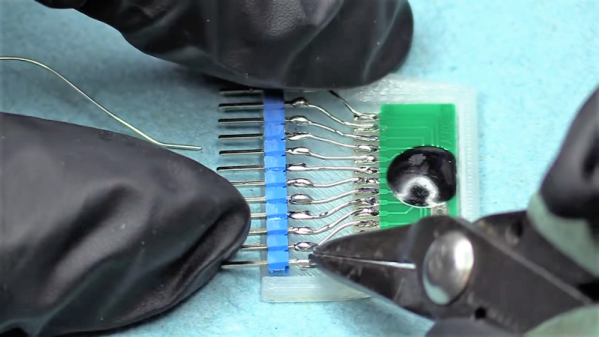
The process is simple and well-documented, but as usual with antenna design it requires attention to detail. Wire for the antenna is silver-plated copper, salvaged from the core of RG214U coaxial cable. After straightening, the wire is wound tightly around a 5 mm core. 7 turns are each carefully spaced 2 mm apart. After that, it’s just a matter of measuring and bending the end for soldering to the wireless device in question. [Mare] has used this method for wireless LoRa sensors in space-constrained designs, and it also has the benefit of lowering part costs since it can be made and tested in-house.

Antennas have of course been made from far stranger things than salvaged wire; one of our favorites is this Yagi antenna made from segments of measuring tape.

A Candle Powered Guitar Pedal

When it comes to guitar effects pedals, the industry looks both back and forward in time. Back to the 50’s and 60’s when vacuum tubes and germanium transistors started to define the sound of the modern guitar, and forward as the expense and rarity of parts from decades ago becomes too expensive, to digital reproductions and effects. Rarely does an effects company look back to the turn of the 19th century for its technological innovations, but Zvex Effects’ “Mad Scientist,” [Zachary Vex], did just that when he created the Candela Vibrophase.

At the heart of the Candela is the lowly tea light. Available for next to nothing in bags of a hundred at your local Scandinavian furniture store, the tea light powers the Zvex pedal in three ways: First, the light from the candle powers the circuit by way of solar cells, second, the heat from the candle powers a Stirling engine, a heat engine which powers a rotating disk. This disc has a pattern on it which, when rotated, modifies the amount of light that reaches the third part of the engine – photoelectric cells. These modulate the input signal to create the effects that give the pedal its name, vibrato and phase.

Controls on the engine adjust the amount of the each effect. At one end, the effect is full phasor, at the other, full vibrato. In between a blend of the two. A ball magnet on a pivot is used to control the speed of the rotating disk by slowing the Stirling engine’s flywheel as it is moved closer.

While more of a work of art than a practical guitar effect, if you happen to be part of a steam punk inspired band, this might be right up your alley. For more information on Stirling engines, take a look at this post. Also take a look at this horizontal Stirling engine.

Continue reading “A Candle Powered Guitar Pedal”

A Hacked Solution For Non-Standard Audio Modules

When life hands you lemons, lemonade ends up being your drink of choice. When life hands you non-standard components, however, you’ve got little choice but to create your own standard to use them. Drinking lemonade in such a situation is left to your discretion.

The little audio record and playback modules [Fran Blanche] scored from eBay for a buck a piece are a good example. These widgets are chip-on-board devices that probably came from some toy manufacturer and can record and playback 20 seconds of audio with just a little external circuitry. [Fran] wants to record different clips on a bunch of these, and pictured using the card-edge connector provided to plug them the recording circuit. But the pad spacing didn’t fit any connector she could find, so she came up with her own. The module and a standard 0.1″ (2.54 mm) pitch header are both glued into a 3D-printed case, and the board is connected to the header by bonding wires. It makes a nice module that’s easily plugged in for recording, and as [Fran] points out, it’s pretty adorable to boot. Check it out in the video below.

Sure, the same thing could have been accomplished with a custom PCB breaking out the module’s pins to a standard card-edge connector. But [Fran] knows a thing or two about ordering PCBs, and our guess is she wanted to get this done with what was on hand rather than wait for weeks. There’s something to be said for semi-instant gratification, after all. And lemonade.

Continue reading “A Hacked Solution For Non-Standard Audio Modules”

A 3D Printed Kinematic Camera Mount

[Enginoor] is on a quest. He wants to get into the world of 3D printing, but isn’t content to run off little toys and trinkets. If he’s going to print something, he wants it to be something practical and ideally be something he couldn’t have made quickly and easily with more traditional methods. Accordingly, he’s come out the gate with a fairly strong showing: a magnetic Maxwell kinematic coupling camera mount.

If you only recognized some of those terms, don’t feel bad. Named for its creator James Clerk Maxwell who came up with the design in 1871, the Maxwell kinematic coupling is self-orienting connection that lends itself to applications that need a positive connection while still being quick and easy to remove. Certainly that sounds like a good way to stick a camera on a tripod to us.

But the Maxwell design, which consists of three groves and matching hemispheres, is only half of the equation. It allows [enginoor] to accurately and repeatably line the camera up, but it doesn’t have any holding power of its own. That’s where the magnets come in. By designing pockets into both parts, he was able to install strong magnets in the mating faces. This gives the mount a satisfying “snap” when attaching that he trusts it enough to hold his Canon EOS 70D and lens.

[enginoor] says he could have made the holes a bit tighter for the magnets (thereby skipping the glue he’s using currently), but otherwise his first 3D printed design was a complete success. He sent this one off to Shapeways to be printed, but in the future he’s considering taking the reins himself if he can keep coming up with ideas worth committing to plastic.

Of course we’ve seen plenty of magnetic camera mounts in the past, but we really like the self-aligning aspect of this design. It definitely seems to fit the criterion for something that would otherwise have been difficult to fabricate if not for 3D printing.

Many Ways To Drive A Small Motor

Tiny motors used for haptic feedback and vibration come in a variety of shapes and sizes. The most familiar is the “eccentric rotating mass” (ERM) variety which just spins an imbalanced weight on a small motor and comes packaged in two form factors. The classic is the pager “pager motor” which just looks like a tiny, adorable motor and the squat cylindrical “pancake style”. ERMs are simple to use but provide imprecise response when compared to their new-age cousin the “linear resonant actuator”. Unlike the motor in an ERM, LRAs are typically an enclosed mass on a spring placed near a coil which pushes the mass back and forth. The name LRA might not be familiar but Apple’s branded implementation, the Taptic Engine, might be a little more recognisable.

[Precision Microdrives] is a vendor of these sorts of devices who happens to have a pleasantly approachable set of application notes covering any conceivable related topic. A great place to start is this primer on ways to drive motors with constant voltage in a battery powered environment. It starts with the most simple option (a voltage divider, duh) and works through a few other options through using an LDO or controller.

If you’re thinking about adding haptics to a project and are wondering what kind of actuator to use (see: the top of this post) AB-028 is a great resource. It has a thorough discussion on the different options available and considerations for mounting location, PCB attachment, drive modes, and more. Digging around their site yields some other interesting documents too like this one on mounting to fabric and other flexible surfaces. Or this one on choosing PWM frequencies.

Of Roach Killer And Rust Remover: Sam Zeloof’s Garage-Made Chips

A normal life in hacking, if there is such a thing, seems to follow a predictable trajectory, at least in terms of the physical space it occupies. We generally start small, working on a few simple projects on the kitchen table, or if we start young enough, perhaps on a desk in our childhood bedroom. Time passes, our skills increase, and with them the need for space. Soon we’re claiming an unused room or a corner of the basement. Skills build on skills, gear accumulates, and before you know it, the garage is no longer a place for cars but a place for pushing back the darkness of our own ignorance and expanding our horizons into parts unknown.

It appears that Sam Zeloof’s annexation of the family garage occurred fairly early in life, and to a level that’s hard to comprehend. Sam seems to have caught the hacking bug early, and by the time high school rolled around, he was building out a remarkably well-equipped semiconductor fabrication lab at home. Sam has been posting his progress regularly on his own blog and on Twitter, and he dropped by the 2018 Superconference to give everyone a lesson on semiconductor physics and how he became the first hobbyist to produce an integrated circuit using lithographic processes.

Continue reading “Of Roach Killer And Rust Remover: Sam Zeloof’s Garage-Made Chips”

Super Mario Bros 2 Player Rom Hack

NES Hack Lets The Mario Bros. Play Together

Being relegated to player two used to be a mark of disgrace in the 8-bit era of videogames. Between never being to select a level and having to wait your turn to play, the second player experience was decidedly third rate. Super Mario Bros. on the Nintendo Entertainment System was no different in this regard as it offered no character selection option and also required players to alternate taking control upon failing stages. It made the two player mode more like playing in parallel than actually together. However, there is a new ROM Hack for the original Super Mario Bros. from [Corpse Grinder] that allows players to play as the Brothers Mario simultaneously. Finally, a true co-op experience.

It’s important to note that the level power-ups have not been doubled-up in the patch, so this will no doubt be some friendly competition. Also it would be in both players interest to play with someone around their same skill level as any player dying in a level will cause both to start back at the last checkpoint. Not to worry, [Corpse Grinder] appears to have yet another Super Mario Bros. co-op patch in the works with this video from their YouTube channel below.

Whether you dump your own NES cartridge or extract the ROM image of Super Mario from a Virtual Console download, the patch itself comes in the form of a XDelta file. In order to apply the patch to a ROM image of Super Mario Bros. you’ll need a program like xdelta UI. Make sure to backup a copy of the ROM image before applying the patch, because this process is a one-way street.

Continue reading “NES Hack Lets The Mario Bros. Play Together”