Logging Two Multimeters At (nearly) The Same Time

log-two-multimeters-at-one-time

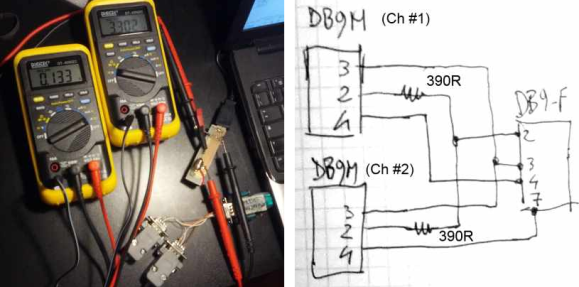
It’s pretty common to have at least a couple of meters around to measure different values of a circuit at the same time. Where [Emilio P.G. Ficara] ran into a problem was logging the data from both at once. These Fluke meters have a serial-out, but his computer only has a single serial-in port. He cracked open one of the meters and figured out how to log data from both at the same time.

A lot of folks would look to a microcontroller to solve this problem. You use the chip to pull from each meter simultaneously and report back to a computer (or just dump the values onto an SD card). But this solution is a simple mechanical connector and a bit of creative programming. The way the serial output is set up on these meters they won’t interfere with each other as long as they’re read one at a time. [Emilio] wired them up as seen above, using his own software to manage the pins of the serial port. The example output he posted shows readings from the meters taken within about a tenth of second from each other. That should be good enough for most applications.

Upgrading A Fluke Multimeter With A Masterful Addition

LCD

The old Fluke 8050a multimeter from the 80s is an awesome piece of lab equipment. It’s built like a tank, and thanks to the newer more portable models, this old meter is available for a pittance on eBay. [Ken] picked up a few of these meters and decided to give one of them a little upgrade – a 2.2″ 320×240 LCD display that is a vast improvement on the old stock seven-segment numerical display.

Inside the Fluke 8050a is a 40-pin DIP processor that handles all the computations inside the unit. [Ken]’s solution to tap into this processor was to take a 40-pin PIC microcontroller, bend some of the pins backwards, and use the remaining pins to drive the new LCD display. It’s actually somewhat brilliant in its simplicity and looks really cool to boot.

The rest of the circuitry consists of a level converter and a few wires going directly to the LCD display. [Ken] already has another Fluke 8050a on the bench waiting for a facelift and some plans for a few improvements that include a bar graph, histogram, and possibly even a touch display.

EEPROM Hack Unlocks Crippled Features In Agilent Multimeter And LCR Meter

u1241a-agilent-hack

[Gnif] was doing what any good hacker does… poking around the insides of one of his tools to see how it works. While in there, he discovered that an EEPROM hack could make the Agilent U1241A function like the U1242A.

If you’re into this kind of thing the Rigol 1052e hack should have already popped to mind. That was a firmware crippled device that, when unlocked, made the cheaper model behave the same ways as it’s $400 more expensive sibling. This doesn’t have quite the same impact, as the price difference is somewhere between $20-$100. Still, this stuff is just cool, right?

A few posts down in the thread linked above [Gnif] shares the story of how he found the hack. After shorting the i2c lines of the EEPROM while powering up the meter he was able to see that the device initializes a lot of its values to 0xFF when it can’t find the stored data. The next step was to use an STM32 board to dump the EEPROM contents. With the backup file stored safely he started changing values and reflashing the chip. Through this process he discovered that switching one byte from 0x01 to 0x02 enabled the higher model’s features. It also works for upgrading the U1732C to the U1733C feature set.

Electric Clothes Drier Repair Heats Things Up

clothes-dryer-fix

[How To Lou] sure has shown us how to do quite a few things. This time he’s dealing with an electric clothes dryer that won’t heat. We’ve been elbow deep in our own appliances and we think [Lou’s] matter-of-fact demonstration will help you gain the confidence to investigate problems before deciding if it’s a job to be relegated to the repair man.

This picture shows the back side of a clothes dryer after having a protective panel removed. Just out of frame is a functional schematic which lists each part and it’s resistance measurement. Lou has labelled those parts in this image to help us understand what we’re looking at. In the video after the break he begins doing the same troubleshooting that a repair would use. He grabbed his multimeter and used it to test the resistance of each component after removing the wires from it. All of them should read zero Ohms except for the heater coil which the schematic rates at 7.8-11.8 Ohms. The high limit thermostat is loose and measures an infinite resistance. This, coupled with the charred wire on one side is the culprit. As with that ice maker repair from yesterday, [Lou] searches for the numbers on the part to find the replacement he needs.

Continue reading “Electric Clothes Drier Repair Heats Things Up”

Multimeter Add-on Lets You Measure Tiny Resistance Values

This multimeter add-on is called the Half Ohm. It allows you to measure small resistance values, and can be used to track down shorts on a PCB.

The board acts as a pass-through for both probes. When your meter is set to measure voltage and nothing is connected to the probes the display will read out the level of the coin cell that powers the add-on. When you are probing, the value in millivolts is actually showing the resistance in milliohms. This works for any measurement less than one Ohm. Interestingly enough, it will help you zero in on a solder bridge. By probing the two shorted tracks you can find the issue by following the falling resistance values.

[Jaanus] published several posts leading up to the final version of the board. Check out this category link for his blog if you’re interested in reading through them.

Upgrading A Digital Multimeter To Tell The Temperature

[Rajendra] tipped us off to this really slick hack he’s done to allow his multimeter to tell the ambient temperature. He’s basically measuring the output of an LM35 temp sensor that he has mounted in the case. The circuit is extremely simple and only requires the sensor, a couple resistors, and a switch so that you can return to normal function. When finished, you’ll have a multimeter that will display the ambient temperature when set to to the correct range (0-200 mV in his case). The switch is there so that you can return your multimeter to normal function afterwards.  While [Rajendra] chose to display ambient temperature, you could just as easily create an external probe for measuring other things.

Hackaday Links: December 25, 2011

Ah, Christmas. That wonderful time of year when you can roll out of bed to the screams and wails of children, grab a hot cocoa, and spend several hours arguing with an 8-year-old about which LEGO set to build first. Simply magical. While you’re waiting for the Doctor Who Christmas special to come on, settle down with these wonderful Christmas-themed builds that came in over the last few weeks.

One step closer to Robot Santa

Here’s an interesting way to spice up your seasonal headwear. [Mark] took a Santa hat and added a string of multicolored LEDs to the brim. The lights were picked up at a drug store for a dollar. Control is through a simple push button connected to an ATtiny13. Press the button, the lights cycle in a different pattern. Very cool, so check out the video.

A holographic holiday tree

[Auger] posted this very cool light up Christmas tree decoration on Instructables. This tree is made up of three pieces of acrylic. Different designs were laser cut into each piece of plastic – candy canes for the ‘red’ piece, stars and tinsel for the ‘yellow’ piece, and the tree for the ‘green’ piece. LEDs of the respective colors are cemented to the bottom of each bit of plastic. It’s called light piping and is used everywhere. This is the first time we’ve seen three colors, though.

This is what nerds do, and it’s awesome

[Rickard Dahlstrand] was playing around with his phone trying to take deliberately fuzzy pictures of his tree. He noticed the dashes produced from the LED Christmas lights must be produced from PCM dimming. Going through the EXIF data in the picture, he found the exposure time was 1/17th of a second. 1/17 of a second = ~ 58 ms / 5 (cycles on the picture) = ~11 ms per cycle = ~100 Hz frequency on the PCM dimming. Of course this is just about 2 times the line frequency in [Rickard]’s native Sweden, so we’ll call this confirmed. There’s no blog post for this, but we’ve never seen a clearer example of applied geekery. Simply awesome.

Yeah, we measured [Rickard] on a nerd meter

In the spirit of giving, [Johannes] decided to tell the entire world exactly how nerdy he is. He built a ‘Nerd Alert’ meter out of an old 1950s Japanese multimeter. The old guts of the meter were chucked, and a simple amp made out of a transistor amplifies the current flowing through the user’s fingers. A neat scale ([Johannes] measures somewhere between Amiga Workbench and Space invaders) replaces the old, boring, number-based one. Again, no write-up, but here’s some awesome build pictures.

Finally a use for all those old radio tubes

[AUTUIN] took apart a vacuum tube with a blow torch and a diamond cutting wheel. Surprisingly, he was able to put it back together, but not before making a wonderful Christmas ornament. There are two copper wires inside the envelope that are the leads to a single orange-red LED. The whole thing is powered by a watch battery. We’ll be sure to reference [AUTUIN] next time we have to take apart a glass bulb, because he managed not to burn, cut or blind himself.

Six things in a links post? It’s a Christmas miracle!

[Darryl] sent in a nice tool to select and display all of the hacker/maker merit badges available from Adafruit. Oh, we’re still trying to figure out who to give 10 badges to. We’re giving away skull ‘n wrench badges to the top ten hacks ever featured here. Leave a note in the comments, or tell us who should win.

Holiday wishes

Now put the computer down and go spend some time with your families, or failing that, strangers. Of course there’s an all day Doctor Who marathon, and that thing isn’t going to watch itself…