Retrotechtacular: How Not To Use Hand Tools

Whatever you’re doing with your hand tools, by the US Army’s lights, you’re probably doing it wrong. That seems to be the “Green Machine’s” attitude on pliers and screwdrivers, at least, the main stars of this 1943 War Department training film on the horrors of tool abuse.

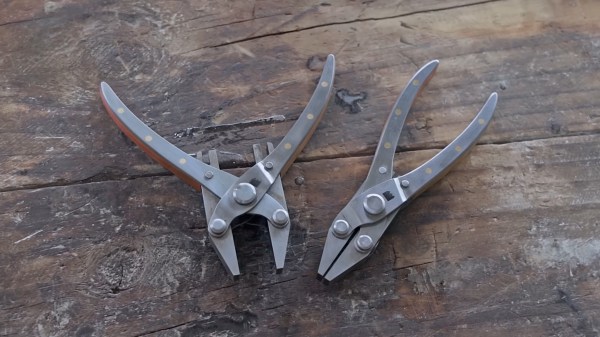
As kitschy as the film might be, they weren’t wrong. That’s especially true about the dreaded slip-joint pliers, which seem to find their way onto everyone’s list of unloved tools and are shown being used for their true purpose — turning nuts and bolt heads from hexagons into circles. Once that gore is wrapped up, we’re treated to the proper uses of pliers, including the fascinating Bernard-style parallel jaw pliers. We can recall these beauties kicking around the bottom of Dad’s tool kit and being entranced by the mechanism used to keep the jaws parallel and amplify the force applied. Sadly, those pliers are long gone now; Tubalcain did a great review of these pliers a few years back if you need a refresher.

A selection of screwdrivers gets the same treatment, complete with dire warnings against using them as prybars and chisels. Also against the Army Way is using the wrong size screwdriver for the job, lest you strip the head of the screw or break the tool itself. It has to be said that the Plomb Tool Company of Los Angeles, which produced the film, made some fantastic-looking screwdrivers back in the day. The square shanks on some of those straight screwdrivers are enormous, and the wooden handles look so much more comfortable than the greebled-up plastic nonsense manufacturers seem to favor these days. Also interesting is the reference to the new-fangled Phillips screw, not to mention the appearance of a Yankee-style spiral ratcheting screwdriver, another of Dad’s prized acquisitions that thankfully is still around to this day.

What strikes us about these military training films is how many of them were produced. No subject seemed too mundane to get a training film made about it, and so many were made that one is left wondering how there was any time left for soldiering after watching all these films. But really, it’s not much different today, when we routinely pull up a random YouTube video to get a quick visual demo of how to do something we’ve never tried before. The medium may have changed, but visual learning is still a thing.

Continue reading “Retrotechtacular: How Not To Use Hand Tools”

Two pairs of steel parallel pliers sit on a rough wooden benchtop. The pair on the left is open and the pair on the right is closed, demonstrating the parallel nature of the pliers' jaws over their entire range of motion. There are three brass pins flush with the steel surface of the handles and you can just barely make out the brass and copper filler material between the steel outer surfaces of the handles.

Producing A Pair Of Parallel Pliers

A regular pair of pliers is fine most of the time, but for delicate work with squarish objects you can’t go wrong with a pair of parallel pliers. [Neil Paskin] decided to make his own pair from scratch. (YouTube)

The jaws were machined down from round stock in [Paskin]’s mill before heat treating and tempering. The steel portions of the handles were cut from 16 gauge plate steel and half of them were stamped on a fly press to make the bridging section around the pivot bolt. The filler for the handles is copper on one side and brass on the other as [Paskin] didn’t have enough brass of the correct size to do both.

The steel and filler were joined with epoxy and copper pins before beveling the edges and sanding to give a comfortable contour to the handles. The bolts for the pliers started as ordinary hex bolts before being machined down on the lathe to a more aesthetically-pleasing shape and size. The final touches included electrolytically etching a logo into the bridge and then spraying down the pliers with a combination lubricant and corrosion preventative spray. This is surely a pair of pliers worth handing down through the generations.

For more mesmerizing machining, checkout this pocket safe or this tiny adjustable wrench.

Continue reading “Producing A Pair Of Parallel Pliers”

Reusing PCB Components


If you’re anything like us, you have a closet full of old electronics, some broken, some obsolete. You can stop using those as paperweights with the help of this guide that shows you how to recycle and reuse PCB components.

The first step of the process is finding electronics you don’t mind taking apart. Next place the PCB you’ll be stripping in a vice, with the components facing away from you and the solder side facing towards you. Grip the component you want with a pair of pliers, and apply a hot soldering iron to the solder that is holding the component. The solder will melt and allow you to safely and cleanly remove the component.

This process can be applied to virtually any component on an PCB, and the author of the guide, [Patented], got a lot of components this way, including resistors, capacitors, switches, audio jacks, and much more. Don’t forget to toss any free-floating metal or plastic parts in the recycle bin when you’re done. You can feel good about the fact that nothing was wasted, you found parts for your next project, and you cleared out some space.