Design Scanimations In A Snap With The Right Math

Barrier-grid animations (also called scanimations) are a thing most people would recognize on sight, even if they didn’t know what they were called. Move a set of opaque strips over a pattern, and watch as different slices of that image are alternately hidden and revealed, resulting in a simple animation. The tricky part is designing the whole thing — but researchers at MIT designed FabObscura as a design tool capable not only of creating the patterned sheets, but doing so in a way that allows for complex designs.
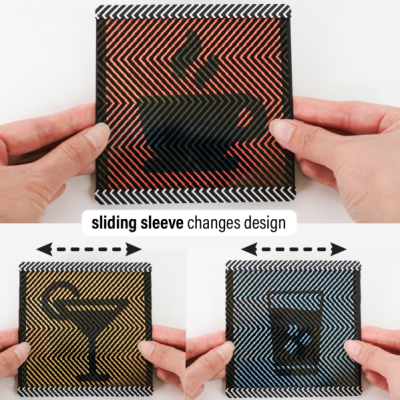
The barrier grid need not consist of simple straight lines, and movement of the grid can just as easily be a rotation instead of a slide. The system simply takes in the desired frames, a mathematical function describing how the display should behave, and creates the necessary design automatically.

The paper (PDF) has more details, and while it is possible to make highly complex animations with this system, the more frames and the more complex the design, the more prominent the barrier grid and therefore the harder it is to see what’s going on. Still, there are some very nice results, such as the example in the image up top, which shows a coaster that can represent three different drink orders.

We recommend checking out the video (embedded below) which shows off other possibilities like a clock that looks like a hamster wheel, complete with running rodent. It’s reminiscent of this incredibly clever clock that uses a Moiré pattern (a kind of interference pattern between two elements) to reveal numerals as time passes.

We couldn’t find any online demo or repository for FabObscura, but if you know of one, please share it in the comments.

Continue reading “Design Scanimations In A Snap With The Right Math”

Scanimate Analog Video Synths Produced Oceans Of Motion Graphics

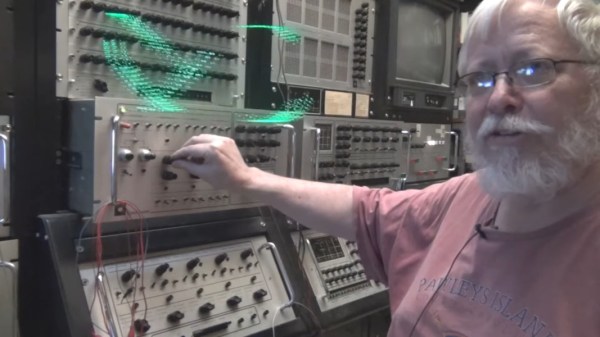
Why doesn’t this kind of stuff ever happen to us? One lucky day back in high school, [Dave Sieg] stumbled upon a room full of new equipment and a guy standing there scratching his head. [Dave]’s curiosity about this fledgling television studio was rewarded when that guy asked [Dave] if he wanted to help set it up. From that point on, [Dave] had the video bug. The rest is analog television history.

Today, [Dave] is the proud owner and maintainer of two Scanimate machines — the first R&D prototype, and the last one of only eight ever produced. The Scanimate is essentially an analog synthesizer for video signals, and they made it possible to move words and pictures around on a screen much more easily than ever before. Any animated logo or graphics seen on TV from the mid-1970s to the mid-80s was likely done with one of these huge machines, and we would jump quite high at the chance to fiddle with one of them.

Analog television signals were continuously variable, and much like an analog music synthesizer, the changes imposed on the signal are immediately discernible. In the first video below, [Dave] introduces the Scanimate and plays around with the Viceland logo a bit.

Stick around for the second and third videos where he superimposes the Scanimate’s output on to the video he’s making, all the while twiddling knobs to add oscillators and thoroughly explaining what’s going on. If you’ve ever played around with Lissajous patterns on an oscilloscope, you’ll really have a feel for what’s happening here. In the fourth video, [Dave] dives deeper and dissects the analog circuits that make up this fantastic piece of equipment.

Here’s another way to play with scan lines: delay the output to some of them and you have a simple scrambler.

Continue reading “Scanimate Analog Video Synths Produced Oceans Of Motion Graphics”

Mangling Images With Audio Effects

Ever wonder what those snapshots you took of your trip to Paris would look like if you ran them through a Proco RAT or a Boss Overdrive? How about a BF-3 flanger? [Robert Foss] wrote in with this nifty little script (GitHub) that processes images as if they were audio files so that you can try it out without investing in a rack of analog pedals. Test your audio/visual DSP intuition and see if you can name the images without looking at the effects.

If you know your Linux command-line utilities, there’s really not much to it — scroll down to the very bottom of the script to see how it’s done. ffmpeg converts the images to YUV format, which works much better than RGB for audio processing, and then sox adds the audio effects. Another trip through ffmpeg gets you back to an image or video.

OK, it’s cheating because it’s applying the audio effects inside the computer, but nothing’s stopping you from actually taking the audio out and running it through that dusty Small Stone. Of course, once you’ve got audio outside of the computer, the world is your oyster. Relive the glorious 70’s when video artists made works using souped-up audio synthesizers. If you haven’t seen the Sandin Image Processor or the Scanimate in action, you’ve got some YouTubing to do.