A New Handle For An Old Soldering Station

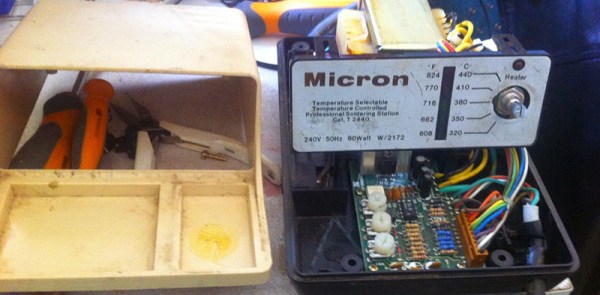
About 20 years ago, [Simon] spent a few week’s pay on a soldering station, a Micron W/2172. It served him well for the past few decades, but lately he hasn’t been able to find a supply of new tips for it. The Micron went into a cupboard and he upgraded to a newer Hakko soldering station.

The old Micron was still sitting in the cupboard when [Simon] realized both stations use a 24V supply for the heater, and you can buy replacement Hakko handle for a few bucks. Having two soldering stations would be handy, so [Simon] set out to convert the old Micron station to accept Hakko handles.

The only technical challenge for this modification was to figure out how the old circuit board in the Micron would read the thermistor  in the new handle. The original circuit used a dual op-amp, with one side used to amplify the thermocouple and the other to compare it to the temperature set point. After measuring the set point and a bit of Excel, [Simon] had a small circuit board that would replace the old op-amp. After that it was only a matter of wiring the new handle into the old station, calibrating the temperature settings, and enjoying the utility of two soldering stations.

mobilesolderingworkstation

Mobile Soldering Workstation Sets Up Quickly, Lets You Get To Work

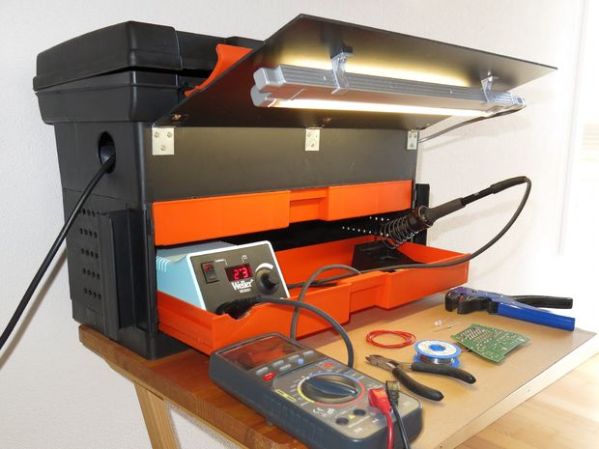
Who here hasn’t put off soldering up a project because pulling out and setting up all your soldering gear is a pain? A lot of hobbyists don’t have a dedicated workbench for such activities and their gear may even be packed away somewhere inconvenient. [laxap] has come up with a solution using a plastic toolbox as a base for his Mobile Soldering Workstation.

[laxap] started with a regular off the shelf toolbox that has a lid and three drawers on the bottom. Although the Weller soldering iron base fit nicely in the bottom drawer, it did necessitate ditching the middle drawer for clearance. The compartmentalized top drawer is unmodified and holds parts and supplies in an orderly fashion.

Lifting up the lid of the box reveals a removable tray, which as intended, is a great spot to store tools such as a multimeter and wire strippers. The area under the removable tray is reserved for a power strip and power cord storage. A hole drilled in the side of the toolbox allows quick access to the power strip’s plug, a quick pull out and plug in is all that is necessary to get this workstation powered up.

That front flip up panel was made specifically for this project. Not only does it help keep the drawers from sliding open during transport, it also holds a lamp to aid in seeing what you’re doing! A bent aluminum strip acts as a latch to keep the panel in position.

It’s a pretty simple idea but it certainly gets the job done and makes soldering a whole bunch more convenient. If you like mobile workbenches, you may want to check out this all-wooden shelf style or one that features integrated solderless breadboards.

Homemade Soldering Station for cheap Soldering Irons

Homemade Soldering Stations For Cheapy Irons

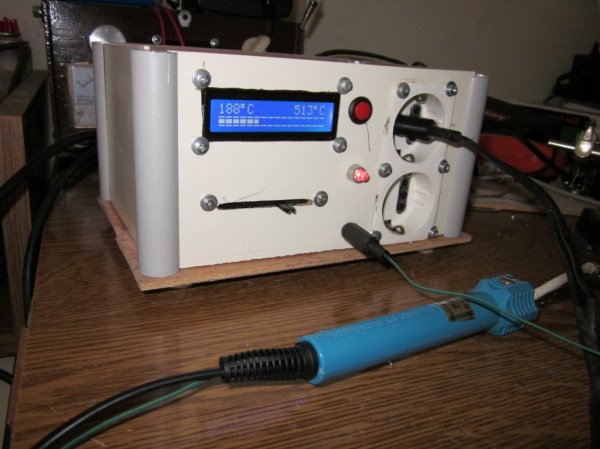
Everyone reading this post has had a cheap pencil-style soldering irons that plug straight into the wall at some point in their lives. Even if you’ve upgraded to a professional soldering station, you probably have one of these cheapy irons kicking around that are slow to heat up to an unknown temperature. [Pantelis] thought he could fix the latter problem with his Homemade Soldering Station for those basic soldering irons.

Since the intent of the soldering station was to control the temperature of the iron [Pantelis] had to figure out a way to sense the temperature. He did this by strapping a thermocouple to the iron near the tip. The wires were run back through the handle and then along the power cord.

Homemade Soldering Station for cheap Soldering Irons

Both the stock iron plug and the thermocouple leads plug into a box put together specifically for this project. In the photo you’ll notice the LCD screen that displays both the target and actual temperatures. The linear potentiometer below the LCD screen is used to set the target temperature. The LED to the right alerts the operator that the iron is heating up and when it is at temperature and read to go.

Although there isn’t a lot of schematic or part list information, [Pantelis] did do a good job photo documenting his build. Check it out, it’s worth a gander.

Ask Hackaday: What’s An Easy Way To Build A Potentiometer For A Soldering Iron?

diy-potentiometer-2

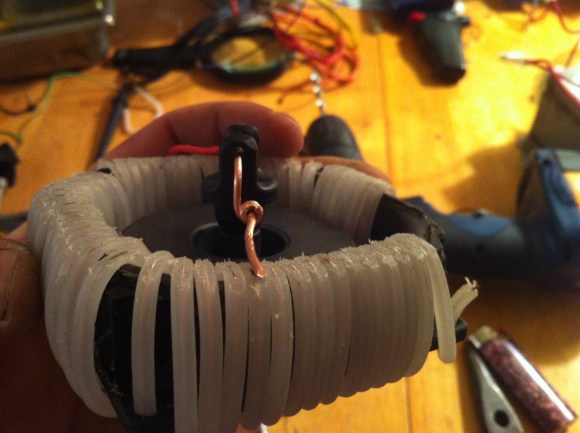
[Lee] wrote in to share the work he’s done in building a controller for his soldering iron. The idea started when he was working with an ATX power supply. He figured if it works as a makeshift bench supply perhaps he could use it as the source for an adjustable iron. To get around the built-in short-circuit protection he needed a potentiometer to limit the current while allowing for adjustments. His first circuit used a resistor salvaged from an AT supply and a trimpot from some computer speakers. That melted rather quickly as the pot was not power rated.

This is a picture of his next attempt. He built his own potentiometer. It uses the center conductor from some coaxial cable wrapped around the plastic frame of an old cooling fan. Once the wire was in place he sanded down the insulation on top to expose the conductor. The sweeper is a piece of solid core wire which pivots to connect to the coil in different places. It works, and so far he’s managed to adjust a 5V rail between 5A and 20A.

How would you make this system more robust? Short of buying a trimpot with a higher power rating, do you think this is the easy way to build a soldering iron controller? Let us know by leaving your thoughts in the comments.

Continue reading “Ask Hackaday: What’s An Easy Way To Build A Potentiometer For A Soldering Iron?”

Putting The Flex Back Into The RDS 80 Soldering Station

ersa_soldering_iron_fix

[Markus] was looking to upgrade his soldering station, and having had good luck with Ersa in the past, opted to purchase one of their new stations, the RDS 80.

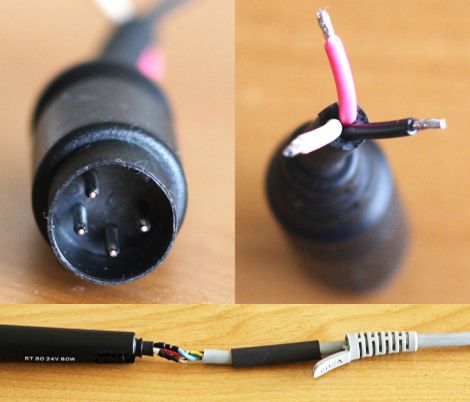
Once he got the iron home however, he was very disappointed to see that while his previous Ersa model used a silicone cable to connect the iron to the base station, his new iron used a stiff, non heat-resistant PVC cable instead. He found plenty of people complaining about the same issue online, but no one seemed to have a fix, so he set off to figure it out for himself.

He thought that he could disassemble the iron and change the wiring out once it was apart, but it seemed that there was no way of doing so without destroying it. Instead he chopped the wire off at the end of the soldering iron, replacing it with a new silicone cable. He did the same thing at the base station end, since he was forced to reuse the proprietary 4-pin plug Ersa decided to use there.

His modifications worked out nicely, and he is now happily soldering away.

If you happen to have one of these soldering stations, be sure to swing by his site to get a closer look at how he swapped out the cable.

Tools: Aoyue 968 3-in-1 Soldering And Rework Station

The $10 “fire-starter” is the most common beginner soldering iron. These are simple irons with a hot end, a handle, and little else. There’s no temperature control or indication. Despite their simplicity, they’ll do just about anything. You can solder any legged chip type with this type of iron. We used fire-starters in the lab for years.

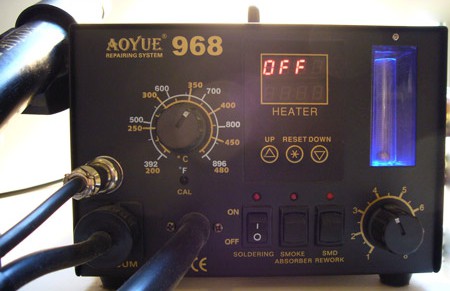
Eventually, we wanted a hot air rework tool to salvage SMD parts and solder QFN chips. Aoyue is a relatively unknown Chinese brand that makes soldering stations very similar in appearance and function to Hakko. Aoyue stations are recommended and used by Sparkfun Electronics, something that factored heavily in our decision to buy an Aoyue. Read more about our experiences with this tool after the break.

Continue reading “Tools: Aoyue 968 3-in-1 Soldering And Rework Station”