CNC Router Skateboard

Self Replicating Skateboard…. What?!?!?

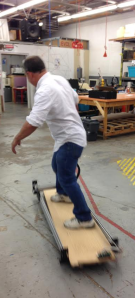
[Bart] and company over at Pumping Station One make a lot of skateboard decks. They wanted to build a CNC Router that was not only portable but had a size that was optimized for cutting skateboard decks. The project got a little out of hand and the CNC Router ended up also being a skateboard! As crazy as that sounds, the craziest part may be that they built it in just one night.
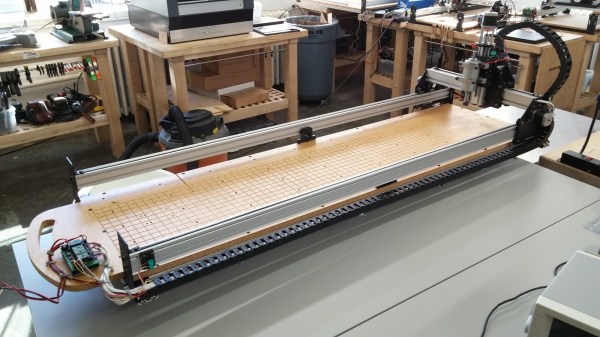
CNC Router SkateboardThe project started off with some stock Shapeoko 2 parts. Achieving the deck-cutting size required shortening the X Axis and tripling the length of the Y Axis resulting in a 250 x 1200mm work envelope. The DC spindle used accepts ER16 collets and has a fully variable speed control. The stand alone selectable 24/48 volt power supply has a neat DIY handle to ease transportation. Even though the router itself has skateboard trucks, it also has a handle at the front so it’s easy to grab and drag behind you.

The guys that built this admit that, as a skateboard, it is kind of crappy. They do go on to mention that a 230lb dude was able to ride it without incident. As a project, however, they hit their goals on the head, ending up with an easily-transportable dedicated skateboard-deck-making CNC Router.

Star Gate Clock

Star Gate LED Clock Has Plenty Of Pizazz

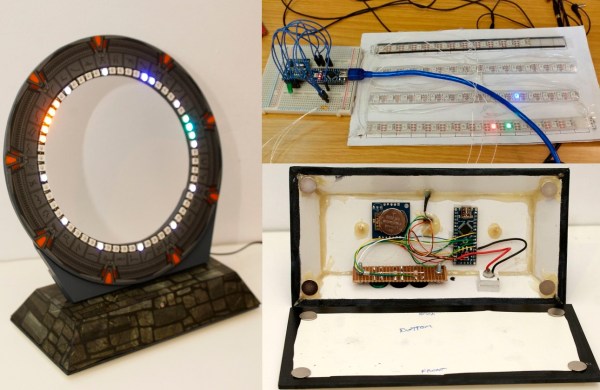
[David Hopkins] has finally finished off his Star Gate LED clock over on Hackaday.io and it looks fantastic.

We originally featured his progress with the project in Hacklet 18 – Tick Tock, it’s Time for Clocks, and we’re happy to say it’s finally complete. The clock features 60 WS2812 LEDs to simulate the Star Gate’s chevrons — and to tell the time. Under the hood is an RTC, an Arduino Nano, an LDR and even an hourly ‘chime’. Did we mention it also automatically dims at night?

What we’re almost more impressed with is the build quality, which [David] doesn’t actually mention how he did it — regardless, it looks great! Stick around after the break to see a video of it in action, so you can really appreciate the clock’s capabilities.

Continue reading “Star Gate LED Clock Has Plenty Of Pizazz”

Hackaday Links Column Banner

Hackaday Links: BSAPEDWLOVKTUB.YBKAB

Here’s something that’s just a design study, but [Ivan]’s Apple IIe phone is a work of art. You’re not fitting a CRT in there, but someone out there has a 3D printer, an old LCD, and a GSM module. Make it happen. See also: the Frog Design Apple phone.

A few days ago we posted something on an old ‘286 machine that was able to load up the Hackaday retro site. For a few people, this was the first they’ve heard about our CSS and Javascript-less edition designed specifically for old computers. They dragged out some hardware, and [WTH] pulled up the site on a Dell Axim.It’s actually somewhat impressive that these machines have SD cards…

[Arduino Enigma] created a touchscreen Enigma machine. Why haven’t we seen an Arduino Colossus yet?

The crew at Adafruit now have a Flying Toaster OLED, which means we now have flying toaster bitmaps for all your OLED/graphic display projects.

[Ian] had an old rackmount programmable voltage standard. This was the remote programmable voltage standard, without front panel controls. No problem, just get an Arduino, shift register, and a few buttons. Video right here.

A few months ago, [Jan] released a neat device that stuffs a modelling synth inside a MIDI plug. He’s selling them now, and we’d love to see a few videos of this.

Super Smash Bros Kinect

Super Smash Bros Gets A Revamp With The Microsoft Kinect

[Eric] just sent in this awesome Kinect hack that he and a few friends worked on. Playing Super Smash Bros with a Kinect.

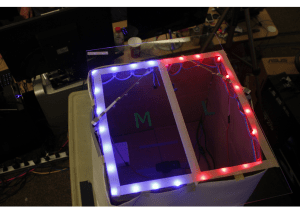
The system makes use of two Kinects, and three PCs. The first Kinect records each individual players moves, while the second Kinect watches both players “fight” each other. The first PC runs an Nintendo 64 emulator to play the game.character selection

The second PC runs a camera with OpenCV to add another cool but perhaps unnecessary feature, you see, even the character selection is a physical process, adding to the idea of playing the entire game with your body. A glass table allows players to set their 3D printed token onto the glass, effectively placing it on the character they would like to use.

And when the match ends, a windshield wiper knocks off the losing player’s token from the table.

The third PC is responsible for running both Kinects, which then has to send the resulting commands back to first PC over a TCP connection for input into the game.

They introduced it to the public at MHacks Fall 2014, a hacking competition sponsored by Dell and Intel. Video Below.

Continue reading “Super Smash Bros Gets A Revamp With The Microsoft Kinect”

VFD Wristwatch

The ChronodeVFD Wristwatch

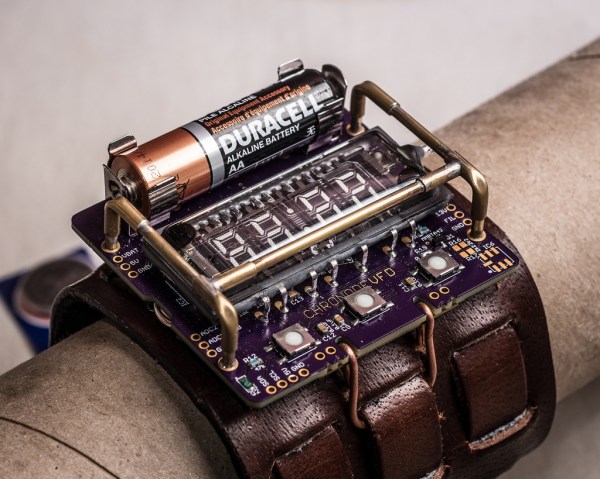
Not just another steampunk fashion statement, [Johngineer’s] ChronodeVFD wristwatch is as intricate as it is beautiful. Sure, we’ve seen our share of VFD builds (and if you want a crash course in vacuum fluorescent displays, check out Fran’s video from earlier this year) but we seldom see them as portable timepieces, much less ones this striking.

The ChronodeVFD uses a IVL2-7/5 display tube, which in addition to being small and low-current is also flat rather than rounded, and features a transparent backing. [Johngineer] made a custom board based around an AtMega88 and a Maxim DS3231 RTC (real time clock): the latter he admits is a bit expensive, but no one complains about left-overs that simplify your design.

The VFD runs off a Maxim MAX6920 12-bit shift register and is powered by a single alkaline AA battery. A rechargable NiMH would have been preferable, but the lower nominal voltage meant lower efficiency for his boost converters and less current for the VFD. [Johngineer] won’t get much more than 6-10 hours of life, but ultimately the ChronodeVFD is a costume piece not meant for daily wear. Swing by his blog for a number of high-res photos and further details on how he built the brass tubing “roll cage” enclosure as well as the mounts for the leather strap.

mobilesolderingworkstation

Mobile Soldering Workstation Sets Up Quickly, Lets You Get To Work

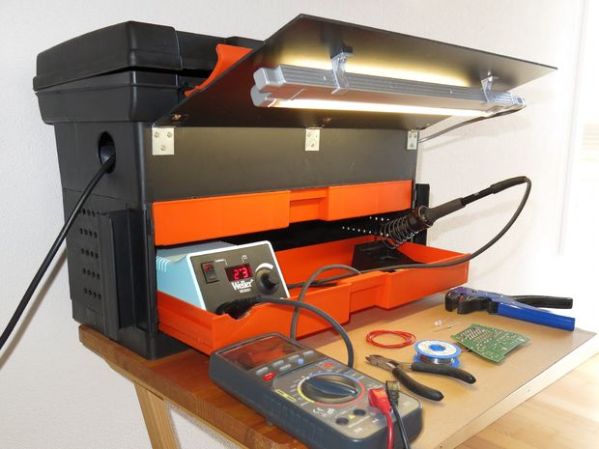
Who here hasn’t put off soldering up a project because pulling out and setting up all your soldering gear is a pain? A lot of hobbyists don’t have a dedicated workbench for such activities and their gear may even be packed away somewhere inconvenient. [laxap] has come up with a solution using a plastic toolbox as a base for his Mobile Soldering Workstation.

[laxap] started with a regular off the shelf toolbox that has a lid and three drawers on the bottom. Although the Weller soldering iron base fit nicely in the bottom drawer, it did necessitate ditching the middle drawer for clearance. The compartmentalized top drawer is unmodified and holds parts and supplies in an orderly fashion.

Lifting up the lid of the box reveals a removable tray, which as intended, is a great spot to store tools such as a multimeter and wire strippers. The area under the removable tray is reserved for a power strip and power cord storage. A hole drilled in the side of the toolbox allows quick access to the power strip’s plug, a quick pull out and plug in is all that is necessary to get this workstation powered up.

That front flip up panel was made specifically for this project. Not only does it help keep the drawers from sliding open during transport, it also holds a lamp to aid in seeing what you’re doing! A bent aluminum strip acts as a latch to keep the panel in position.

It’s a pretty simple idea but it certainly gets the job done and makes soldering a whole bunch more convenient. If you like mobile workbenches, you may want to check out this all-wooden shelf style or one that features integrated solderless breadboards.

jackolantern

Simple LED Project To Spice Up Your Halloween Party

[Paul’s] project is a great example of how you can take a simple project and turn it into something more interesting. He built himself a jack-o-lantern with an Internet controlled RGB LED embedded inside.

[Paul] first wired up an RGB LED to a Raspberry Pi. He was sure to wire up each color using a 100ohm resistor to prevent the LED from burning out. The web interface was written in Python. The interface is pretty simple. It consists of three text fields. The user enters a value between 0 and 255 for each of the three LED colors. The program then lights up the LED accordingly.

[Paul] realized he would need a diffuser for the LED in order to really see the blended colors properly. Instead of using a common solution like a ping-pong ball, he opted to get festive and use a plastic jack-o-lantern. [Paul] removed the original incandescent bulb from the lantern and mounted the LED inside instead. The inside of the pumpkin is painted white, so it easily diffuses the light. The result is a jack-o-lantern that glows different colors as defined by his party guests. Be sure to check out the demonstration video below.