Video: Soldering Our PIC Development Board

For those of you who followed along with our Eagle CAD series, here is the final payoff where we assemble the circuit board that was designed. In this video, [Jack] explains where things will go on the board and then shows you how to solder the parts. For the advanced folks out there who haven’t moved to solely surface mount parts when you can get away with it, he shows an easy way to solder the processor, which is a TQFP-44 part. This can seem like a daunting task but it really isn’t.

If you would like to make your own board like this, you can find the files here. Please note that although this board shouldn’t have any issues, we haven’t tested it ourselves yet. [Jack] is going to do some videos about a different topic for a few weeks but will pick back up with this board again when they are done.

Video is after the break. Continue reading “Video: Soldering Our PIC Development Board”

One-man SMD Assembly Line Shares A Lot Of Tips About Doing It Right

Need to use that antiquated hardware that can only be connected via a parallel port? It might take you some time to find a computer that still has one of those, or you could try out this USB to Parallel port converter. It’s not limited to working with printers, as the driver builds a virtual parallel port that you should be able to use for any purpose. But what we’re really interested in here isn’t the converter itself, but the build process. [Henrik Haftmann] posted a three-part series of videos on the assembly process, which you can watch after the break.

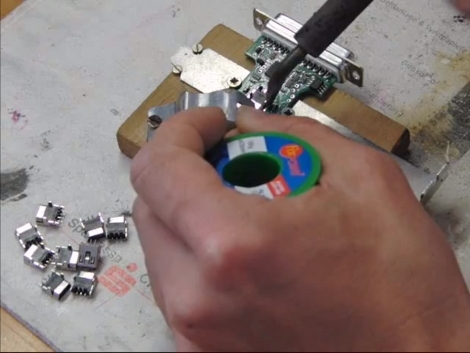
The build is mostly surface mount soldering with just a handful of components that need to be hand soldered. The first of his videos shows him stenciling solder paste onto the boards. From what we can see it looks like he built a nice jig for this using scrap pieces of copper-clad which match the thickness of the PCB, and hold it and the stencil securely in place. There’s a bunch of other tips you can glean from the videos, like the image seen above. It’s a clamp that holds the PCB and USB jack together while they are soldered.

If you’re ever thinking of assembling a bunch of boards you should set aside thirty minutes to watch them all.

Continue reading “One-man SMD Assembly Line Shares A Lot Of Tips About Doing It Right”

How To Add Modular Tools To Your Soldering Platform

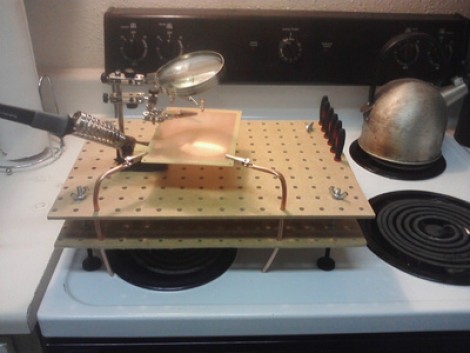
[Patenomics] has had some trouble finding a suitable place to work on projects in his tiny apartment. Lately he’s taken to using the stove top as a soldering platform and was looking for ways to protect the stove while adding functionality. He built this soldering platform from a couple chunks of pegboard and some hardware store parts. He’s in for under $15 and has a really functional platform that may be worth adding to your solder station.

The two pegboard pieces are held in place by threaded rod and some nuts. This hardware also lends itself to adjustable feet so that you can make the platform level and stable. The holes in the top and bottom sheets line up to receive and securely position some additional tools. Here you can see that bendable copper pipe keeps some alligator clips right where they’re needed, but future plans include adding lights, clamps, and lasers.

This makes a nice work platform to go along with your other portable electronic bench tools. But if you’ve really got the itch, you’ll eventually outgrow all of this and then it might be time to find yourself a hackerspace to join.

SMD Soldering With Gas

[desimon] had a wanted to use some accelerometer chips, but their 3x3mm 16-VFQFN packages made it pretty darn hard to solder by hand. While there are endless ways to approach this, we found this one peculiarity interesting from his use of a gas torch, though it is pretty much hot air reflow.

A PCB for the tiny devices is etched and tinned, the pads have a healthy but not overdone amount of solder applied to them. A liberal coat of flux, rough alignment of the chip and a few gentle passes from the torch and the hobby grade solder melts while the surface tension pulls everything into final alignment.

Having personally used a hot air gun a number of times (and also burning my hand about the same number of times) the localized heat of the torch does make more sense, and there is virtually no heat up time for it either, though it appears just as easy to scorch the board. It is a live flame so be careful!

Electronics Tutorial Two-fer: Soldering Skills And Wires

electronics_tutorial_twofer_soldering_skills_and_wires

There is a plethora of electronics tutorials scattered about online. Sometimes it can be hard to separate the good ones from the bad, and the enlightening from the misinformed. We recently came across a pair that we found helpful, and thought they would appeal to anyone starting off in electronics.

In this video tutorial, [Dave Jones] at the EEVblog covers soldering, detailing good practices and common mistakes to avoid when working with through-hole components. As the second video in a series he picks up where part one left off, excitedly demonstrating the ins and outs of good soldering skills.

Hackaday reader [grenadier] is working on a series of beginner’s electronics tutorials, and this week’s entry covers wiring. He discusses wire types, gauges, and even provides a nifty self-computing chart that calculates power loss based on the length and gauge of the selected wire. Before wrapping things up, he briefly touches on fuses and the pitfalls of choosing wire that’s not up to the task at hand. While you’re over there looking over his tutorial, be sure to check out the Junkbox, there’s plenty of awesome stuff to be had!

cleaning_pcbs

Cleaning Flux From PCBs The Easy Way

While we’re all for building circuits on protoboard or constructing a deadbug circuit for a last minute project, it’s always nice to see a proper PCB now and again. We think that leftover flux can sometimes make even the nicest of circuit boards look a bit dingy, and Hackaday reader [RandomTask] wholeheartedly agrees. He wrote in to share a method he found online that he uses to get his PCBs squeaky clean after soldering.

The secret to his clean PCBs is a product called Poly Clens. It’s essentially a paint brush cleaner that does a great job at removing flux without having to resort to using a brush to scrub it off the board. [RandomTask] simply submerges his newly assembled board in a small container filled with Poly Clens, agitating it for about half a minute or so. After the flux has been removed he rinses it with water, pats it dry, then ensures the board is moisture-free with a few passes of his heat gun.

He says that the entire process takes him less than 5 minutes per board, which is far better than the old alcohol and stiff brush method he used in the past.

What tips or tricks do you have for getting your new projects cleaned up? Be sure to share them with us in the comments.

Easy To Build Rig Prevents Reflow Soldering Mishaps

reflow_soldering_rig

[Erich aka VK5HSE] performs quite a bit of solder reflow work, but has always been concerned about bumping his circuit boards once the solder has liquified and is ready to be removed from the heat source. He says that removing workpieces from toaster ovens often results in the unintentional jarring of a circuit board full of components sitting on molten solder, and he wanted to find a solution.

Using some off-the shelf components from a local hardware store, he built a rig that fits on top of a hot plate, allowing him to move hot circuit boards away from the heat source in a smooth controlled motion. The rig is pretty simple, not only preventing unwanted workpiece movement, but also making it easy to regulate the amount of time a circuit board is allowed to heat.

He suggests that his design is not absolutely ideal, and that it can easily be improved upon in several ways without adding significant cost to the project.