Hackaday Links: August 21, 2011

Arduino + PS2 controller + R2D2

Here’s an unbelievably real-looking R2D2 replica driven by a PS2 controller with an Arduino inside that plays sounds from the movies. Too bad we couldn’t find any more details about it. [Thanks Bill]

Server build time-lapse

[Justin] and his colleagues spent five days upgrading their server by building a 29-unit cluster. Lucky for us they set up a web-cam to capture the process.

Cockroach computer

Behold this working desktop computer, complete with monitor and mouse. We’re not sure how it was done, or what it’s for, but worth a peek just because of its size. [Thanks Harald via Dvice]

Modelling self-assembling viruses

A 3D printer and magnets were used to build this model of a self-assembling virus. Shake the jar and it falls apart. Shake a bit more and it’ll rebuild itself… it has the technology.

Tardis cufflinks

[Simon] is exercising his geek chic with these Tardis cuff links. The Doctor Who inspired accessories were made from a model railroad telephone booth.

One-man SMD Assembly Line Shares A Lot Of Tips About Doing It Right

Need to use that antiquated hardware that can only be connected via a parallel port? It might take you some time to find a computer that still has one of those, or you could try out this USB to Parallel port converter. It’s not limited to working with printers, as the driver builds a virtual parallel port that you should be able to use for any purpose. But what we’re really interested in here isn’t the converter itself, but the build process. [Henrik Haftmann] posted a three-part series of videos on the assembly process, which you can watch after the break.

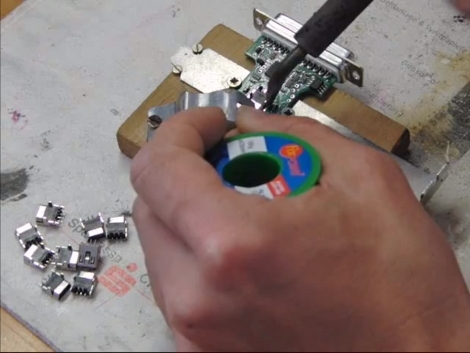
The build is mostly surface mount soldering with just a handful of components that need to be hand soldered. The first of his videos shows him stenciling solder paste onto the boards. From what we can see it looks like he built a nice jig for this using scrap pieces of copper-clad which match the thickness of the PCB, and hold it and the stencil securely in place. There’s a bunch of other tips you can glean from the videos, like the image seen above. It’s a clamp that holds the PCB and USB jack together while they are soldered.

If you’re ever thinking of assembling a bunch of boards you should set aside thirty minutes to watch them all.

Continue reading “One-man SMD Assembly Line Shares A Lot Of Tips About Doing It Right”

Resurrecting An Electric Razor

[Salvatore Ventura] likes a close shave from an electric razor, and nothing shaves closer than a new set of blades. After shelling out for some sharp ones, the rechargeable batteries died so he set out to replace them with a couple of double A’s (not the ones pictured above as those are alkaline).

This fix actually increased the original battery life of the razor by about 30%. That’s thanks to a larger capacity than the battery that had come with the razor. But [Salvatore] didn’t get to enjoy the windfall for very long. One morning the charge light was blinking on the razor and it wouldn’t spin up at all. After testing the batteries with a multimeter he found that they had a full charge and figured it was the main board that had gone out.

The real question is, what is that board actually doing? A bit of study led him to the conclusion that it is just a charging circuit, and an on/off switch. He kissed the board goodbye, wired up the AA battery holders directly. Now he jams a paper clip into the recharging jack, shorting the pins to complete the circuit. He could even keep using rechargeables with an external charger if he was careful not to run them too low.

This GLaDOS Potato Is A Lie

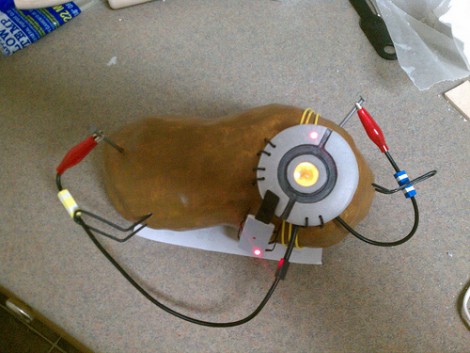
Why settle for virtual reality when you can make the digital world into reality? [Josh] wanted to have a GLaDOS potato accompany him through life when not playing Portal 2. He set to work to see what kind of replica prop he could come up with. Judging from the image above, and demo video after the break, he nailed it right in the spud.

There’s no worrying about rot. The potato and a few parts were molded from Sculpey and baked in the oven. Since the fake spud is hollow in the center it’s easy to hide the bits that make it talk. An old MP3 player was loaded with quotes from the game, and plays them back via an LM386 audio amplifier circuit and a speaker hidden below the electronic eye. The eye is lit by five yellow LEDs which are also tied into the amplifier to make them blink and fade with the intensity of the audio signal.

A paint job and the nails and wire really make the build look just right. Now [Josh] needs to host a geek-themed Halloween party so he can really show this off.

Continue reading “This GLaDOS Potato Is A Lie”

Basic Animatronics Continued: Servo Actuated Mouth

[Chris] is at it again and this time he has put together a tutorial rounding off his animatronic face by actuating the mouth. His tutorial covers two different styles of robot mouth: an LCD mouth which dims to imply actuation and a servo articulated flap.

[Chris] covers all the aspects of each mouth type, from the basics of human mouth actuation to servo motor control. In this case the LCD mouth is not quite as impressive so it gets installed on a face mock up while the servo mouth goes on the face previously featured in his other tutorials. The entire setup is still controlled using a single PIC 18F452. The circuit diagrams and code for both types of mouth are all available on the site including videos of the actuated mouth and a gif of the LCD mouth in action.

Check out a video of the articulated mouth below throwing down some classic season 6 Jean-Luc. If you are interested in the other parts of the face we have covered [Chris]’s other tutorials on the eyebrows and the eyeballs. These are a great jumping point for your own animatronic face project and do a great  job of setting up all the know how you’d need to build your own emotional puppet.

Continue reading “Basic Animatronics Continued: Servo Actuated Mouth”

A Quick And Dirty VU Meter For Your Next Party

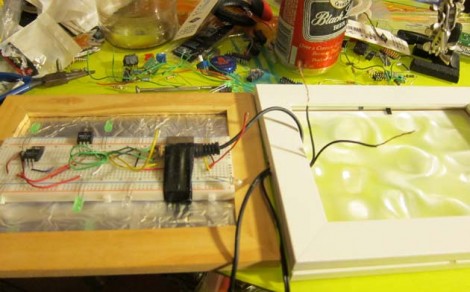
If you want an easy project to spice up your next party, chances are you already have parts on hand to throw together [Mikerbot’s] quick and dirty VU-meter lights. The circuit he designed uses the audio input to trigger the base of a PNP transistor, toggling power through a string of LEDs. He’s using four lights for each of the stereo output signals, making them pulse with the music as seen in the video after the break. The circuit is built on a breadboard, and housed in a picture frame with a less-than-impressive diffuser (we think that’s always the hardest part… check out the Heavy Frost used in this project if you want something that works really well).

There are some VU meter chips out there that will really augment this concept. But one improvement might be to throw in an amplifier chip like the LM386 and a couple of potentiometers so that you can dial-in the sensitivity.

Continue reading “A Quick And Dirty VU Meter For Your Next Party”

[Bunnie] Mods Chumby To Capture Epic Time-lapse Video

When [Bunny] moved into his apartment in Singapore he was surprised to find that a huge building project was just getting started on the other side of the block. Being the curious sort, he was always interested in what was going on, but just looking in on the project occasionally wasn’t enough. Instead, he set up a camera and made a time-lapse video.

This isn’t hard, you can find a slew of intervalometer projects which we’ve covered over the years. But being that [Bunnie] is one of the designers of the Chumby One, and frequently performs hacks on the hardware, it’s no surprise that he chose to use that hardware for the project.

Luckily, he’s sharing the steps he used to get Chumby capturing images. He mentions the hardest part is finding a compatible USB camera. If you have one that works with a 2008 Linux kernel you should be fine. The rest is done with shell scripts. Mplayer captures the images when the script is called from a cron job. Once all the frames are captured, he used mencoder to stitch the JPEGs into a movie. See the result after the break.

Continue reading “[Bunnie] Mods Chumby To Capture Epic Time-lapse Video”