Scratch-Built Industrial Camera’s Modular Design Really Stacks Up

The news here isn’t so much that [Guarav Singh] built this high-quality industrial digital camera from scratch, but it’s in the way it was accomplished. That plus the amount of information that’s packed into the write-up, of course. And the excellent photography.

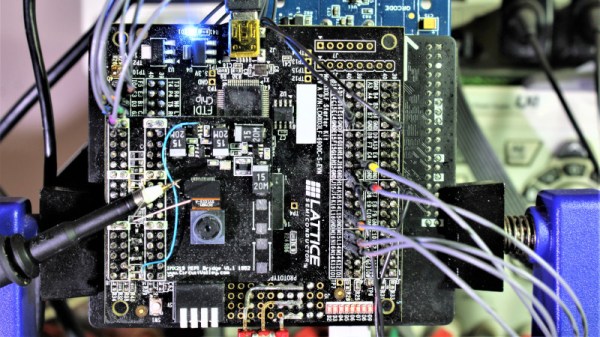
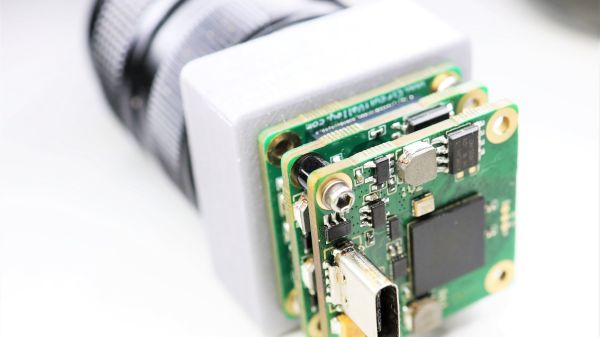
Modularity was one of [Guarav]’s design goals, with the intention of being able to swap out the sensor as the technology changes. To that end, [Guarav] came up with a stack of three PCBs. The middle board of the stack contains a Lattice FPGA chip along with two 16-MB RAMs and the FPGA config flash. The sensor board lies on one side of the FBGA board, while the USB 3.0 board is on the other. Each six-layer board is a masterpiece of high-density design, and the engineering that went into interfacing them and getting everything squeezed into a 3D-printed case with an integrated aluminum C-mount ring is pretty impressive.

[Guarav]’s write-up goes into a great deal of detail on processing the sensor data on the FPGA. Also, there’s quite a bit of practical information on implementing MIPI (Mobile Industry Processor Interface) and the CSI (Camera Serial Interface) specification. We’ve delved into this world before, but this project is a great hands-on explanation that might really help move your MIPI project along.

Thanks for the tip, [STR-alorman].

Getting 1000 FPS Out Of The Raspberry Pi Camera

The Raspberry Pi camera has become a de facto standard for many maker projects, making things like object recognition and remote streaming a breeze. However, the Sony IMX219 camera module used is capable of much more, and [Gaurav Singh] set out to unlock its capabilities.

After investigating the IMX219 datasheet, it became clear that it could work at higher bandwidths when configured to use all four of its MIPI CSI lanes. In the Raspberry Pi module, only two MIPI lanes are used, limiting the camera’s framerate. Instead, [Gaurav] developed a custom IMX219 breakout module allowing the camera to be connected to an FPGA using all four lanes for greater throughput.

With this in place, it became possible to use the camera at framerates up to 1,000 fps. This was achieved by wiring the IMX219 direct to an FPGA and then to a USB 3.0 interface to a host computer, rather than using the original Raspberry Pi interface. While 1,000 fps is only available at a low resolution of 640 x 80, it’s also possible to shoot at 60 fps at 1080p, and even 15 fps at 3280 x 2464.

While it’s probably outside the realm of performance required for the average user, [Gaurav] ably demonstrates that there’s often capability left on the table if you really need it. Resources are available on Github for those eager to delve deeper. We’ve seen others use advanced techniques to up the frame rate of the IMX219, too. Video after the break.

Continue reading “Getting 1000 FPS Out Of The Raspberry Pi Camera”