The Basics Of Building A Multitouch Table

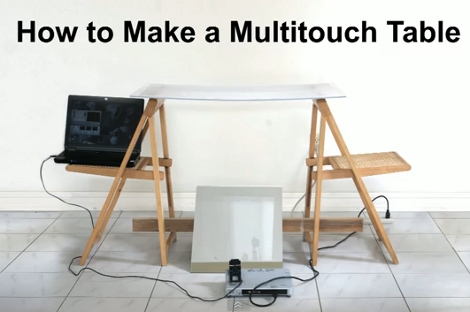
Here is a bare-bones multitouch table setup. We looked in on [Seth Sandler’s] multitouch work a few years ago when he completed the MTmini build. He’s scaling up the size a bit with the MTbiggie, and showing you how easy it is to put together. The demo rig seen above is just a couple of chairs, a sheet of acrylic, a mirror, a projector, a computer, and a diy infrared webcam.

The rig uses ambient infrared light to detect the outlines of your fingers when they touch the acrylic surface. A webcam with an exposed camera film filter feeds an image of the infrared light received below the surface to the computer. The incoming video is processed using Community Core Vision, where each individual point is isolated and mapped. Once the data is available the sky’s the limit on what you can develop. [Seth’s] demo packages include a mouse driver, some physics applications, an Angry Birds implementation, and a few others. See for yourself in the video after the break.

Continue reading “The Basics Of Building A Multitouch Table”

Pidato Box Adds Vibrato Effect To Digital Pianos

piano_vibrato_box

[Joren] likes his digital piano, but it was missing one key component that he wanted to use: the ability to produce vibrato while playing. Vibrato can be done in several different ways on regular pianos, but it seemed as if there was not a lot of consideration given to the effect when designing digital pianos.

He enjoys playing all sorts of music, including solos from Franz Liszt which suggest using vibrato at times, so he decided to build himself a vibrato box. Constructed with a bit of assistance from the friendly folks at Hackerspace Ghent, his “Pidato” incorporates an Arduino and three-axis accelerometer to get the job done.

The Arduino is connected to both the MIDI output of the piano as well as to the accelerometer, which he has mounted on his wrist. While playing, all he needs to do is simply move his hand rapidly to produce the vibrato sound as you can see in the video below. The Arduino code filters out any other sorts of movements to ensure that he does not accidentally trigger the effect when it is not desired.

Check out the video below for a quick demonstration of the Pidato box.

Continue reading “Pidato Box Adds Vibrato Effect To Digital Pianos”

Pinewood Derby Cars Have Come A Long Way

Get your graphite and hike a wheel, [Aron Hoekstra] writes in to completely embarrass us with some excellent pinewood derby cars.    In the pursuit of that extra something [Aron] consulted with his sons who came up with some cool ideas for cars, one Tron themed and the other basically a Wiimote with wheels! The official Pinewood derby rules say nothing about electronics, so as long as nothing helps the block-o-wood travel down the track faster, anything goes. This means you are free to load up whatever cool lights you want, but will have to earn your robotics merit badge some other way.

[Aron] Starts the builds by carving out the shape of the cars, each feature a hollowed out cavity underneath to accommodate the batteries and electronics. For the Tron Light Runner car, one continuous EL strip weaves in and out of the derby car’s body, and a single AAA battery runs the driver. [Aron] notes that it took around five feet of EL wire to cover the little car, which is two more than the driver is rated for. Fortunately the extra little bit of additional wire had little effect on its brightness.

The Wiimote car has detailed 3d buttons, a breadboard with a linear regulator,  and PIC 16F628 driving  blue LEDs.  For the majority of the time the PIC simply runs a chase routine for the four LEDs, but [Aron] went through the trouble to program in the Wiimote’s start-up sequence!

Shown above the [Hokestra]’s work is my older brother’s pinewood derby car (top left) and my… potato rocket… thing… (top right)  from many many years ago. I now seriously regret not considering LEDs! Although I think all that existed then was red,  green and IR.

Check out videos of the [Hoekstra] bros’ cars after the jump!

Continue reading “Pinewood Derby Cars Have Come A Long Way”

nes_cart_building

Creating NES Cartridge Clones From ROM Dumps

Sometimes emulators just don’t cut it when you want to play a vintage game. Like it or not, some people enjoy the nostalgia of playing old games on the actual hardware for which it was designed.

[Callan] wrote in to share a method he has been using to make some of his own NES game cartridges from ROM dumps in order to play them on an honest to goodness NES console.

He starts out with a 190 in 1 game cartridge, where he found a neat Famicom game never released in the US. He decided he would patch the ROM he found on the multicart in order to have an English menu, and then create his very own cartridge from the image. He discusses how to identify which EPROM chips you will need in order to construct your cartridge, as well as some helpful ways of finding a donor cart that has a similar enough board to house your components.

[Callan] also provides a quick walkthrough of erasing and burning your new EPROM chips, before discussing some post-soldering troubleshooting steps you might need to take before your game will work properly.

While we can’t comment on the legality of these game clones, we still think it’s pretty awesome.

Be sure to check out his site for a far more in-depth discussion of the process if this is something that interests you.