Portable Musical Stairs

musical stairs

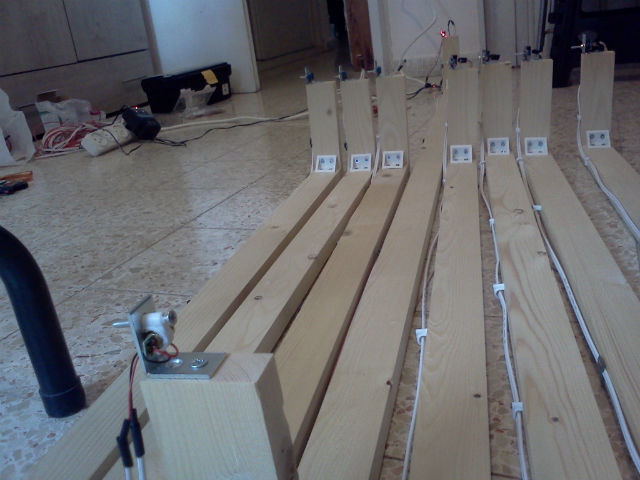
[Amir] recently finished a pretty cool project — Portable Musical Stairs! He designed and built it so it could be temporarily installed in schools for musical therapy sessions with autistic children — a fun activity for all ages!

The system utilizes lasers and photo sensors that come with a built in digital output with a sensitivity potentiometer, which makes it super easy for the Arduino Leonardo to interpret. The reason they are using 2 by 4’s for the system is because of the width of the stairs. At 1.75m across, a laser misaligned by only 1 degree results in it being about 3cm off!

On the software end of things, the Arduino acts as a HID input to the computer to create the sounds. [Amir] has put together a free sound sampler on his website makeysoundy.com, and we must say, it’s pretty fun! You can assign notes to different keys, which makes it super easy to make a similar project to this!

Stick around after the break to see the stairs in action!

Continue reading “Portable Musical Stairs”

Raspi Notifies You Of Space Station Passes

ISS

A few months years ago, [Liam] funded a Kickstarter for a small desk toy that would tell him when the International Space Station was overhead. [Liam] got a little tired of waiting, so he decided to build his own with a Raspberry Pi and an astronomical computation Python library.

The impressive part of this build is computing where an orbiting object is in the sky given the ISS’ orbital elements. For this, [Liam] is using PiEphem, a library that can compute the positions of the sun, moon, planets, asteroids, and Earth-orbiting satellites given a location and a time. Since the ISS orbital elements change every so often, his software is set up to download an update every week or so.

[Liam] developed a few versions of his space station detector, each with a different display. The simplest uses a few LEDs, either through a LedBorg, Blinkstick, or PiGlow to serve as a notification of when the ISS is overhead. Two more complicated versions use an LCD display or LED matrix to signal when the next ISS pass will occur.

Video demo below.

Continue reading “Raspi Notifies You Of Space Station Passes”

Putting A Mac Plus On The Internet

plus

[Jeff] has a Mac Plus, an 8 MHz computer with 4 MB of RAM and a 512×342 1-bit screen. It was his first ‘real’ computer, and like those guys that take Model A Fords out for a Sunday drive, [Jeff] decided to put this old box on the Internet.

A Plus has a few options to get on the Internet. The best, but most expensive, is a SCSI to Ethernet computer. For a somewhat slower connections, a PowerPC mac can be used as an Ethernet to Localtalk (the Macintosh serial port networking protocol) bridge. Lacking either of those pieces of hardware, [Jeff] decided to use a Raspberry Pi. The Pi does the heavy lifting, and a handful of serial adapters and voltage converters turns the Pi into something that can talk to the Plus’ serial port.

Even with the MacTCP stack and the MacWeb browser, there are still some things this ancient computer couldn’t do. HTTPS hadn’t been invented until 1994, cookies are just a pain, and CSS is right out. This means modern websites (except, of course, the Hackaday retro edition) simply won’t render properly. To fix this issue, [Jeff]’s friend [Tyler] came up with a Python script using Requests, Beautiful Soup, and Flask to strip out all the Web 2.0 cruft, handle the cookies, and to get rid of SSL.

The end result is a Mac Plus with 4 Megabytes of RAM on the Internet, able to pull up Wikipedia and Hacker News. It isn’t fast by any means – in the video below, it takes about five minutes to pull up the front page of Hacker News – but it is a 27-year-old computer on the Internet.

Continue reading “Putting A Mac Plus On The Internet”

Fubarino Contest: VFD Clock

hackad

The entries for our Fubarino contest are slowly yet surely coming in. [James] already had an awesome VFD clock under his belt, and figured adding a Hackaday easter egg to his project would be simple enough.

[James’] clock is based on the TI Stellaris LaunchPad with six beautiful seven-segment VFD display tubes. The clock’s time is controlled by a DS1307 RTC chip, and a small switch-mode power supply controlled by the Stellaris boosts the power from 5 Volts to 50 Volts for the tubes. The tubes are controlled with a Max6921 VFD driver chip.

The easter egg for this project – displaying the Hackaday URL – is only shown when you power up the clock when the seconds display shows 37. That’s extremely subtle for an easter egg and just the way we like it.

All the code for [James]’ project is up on GitHub along with the designs for the tube clock’s enclosure. Really an awesome project, and a great way for [James] to earn himself a Fubarino.

What are you waiting for? We still haven’t passed twenty entries which means your chances of winning are pretty good!

Continue reading “Fubarino Contest: VFD Clock”

Over Engineered Kegerator Is Glorious

keger

When [Joey] decided to build a kegerator, he didn’t skimp. No commercial unit or simple kit would do. [Joey] wanted complete temperature monitoring, with a tap on the kegerator itself and a cooled tap remotely mounted at his bar. He started with a box freezer, which was a bit short for his purposes. Not a problem, as [Joey] cut an extended collar for the freezer from HDPE on his shopbot. The new collar gives mounting points for the beer lines, gas lines, as well as all the electronics.

Temperature control is handled by a commercial controller, however temperature monitoring is another thing altogether. An Arduino sits in a custom aluminum case on the outside of the kegerator. The Arduino reports temperature, beer type and also controls the cooling system for the beer lines. The cooling system alone is incredible. [Joey] designed everything in CAD and cut the parts out on his shopbot. Two fans sit in an aluminum air box. One fan is used to push cold air out from the freezer around the beer line. A second fan pulls air back in, keeping the kegerator/line/tap air system a (relatively) closed loop. The entire line set is insulated with 2″ fiberglass flex duct.

Temperature data and trend graphs can be monitored on the web, and [Joey] is using a Raspberry Pi to create a wall mounted status screen for his bar room. We love this build! [Joey] we’d buy you a beer, but it seems like you’ve got that covered already!