
Perhaps the tolerances on today’s hobbyist machines just aren’t good enough for you, or perhaps the work area is just too cramped. Either way, there are times when an off-the-shelf solution just wont fit your needs, and you resolve to build your own CNC machine. Fortunately, none of us are alone in this endeavor because hobbyists have been building their own automation equipment for years. Whether you’re talking building the machine, generating the G-code, or interpreting that G-code into motor signal pulses, the DIY CNC community has evolved a sophisticated set of tools aimed at getting the job done. I thought I’d take a tour of some of the hobbyist’s tools that hallmark 2016 as the best year yet to build your CNC machine.
Hardware
In the last few years, affordable extruded profiles and brackets have made leaps and bounds to satisfy a hungry DIY 3D printer community. Beyond 3D printers, these beams and brackets are a good start for some of our needs in the world of linear motion control. Here’s a quick look at a few components off-the-shelf.
Makerslide Extruded Profiles
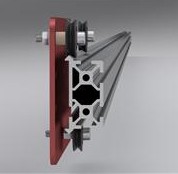 Unless you’ve discovered a deal on eBay or AliExpress, building up a machine from precision linear rails can be a pricey ordeal. Linear rails offer us a rigid, wiggle-free guide for motion along a single axis, but in some cases, the cost needed for hobbyists to afford this precision is outside their budget. [Barton Dring] took the idea of guided linear motion and launched a custom extruded rail that enables bearings to slide freely along an axis. Dubbed Makerslide, this extruded rail features a groove embedded directly into the extrusion and aims to be compatible with most other 20-mm extruded profiles like those from Misumi and Rexroth.
OpenBuilds V-Grooved Rail Attachments
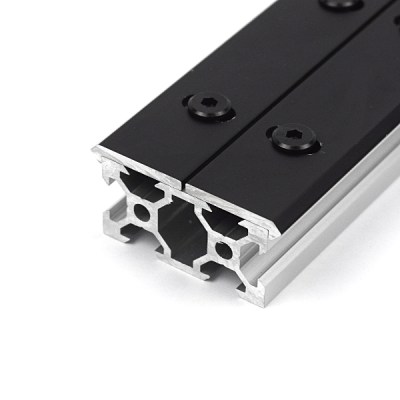
On a similar note, the folks at OpenBuilds took [Barton’s] concept in a slightly different direction. For many of us who have already committed to extrusions from one vendor and have our closets gushing with excess tubes, Open Rail is an extruded v-groove attachment that enables bearing-mounted plates to slide freely just like the extrusions of Makerslide. Unlike Makerslide, however, almost any 20-mm extrusion can be retrofitted with Open Rail, rather than requiring a specialized extrusion.
OpenBuilds Linear Actuator Kits
CNC machines encompass a wide variety of machine designs that spans far beyond this article’s scope. For conventional machines, however, a single motor drives a motion along a single axis. To add direction in a separate dimension, we can sometimes chain together two of the same linear motion units. The folks at OpenBuilds have taken this principle to heart offering single-axis systems as kits. With some creativity and forethought, users can develop a number of automated solutions based on the principle of appending multiple axes. Of course, the folks at OpenBuilds haven’t stumbled upon a never-before-seen solution. Misumi, Rexroth, and other professional automation equipment companies have been selling linear motion systems for years; however, their price range easily leaps beyond the 10K mark.
Not an End-All, but a Solid Start
Despite the design flexibility, neither Makerslide nor OpenBuilds is the all-encompassing solution for every CNC endeavor. Specifically, for rigid machines that can chew through steel, a structure built from bolted aluminum extrusions will be far less rigid than professional machines of a similar scale. Nevertheless, for machines that don’t experience heavy loads, like a 3D printer, a laser cutter, or even some small routers, both Makerslide and OpenBuilds offer an excellent starting point.
Software
With our hands full of stepper motors, extruded profiles, and belts, it’s time to start exploring a software solution to drive it all. While there are plenty of machine-specific solutions, I thought I’d highlight two that are flexible enough to be tuned to a custom machine.
G-code Interpreters
G-code interpreters do just that: they accept input commands in G-code (be it directly from a file or serially through a cable) and convert the commands to step and direction digital outputs with the right timings to produce the control signals for stepper motor drivers. In one sense, they’re the “brains” of the machine, taking the G-code “instruction set” and outputting behaviors that correspond to the input instructions.
LinuxCNC
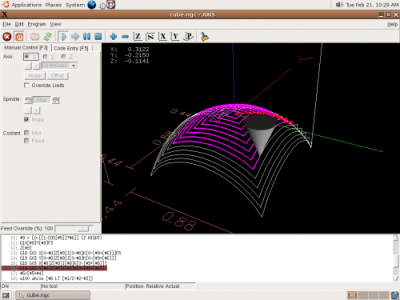
LinuxCNC spun out from a US-government-funded initiative to develop a motion control package for standards testing back in the 90s. Over time, it has evolved into a software package designed to turn a PC into a G-code interpreter, and it’s currently packaged as real-time Linux distribution. From your LinuxCNC-configured PC, you can simply connect your stepper motors, limit switches and other digital I/O devices to the PC’s parallel port which, in turn, outputs motor step and direction pulses to drive your physical hardware.
LinuxCNC isn’t just a G-code interpreter, though. The 15+ years of active development have given it a solid foundation which makes it one of the most adaptable software packages for developing custom machines. By enabling custom kinematics, users can drive non-Cartesian machines like SCARA arms. With a core operating system based on Debian Linux, users can link additional PC peripherals, like USB game controllers, to drive their machines. Some devoted software hackers have even fleshed out the current user interface to directly generate G-code for simple cuts, rather than simply run existing G-code.
Grbl
With over 7 years of active development, Grbl has proven itself to be simple, reliable G-code interpreter firmware for the Arduino Uno. Simply connect your motor controllers and limit switches to the Uno, and Grbl firmware handles the step and direction pulse timing for all 3 axes of your machine. Grbl doesn’t aim to be an all-encompassing interpreter like LinuxCNC, but in exchange it’s a far simpler solution that is relatively easy to set up and works for most, if not all, typical use-cases for a 3-axis machine.
Though Grbl drives the physical hardware, it still requires a serial interface to receive G-code instructions to execute. Fortunately, G-code-streaming packages exist: bCNC and UGS, which have been tested specifically with Grbl.
G-code Generators
Having a fancy CNC machine doesn’t say much if we can’t generate instructions to drive it to cut parts! We need a solution for generating G-code, and, once again, the open source software community has jumped in to provide several packages.
dxf2gcode
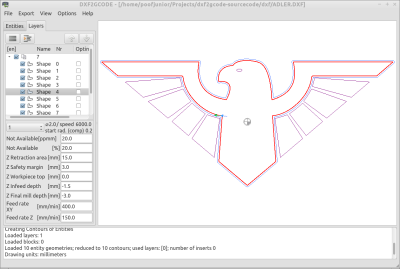 It’s not unlikely that many of your designs may boil down to a collection of flat plates with simple features on them. For 2D milling, dxf2gcode simplifies the process of generating G-code based on an original design file, in this case: a dxf. The project also features automatic cutter compensation done in software, a very handy feature that will generate an offset toolpath based on the diameter of the tool and the type of cut (pocket or outside edge).
gcmc

If you’ve ever tried writing G-code manually, you’ll quickly realize just how unreadable it is without having memorized the majority of the commands. GCMC is a front-end language aimed at producing human-readable machine routines. By abstracting away the unnecessary idiosyncrasies of the language, gcmc facilitates the generation of complex tool motions and patterns simply by tweaking a few parameters.
Doing the Research
Building your own CNC machine may just be your next labor of love, but unless you prefer to reinvent the wheel (and, hey, starting from first principles isn’t always a bad thing), it’s worth taking a look at the tomes of build logs, forum posts, and existing software from the gurus who have built CNCs before us. While I’ve highlighted a few of the more common tools in the land of hardware and software, this list is far from complete. So go forth! Do your research–and, of course, let us know what you find in the comments.


Hey, you guys forgot about Smoothieboard ! :)
2nd this. Smoothie is great.
Too expensive. If you’re in that price-range, go for the Replicape.
KCLinear.com is a good place to get cheap linear bearings. They are based in the USA so you don’t get killed on shipping.
Well, unless one lives outside USA.
In which case you have to pay for the gold plated aircraft.
VXB is also really good, I’ve bought a number of items from them, they have a lot of inexpensive options.
I thought this was a great article. I peruse HaD as a non-technical reader fascinated by all the things hackers (and speaking to the HaD article the other day, I’m using this in a positive sense) can do. Being handy in other realms, I really would like to put together my own CNC at some point to make some of my projects easier, as well as a way to get my feet wet in electronics, hardware, and software. This was a good intro, though I’m always on the lookout for “Building a CNC Machine for Dummies” kind of course.
Well I’ve been working on this for a while.
Vicious1.com
I have a few beginner walkthroughs and lots of successful CNC first timers building some great machines.
Thanks for that. I find forums a great way to learn things so I’m glad you have those. Much appreciated.
My CNC has drawer glides propelled by threaded rods I got from the hardware store. It’s higher friction than ideal, so the motors have to do more work than they should but it’s very precise and reliable. Super cheap too.
The thing about drawer slides, or rollerblade wheels etc. is that the point of contact in the bearing is so small that it deforms under force, so they’re not all that precise or reliable.
One way to make an actually precise bearing is a good old sliding bearing, like two flat sheets with oil in between and a collar to stop the chips from fouling the oil. With the right kind of oil, and with good flat surfaces, you get a hydrodynamic bearing that never lets the metals touch.
Could you link me to a picture of the stup you describe?
http://www-mdp.eng.cam.ac.uk/nagty/resources/enginfo/cookbook/machine/bearings/sliding.html
What I’m talking about is typically made as a dovetail slide
http://www.genericslides.com/images/dovetail_slides_new.jpg
Dovetail slides are a good compromise. My cross vise uses dovetail slides.
Depends on the drawer slide. Used to work at a cabinet shop and they used ones like this for file drawers,
[Can’t include link (spam filter?) google ‘accuride drawer slides’]
We used ones that were rated to 150 pounds. Not sure how much they deformed under that kind of force, but on a full size file drawer they seemed to slide in and out pretty straight and smooth.
Roller slides with multiple roller bearings distribute the load while reducing friction. The key is keeping milled material out of the slide.
I agree to both (a bit): drawer-slides are tricky to use but when used correctly (and the right ones), they are a good cheap alternative to linear bearings. Take my machine as example: https://hackaday.io/project/6845-desktop-size-cnc-milling-machine-from-scratch. My youtube clip #3 embedded in the page explains the problems with using sliders.
Dont forget about the following software solutions:
jscut.org
f-engrave
blender + dmap2gcode (http://wiki.paxspace.org/index.php?title=CNC_Router#3D)
And Autodesks Fusion 360.
I know, could based tools are not everyones favourite. But to have such a powerful parametric CAD package with CAM and even FEM analysis for free (if you are a non-profit maker) is really worth looking into.
FreeCAD also has a Path workbench:
https://github.com/yorikvanhavre/FreeCAD/wiki/Path-module
wiki:
http://www.freecadweb.org/wiki/index.php?title=Path_Workbench
I would love and article about milling pcb or about generating the gcode from the gerbers, something more concrete
I do it from times to times, it’s very slow actually, I recently tried the direct transfer of toner on the PCB and etching with HCl + h2o2 I’m not sure it’s faster, but at least you’re busy during the chooching.
The system I posted in this thread (webgcode) accepts gerber and excellon files (some of them at least) directly by dropping them on the page.
Wow, there are much safer chemicals for etching now. I use ammonium per-sulphate. Even ferric chloride would be safer than storing HCl.
I used that because it in the supermarket and it’s not disgusting like ferric chloride.
I dunno, dilute HCl is something my dad kept in the garage next to the H2SO4 for topping off lead acid batteries. It’s common enough in the hardware store. The HF that they sell for concrete cleaning, though, scares me.
If you haven’t encountered this yet, I recommend checking out John Lauer’s youtube videos. Here’s a good one:
https://www.youtube.com/watch?v=6WNE3E1ZZYY
He’s the brains behind Chilipeppr’s PCB functionality, and has made great strides to make my life much easier :)
Good comment. Mention of the Chilipeppr work should be included in original post.
I often mill PCBs directly from Eagle. There is a plugin called pcb-gcode that works really well. You’ll need 30 degrees engraver bits, also called or V groove bits, that you can easily find on ebay. And you’ll also need a few small diameter drill bits.
People are usually worried about small irregularities on the height of the PCB. If you use 30 degrees bits, or smaller, you can get away with a lot of variation since it would only cut slightly deeper but the traces will only thicken but a small margin.
Thin end mills require really high RPM. from 10 to 25k rpm would be the ideal but you can get away with slow speeds if you travel really slowly.
Using a 10k rpm spindle I’ve been able to mill PCBs at 20 ipm. I think it is considerably fast. A board like an arduino shield can be ready in just a few minutes. PCB-Gcode also cuts double sided boards. If you have a jig to flip the board parallel to one of the cutting directions you can have double sided boards milled at home in minutes.
Yeah, but then you are chained to Eagle. Not good.
I have some experience generating G-code from KiCAD files and milling PCBs, I may make a youtube clip about it soon and add it to the series about my machine (https://hackaday.io/project/6845-desktop-size-cnc-milling-machine-from-scratch). Generally, I create schematics and PCB layout with KiCAD and then use the windows-software “linegrinder” (runs fine on wine/linux) to make the G-code.
For interested people, I created my own end to end system:
https://github.com/nraynaud/webgcode
The first to ask gets to choose an open source license. I might really make it open source soon, I’m interviewing for a job, and if I get it I’ll open source this project.
yesterday I added drag knife support: http://i.imgur.com/Xm4Blo3.png
And I immediately tested creating a stencil and sandblast etching my iPad:
http://imgur.com/a/nZagA
I went through this process a few years ago, first looking at building my own design before buying a second hand used Blackfoot (4×8 wooden chain driven) machine. I knew that this machine had problems but for the price, I thought I was saving some time by getting this instead of starting from scratch. And I thought I could tweak the machine to fix all of the issues- namely backlash and excessive flex. After 8 months, I gave up and got a CNC Router Parts kit. Its a very well designed kit that uses nice Gecko motors and controllers. I kept my old motors/power supply and integrated them with with this new, stiff, extruded aluminum setup.
Even with this great kit there was quite a bit of calibration and adjusting to get the machine to work great. And I did have to scrap the majority of the old Blackfoot motors/power supply for a better system that actually had the power needed to run fast enough to not wear out bits rapidly.
From 3 years of all of this, my advice would be to not start from scratch if the purpose of the cnc router is to make things with the cnc router, not just to make the router itself. The money you think you are saving by going cheap will be eaten up on upgraded hardware that will work, extra bits because your feed rate was too slow and you burned up your bits, and extra wood because your runs kept messing up. And in the end you you will spend the same amount of money to get a working cnc router, except you will have spent a year or more getting it to work.
I’ll try to give examples of what I’m talking about. Unless your system is very stiff, it will not be accurate. You may not think that accuracy is that important to you, but it is. Accuracy is very important if you want to make small holes, like a .5 inch diameter hole. If you have flex, they hole will not be round, but have a flattened, trapezoidal shape. Small holes for bolts or dowels or rods is something you will do time an time again, and if you can’t make a simple hole, the machine is useless.
If you create a stiff cnc router, but did not have the tools to put it together where it is square, its also useless. If you cannot get your gantry to be square, all of your right angles will not be right angles. Circles will not be circles. You think that you will be close enough, but then you will be biting your lip every time you build a part thats off because your system isn’t square.
Also, if you frankenstein together a power supply/motor/controller setup, you will probably end up with a system that is underpowered or overheats. Underpowered and you will have to take shallow cuts, or feed very slow. Either of these will kill your bits, and at $20-30 a pop for the basic ones, this gets old very quickly. And if it overheats, well a whole bunch of bad things can happen in the middle of a long run, all of them destroying your part.
Trust me, if you like to tinker, even a kit like the CNCRP kits give you a ton of room for tinkering. Make your own custom controller box, your limit switches, your zero – plate,your dust collection system, your clamping system. But trying to reinvent the wheel by starting from scratch will most likely end up with a system that has serious deficiencies. And if you don’t have the money for a kit, save up. Or look for a used kit off of craiglist- these things do not have good resale value
Thanks for this. The details that you provided are often overlooked.
Some good points and some bad ones. As long as you understand how feeds and speeds work you can take shallow cuts or feed slowly without necessarily killing your bits. If you are spending $20-30 for an end mill you are either not shopping at the right places or you are buying high end ones.
I have a pretty good handle on feed and speed rates. In general, because of the high router speeds, you have to run at higher feed rates than most cheap/DIY cnc routers can handle if you want to have long bit life. Cheap setups do not have the stiffness to run at these higher speeds (so they are inaccurate) usually. Or they might not have the properly sized motors/controllers/power supply.
The other option, which I think you are hinting at, is reducing cutting depth. And this is the fastest way to shorten bit life. When you reduce cutting depth, more material is going to be cut by the bottom or your bit instead of the sides of the bit. The cutting edge at the bottom is small, so this gets hots and wears very fast. Go look at a worn bit off of a hobby cnc and you will usually find a worn bottom but sharp sides.
Most hobby CNC sites say to set your cut depth at 1/2 of your bit diameter. But large cnc routers never do less than a depth of 1x diameter, and it can easily be more. Doing 3/4in plywood in a single pass at high feed and speed rates is how you keep bits lasting a long time.
And yes, I get high quality bits. If your not running a lot of MDF and can do decent depth passes, good bits are the way to go. Though I can understand not wanting to use them until you figure out your machine- really sucks burning a new bit when trying something new.
“..you have to run at higher feed rates than most cheap/DIY cnc routers can handle if you want to have long bit life.” – How is an increased feed rate (= larger chips eaten away by the milling bit in one turn, more side-force-stress) increasing the life time of the milling bit?
Larger chips can carry the heat away from the bit better. AndrewC is talking about burned bits, not broken ones.
Oh right.. never thought about the fact that the milling speed can be too low, but makes sense.
Dielectric is right. I’m talking about burning bits, caused by allowing the bit to get too hot. Every time you make a single chip, you create an amount of heat relative to the surface area of the cut surface. You want chip volume/chip surface area to be as large as possible to decrease the amount of heat generated, which leads to the desire to have large chips.
Broken bits doesn’t comes from not understanding the nuances of feed and speed in general. That usually comes from making a mistake in your programming (accidentally setting the cutting depth to 1 inch instead of .1inch for instance, or hitting a metal clamp while running at rapid speeds (G00)). And if you have a setup that isn’t stiff (like a wooden router) your machine might just deflect instead of having your bit break- I had this happen once on my wooden cnc router when I was surfacing my spoilboard and my Z axis motor lost steps and cut way to deep. Gantry twisted, and bit burned up before I could stop it, but the bit didn’t snap.
You don’t have to use wood router. You should be able to adjust the speed (RPM) to suit the material you are cutting and the machine you have.
If you need to stick to that router as your spindle and hence cannot lower the RPM then you can choose a smaller diameter end mill to get a more reasonable surface speed.
“And yes, I get high quality bits. If your not running a lot of MDF and can do decent depth passes, good bits are the way to go”
I commented on the cost because you said in your first post that they are “$20-30 a pop for the basic ones”
“I’m talking about burning bits, caused by allowing the bit to get too hot. Every time you make a single chip, you create an amount of heat relative to the surface area of the cut surface. You want chip volume/chip surface area to be as large as possible to decrease the amount of heat generated, which leads to the desire to have large chips”
Too much heat and burning is caused by rubbing, i.e. your bits are spinning so fast (relative to the feed rate) that instead biting and chewing out a chip from the stock it just rubs most of the time and heat is created due to friction. You want to have chips but not necessarily “as large as possible” if your machine is not so stiff.
No inkscape? No sketchup with phlatscript?
No chilipeppr? That said I am all for LinuxCNC.
How dare I forget about PyCAM?
I’ll second Sketchup with SketchUCam
This is a great list. I have an X-Carve, which itself is an open-source machine, and depends heavily on some of the products you’ve outlined.
I’m happy with the X-Carve itself as a kit, but out of the box it is only capable of doing 2D machining (Easel leaves a lot to be desired). Throw in some decent CAM software and a dash of chilipeppr and you’re in business!
You left out the MPCNC. Uses EMT Conduit for rails and 3d Printed parts http://www.vicious1.com/
Firstly, a Plug for CubeSpawn – the aim is much more than a kit or some parts – a whole bootstrapping manufacturing system…
Site http://cubespawn.com – needs work. System Pic: https://goo.gl/V4tV1D Moar Current Pix: https://goo.gl/oiA800
Github https://goo.gl/4ETszV 3DModels https://goo.gl/G4DTHk
Some other tools worth mentioning:
As above, the Smoothieboard is a great tool – I am using it for CubeSpawn and I see it being used for some very nice projects (Like the Ragnar Robot https://www.youtube.com/watch?v=jcWZfBlaBjw)
its a wonderful time to build CNC’s and Robots!
I Third the Smoothieboard – its a great tool…
I am working on a bootstrappable small scale modular factory:
https://docs.google.com/document/d/1L1CGFiLZlogC9BsOPkvHVoQhzDvTagRMN1nQuAFZcp8/edit?usp=sharing
A quick scroll down the comments hasn’t revealed any mentions of probably the best bet for all-in-one CAD and g-code generation, perhaps!?
Autodesk Fusion 360.
It’s free to hobbyists provided you register as so, cloud enabled, although you’re not locked into the cloud features from what I can remember. Extremely powerful CAD editing tools, is in continual development. It’s kind of like an example of how CAD could be brought into the 21st century, much simpler to use than Autocad imo.
It’s also got 3D printing support.
By the way I don’t work for Autodesk!
“much simpler to use than Autocad imo.”
I wish most of the software I used was as easy to use as AutoCad.
I must admit my knowledge of autocad is somewhat outdated. I seem to remember a hideous arrangement of cryptic icons and unmemorable keyboard shortcuts, and strange behaviours, but that’s just me. Ymmv.
I’ll have to try it again, I found it un-usable on the first attempt – the tutorials lead me to an irresolvable error in the geometry where I could nor create the part using the instructions provided.
I believe it was pretty immature software for a while, but because it’s under constant development by autodesk it has turned into something really powerful. I get the impression they’re trying to turn it into their flagship CAD package.
I can’t say though that I’ve thoroughly tested it myself yet, so complex geometry may still trip it up – all I know it’s that it hasn’t had any issues doing my boolean operation tests!
Either way, well worth an update, and another attempt.
I love this article! (I actually requested an article like this because the last one was a long time ago.) I’m in the process of making a cnc and everytime I couldn’t find some info, or had an idea that I didn’t see elsewhere I created a video. I’m up to 20 videos so far:
https://youtu.be/d14OQ8KeQ2Q
Enjoy!
Check out vicious1.com mpcnc, I’m building one now and will be about $200 with everything with some thrifty eBay/Amazon shopping.
It is awesome for the price and can make some pretty good cuts.
Be prepared to have your 3D printer tied up making parts for it after looking at the page. That’s what happened to me.
I have a hard time trusting the rigidity and precision of something like that. Can it reliably cut aluminum? What are its tolerances?
There is some videos up on his site of cutting aluminum. I don’t expect mine to be cutting 1″ aluminum but for some 1/8″ aluminum motor mounts, wood and plastic it will have no problems. And I’m not sure on the tolerances as I have a few days till mine is done, but the cuts people are getting looks really good
I see a lot of talk of CNC machines, but I see extrusions and wood here, for at most,
routing wood with a dremel. What about a small metal mill or lathe?
Serious equipment?
If you really want to make something for metal removal, look up a book from
Moore machine tools:Foundations Of Mechanical Accuracy. That would be the
ultimate reference for building rigid machines like old jig borers to ridiculous
tolerances, surely some of it could be applied to smaller scale homemade designs.
Has anyone thought of using a 3D printer to print a machinable wax castable frame
of a small machine? I thought of making a toolmaker’s microscope using this method,
and I know there are some here that do serious metalwork machining, but haven’t seen
anything like that done yet…
I Posted the CubeSpawn Info above – Modular CNC’s first 4 machines are a 3D printer, a Milling Machine, a metal Lathe and a Surface Grinder – More Info here: https://goo.gl/N9N86f
A list of links to “the tomes of build logs, forum posts, and existing software from the gurus who have built CNCs before us” would have transformed this post from “so-so” to “great”. But putting together a decent set of references takes effort, doesn’t it…
Until recently I had a hard time finding a tool which would generate Gcode for my Handibot from STL files. That was until I found out that Fusion360 (free for hobbyists) not only drives 3D printers, but also has a CAM module.
If you need to create Gcode, I highly recommend checking it out.
no love for machinekit? its a fork from linuxcnc that has made strides to improve the old code, and porting it to work on any type of CNC, from mills to 3d printers, to laser cutters. ive got it setup with a beaglebone black and a CRAMPS board and its awesome :D
Machinekit integration is a core element of CubeSpawn
hit enter before I finished typing, here is a link:https://docs.google.com/drawings/d/1-DmNzjrZVRJrWaAr5G97ed03XqUfzfwnuaSOFxK5Lc4/edit?usp=sharing
I build my own Cnc router out of second hand linear ball rails and ball screws, the frame is made of wood and stell profile.I can cut very well acrylic. I use and old PC with linux Cnc. I use Dxf2Gcode to convert the dxf to gcode. I never find a way to easily cut spines imported from Cad. When the spline gets to the linux Cnc becames an infinite series of points and the process takes ages. Could someone suggest me a way to easily cut spline? , I would change the PC with linuxcnc and shift to arduino with grbl if it gets better.
I mentioned inkscape earlier. Freecad was also mentioned. both may accomplish what you want. PyCAM may also work?
WIth OpenBuilds (http://openbuildspartstore.com/) for V-Slot/C-Beam rails and wheels, Misumi (http://us.misumi-ec.com/vona2/mech/M1500000000/M1501000000/) for structural, non-linear rail extrusions (a little cheaper than OpenBuilds), and even Amazon Prime for random hardware, brackets (http://www.amazon.com/Aluminum-Degree-Joining-Plate-Extrusion/dp/B01A9L2S22), and wheels (http://www.amazon.com/Polycarbonate-Solid-V-Slotted-Aluminum-Extrusion/dp/B019115TP4), it is getting to the point where it’s so affordable and convenient to build a CNC machine that it would be dumb not to.
Heya Phillip. Can i have a quick chat at some stage.
Hey guys, contact me on aidansharples93@gmail.com if you have ten minutes to walk me through some basics setting my rig up. Cheers from a New Zealand devotee.