It’s often said of us humans that we’re the only “tool-using mammals”. While not exclusive to the hacker community, a bunch of us are also “tool-building mammals” when we have the need or get the free time. I initially wanted to try to draw some distinction between the two modes, but honestly I think all good hackers do both, all the time.
We were talking about the cool variety of test probes on the podcast, inspired by Al Williams’ piece on back probes. Sometimes you need something that’s needle-thin and can sneak into a crimp socket, and other times you need something that can hold on like alligator clips. The infinite variety of jigs and holders that make it easier to probe tiny pins is nothing short of amazing. Some of these are made, and others bought. You do what you can, and you do what you need to.
You can learn a lot from looking at the professional gear, but you can learn just as much from looking at other hackers’ bodge jobs. In the podcast, I mentioned one of my favorite super-low-tech hacks: making a probe holder out of a pair of pliers and a rubber band to hold them closed. Lean this contraption onto the test point in question and gravity does the rest. I can’t even remember where I learned this trick from, but I honestly use it more than the nice indicator-arm contraptions that I built for the same purpose. It’s the immediacy and lack of fuss, I think.
So what’s your favorite way of putting the probe on the point? Home-made and improvised, or purpose-built and professional? Or both? Let us know!
This article is part of the Hackaday.com newsletter, delivered every seven days for each of the last 200+ weeks. It also includes our favorite articles from the last seven days that you can see on the web version of the newsletter.
Want this type of article to hit your inbox every Friday morning? You should sign up!
One of the most basic tools for tinkering with electronics is a multimeter. Today, even a cheap meter has capabilities that would have been either very expensive or unobtainable back in the 1970s. Still, even then, a meter was the most affordable way to do various tasks around the shop. Is this cable open? Are these two wires shorted? What’s the value of this resistor? Is the circuit getting power? Is the line voltage dropping? You can answer all those questions — and many more — with a basic meter. But there’s one thing that hasn’t changed much over the years: probes. That’s a shame because there are a lot of useful options.
The probes that came with your meter probably have much in common with the probes a 1970-era meter had. Yeah, the banana plugs probably have a little plastic cover, and the plastic itself might be a little different. Parts are small these days, so the tips might be a little finer than older probes. But if you sent your probes back in time, few people would notice them.
The Blinders Syndrome
One problem is that those probes are usually good enough. We’ve all clipped an alligator clip to a test probe. I’ve even fashioned super pointy probes out of syringes. Years ago, I bought an expensive kit with many attachments I rarely use, like little hooks and spade lugs. Then, I happened to go down the wrong aisle at Harbor Freight.
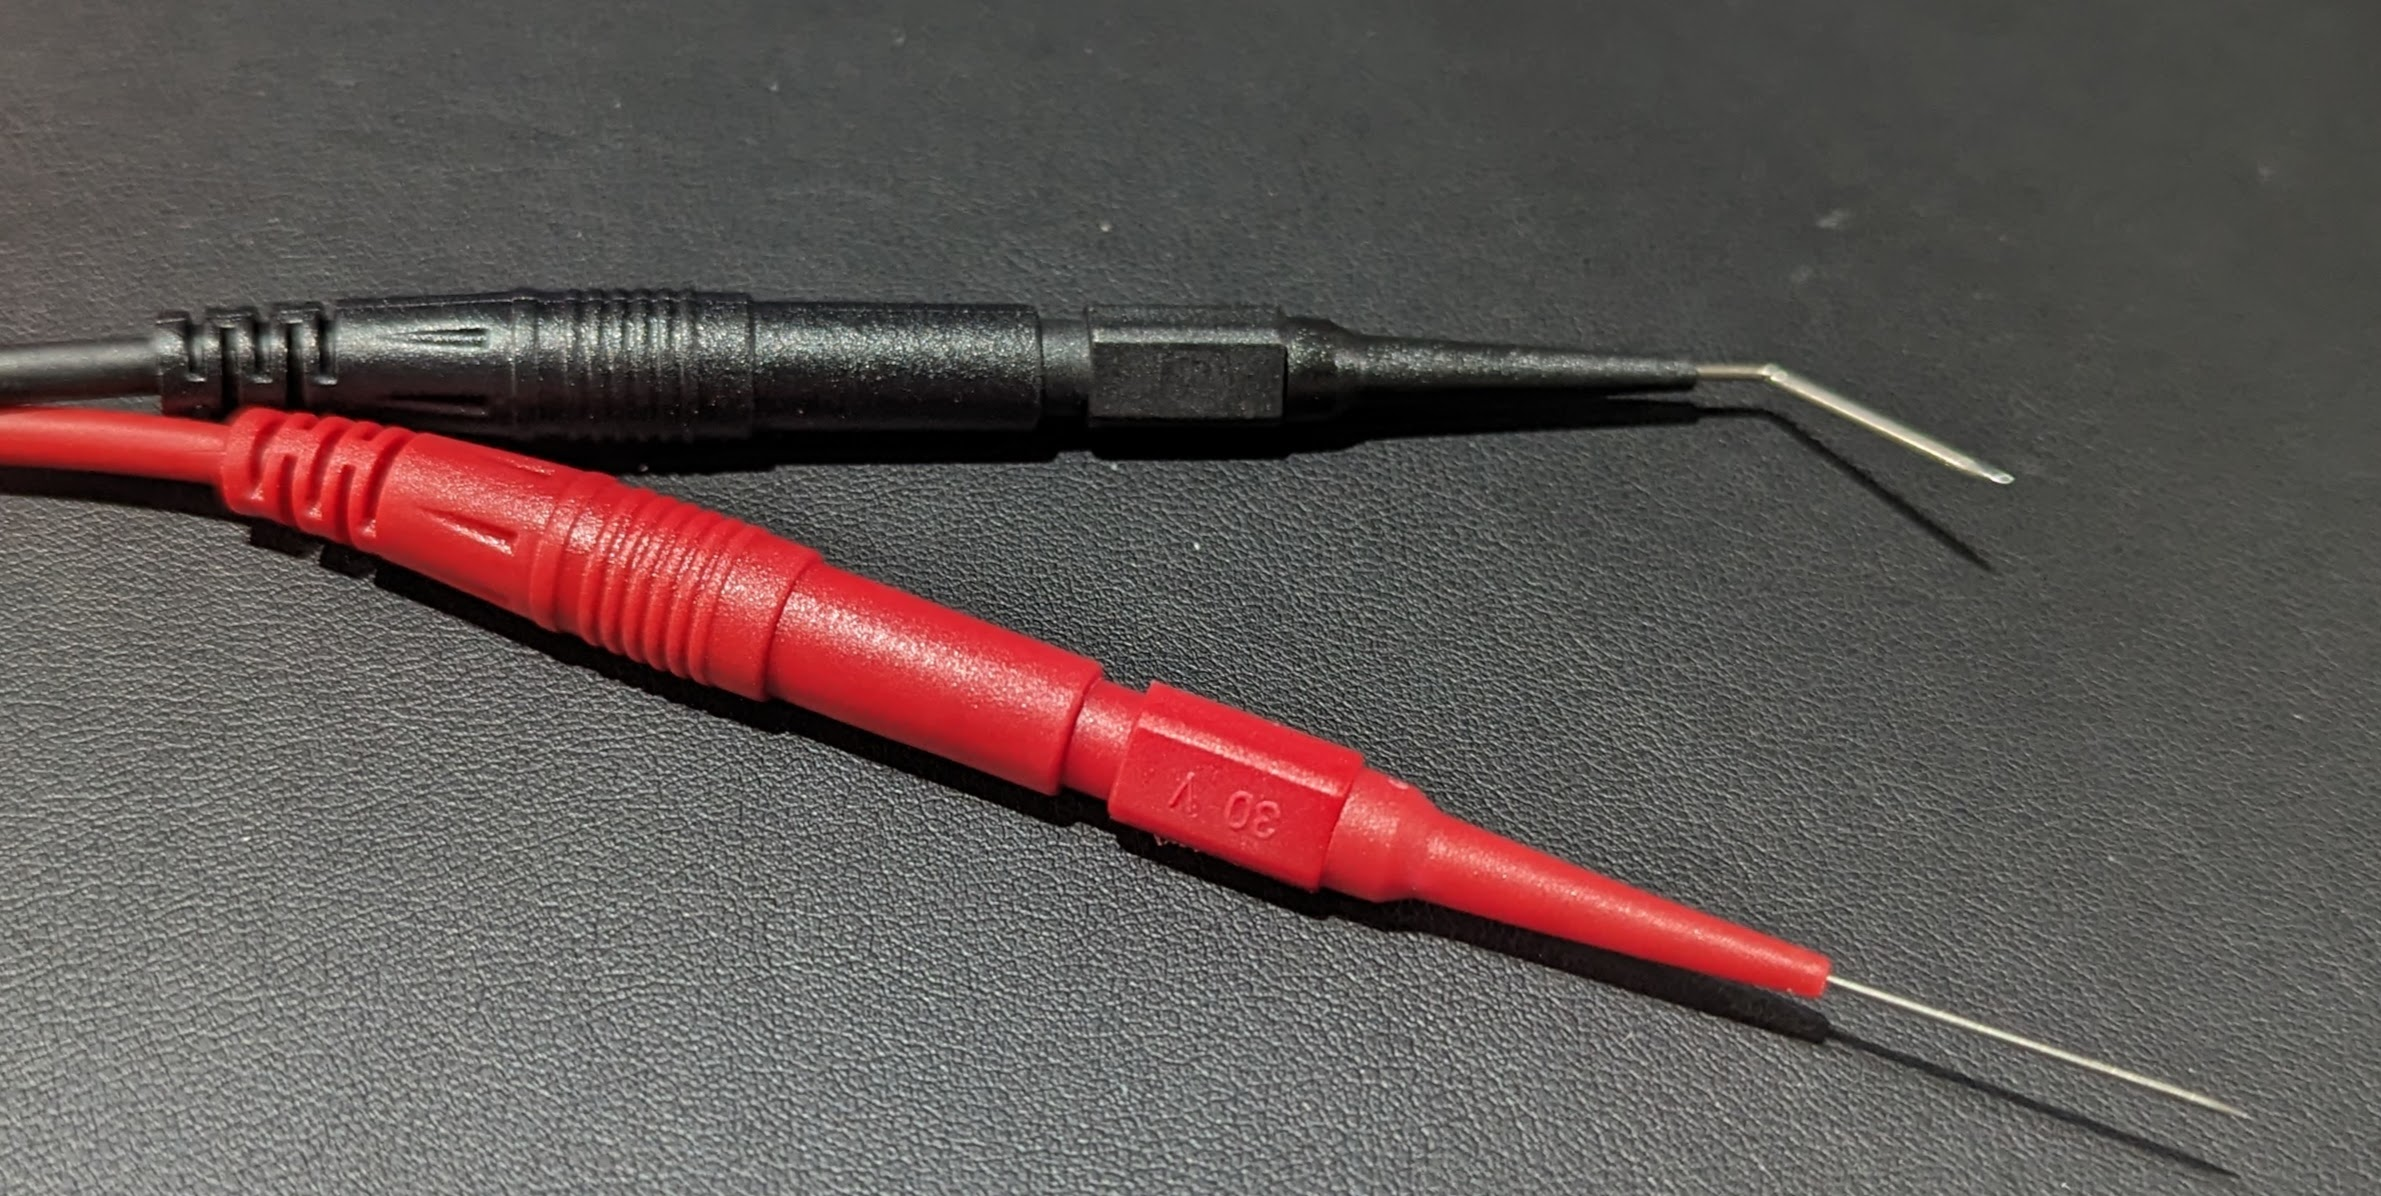
Back probes ready for action.
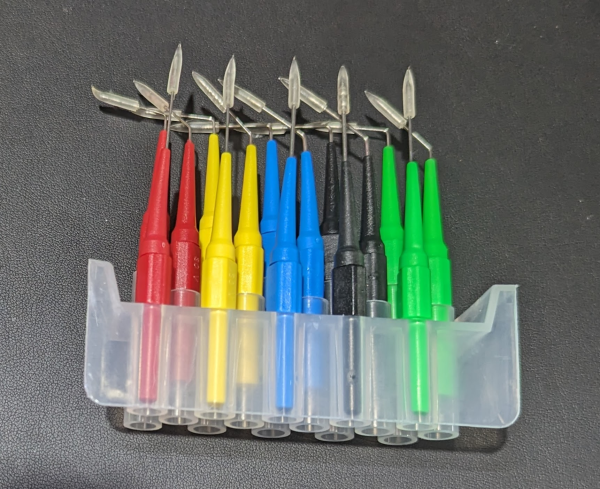
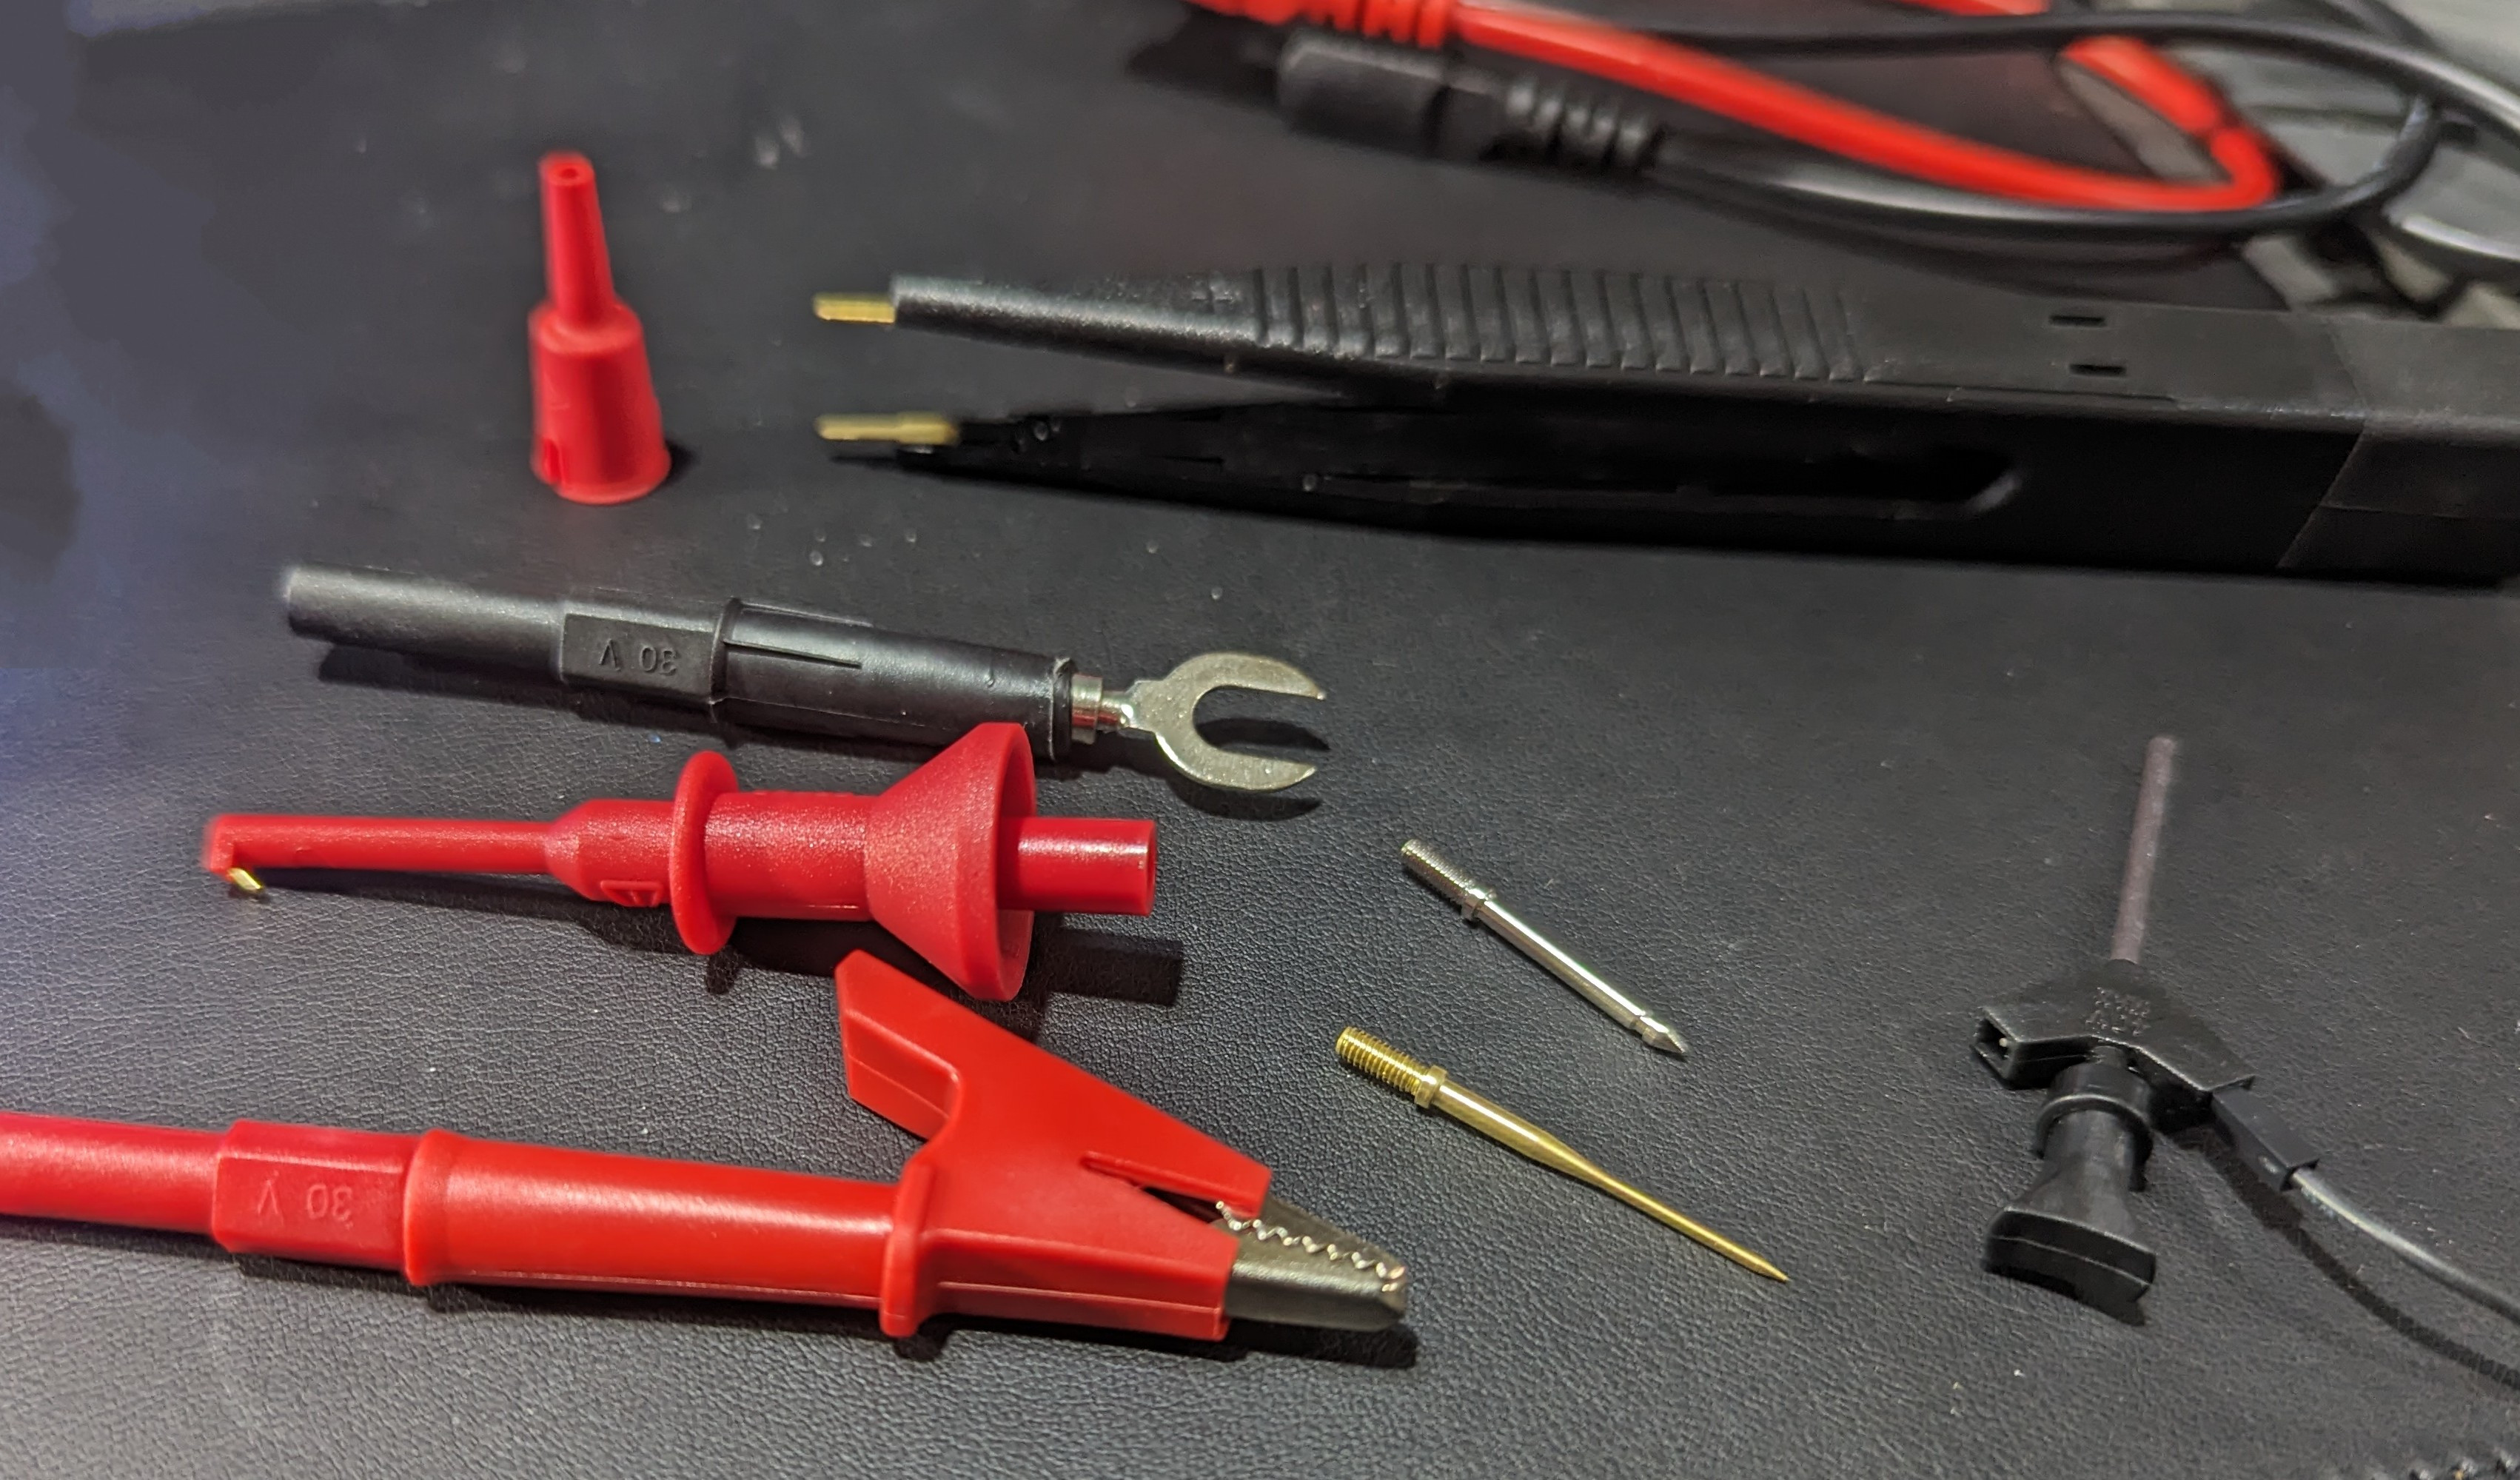
In the automotive section, I noticed a tidy plastic box labeled “22 pc. back probe kit.” I’d never heard the term “back probe,” but it was clearly some sort of wire. It turns out the kit has a bunch of very fine needles on banana jacks and some patch cables to connect them to your meter.
They are “back probes” because you can jam them in the back of connectors next to the wire. There are five colors of needles, and each color set has three items: a straight needle, a bent needle, and a 90-degree bend needle.
I’d never heard of this, and that started me down the rabbit hole of looking at what other exotic probes were out there. If you search the usual sources for “back probe,” you’ll see plenty of variations. There are also tons of inexpensive probe kits with many useful tips for different situations. Like everything, the price was much lower than I had paid for the rarely used kit I bought years ago. The only thing I really use out of that kit are the test hook clips and you can buy those now for a few bucks that just push over your probes.
Choices
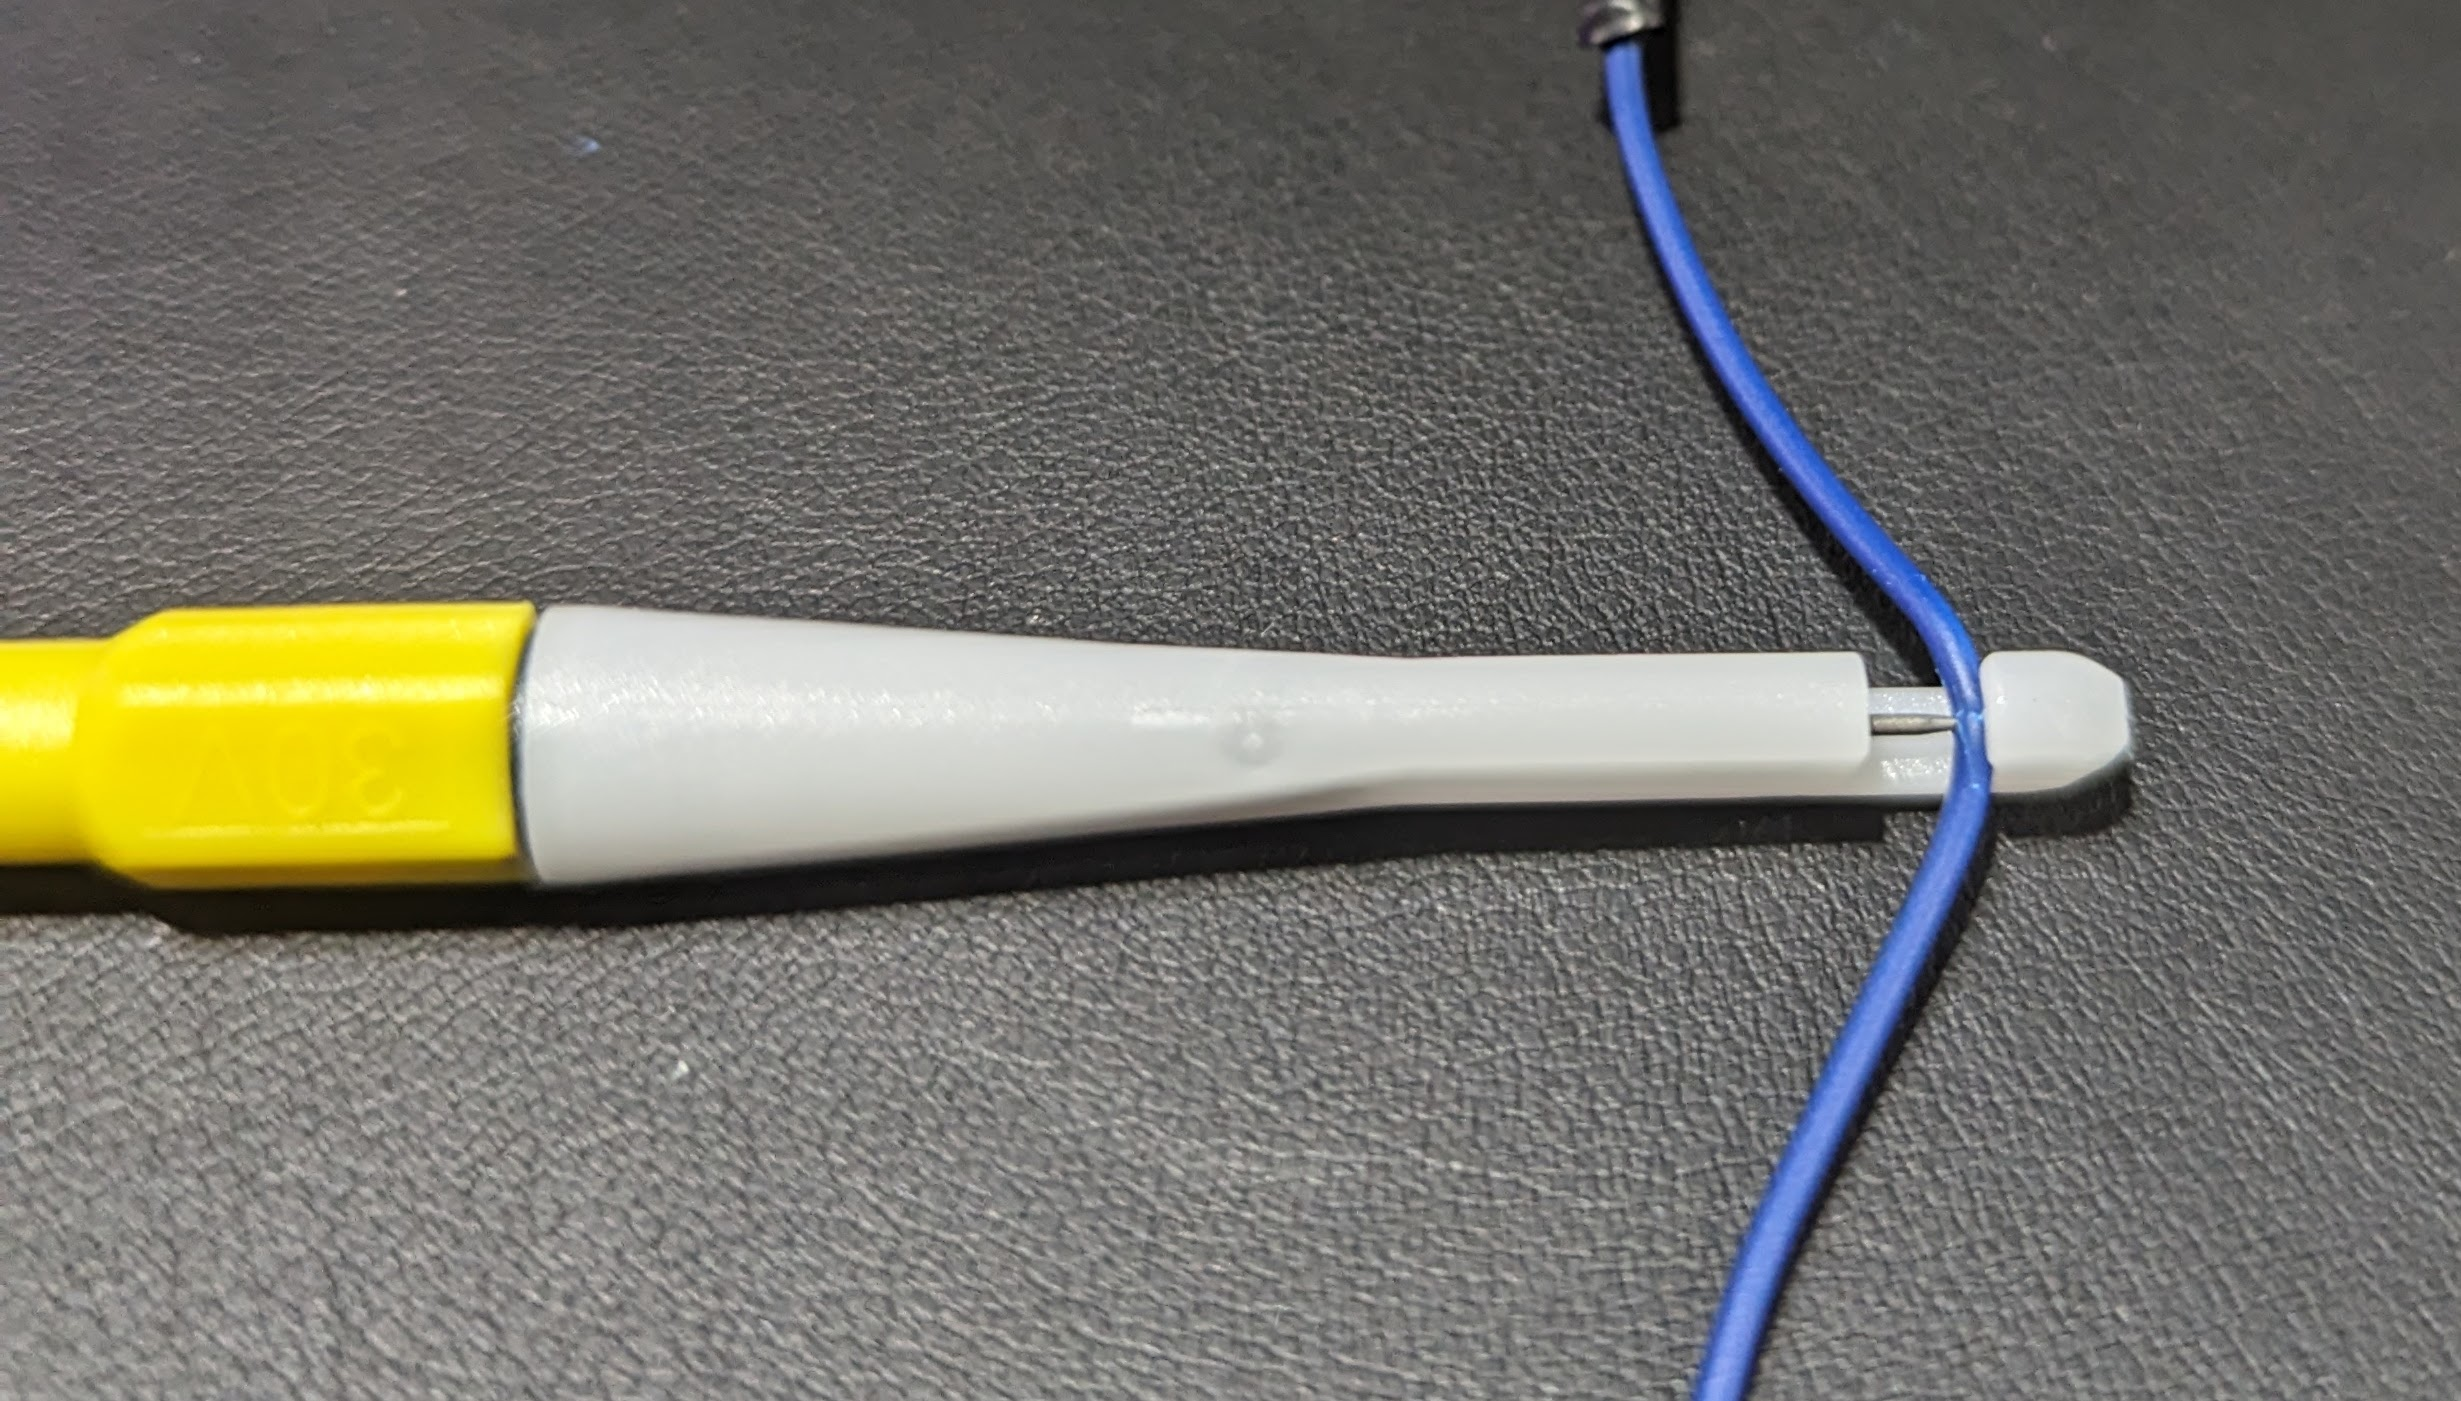
Wire-piercing probe works best for larger wires.
You could probably use the needles to stick through insulation, too. But if that’s your goal, they make piercing clip test probes specifically for that purpose. A little plastic holder has a hook for your wire and a needle that threads in to penetrate the wire.
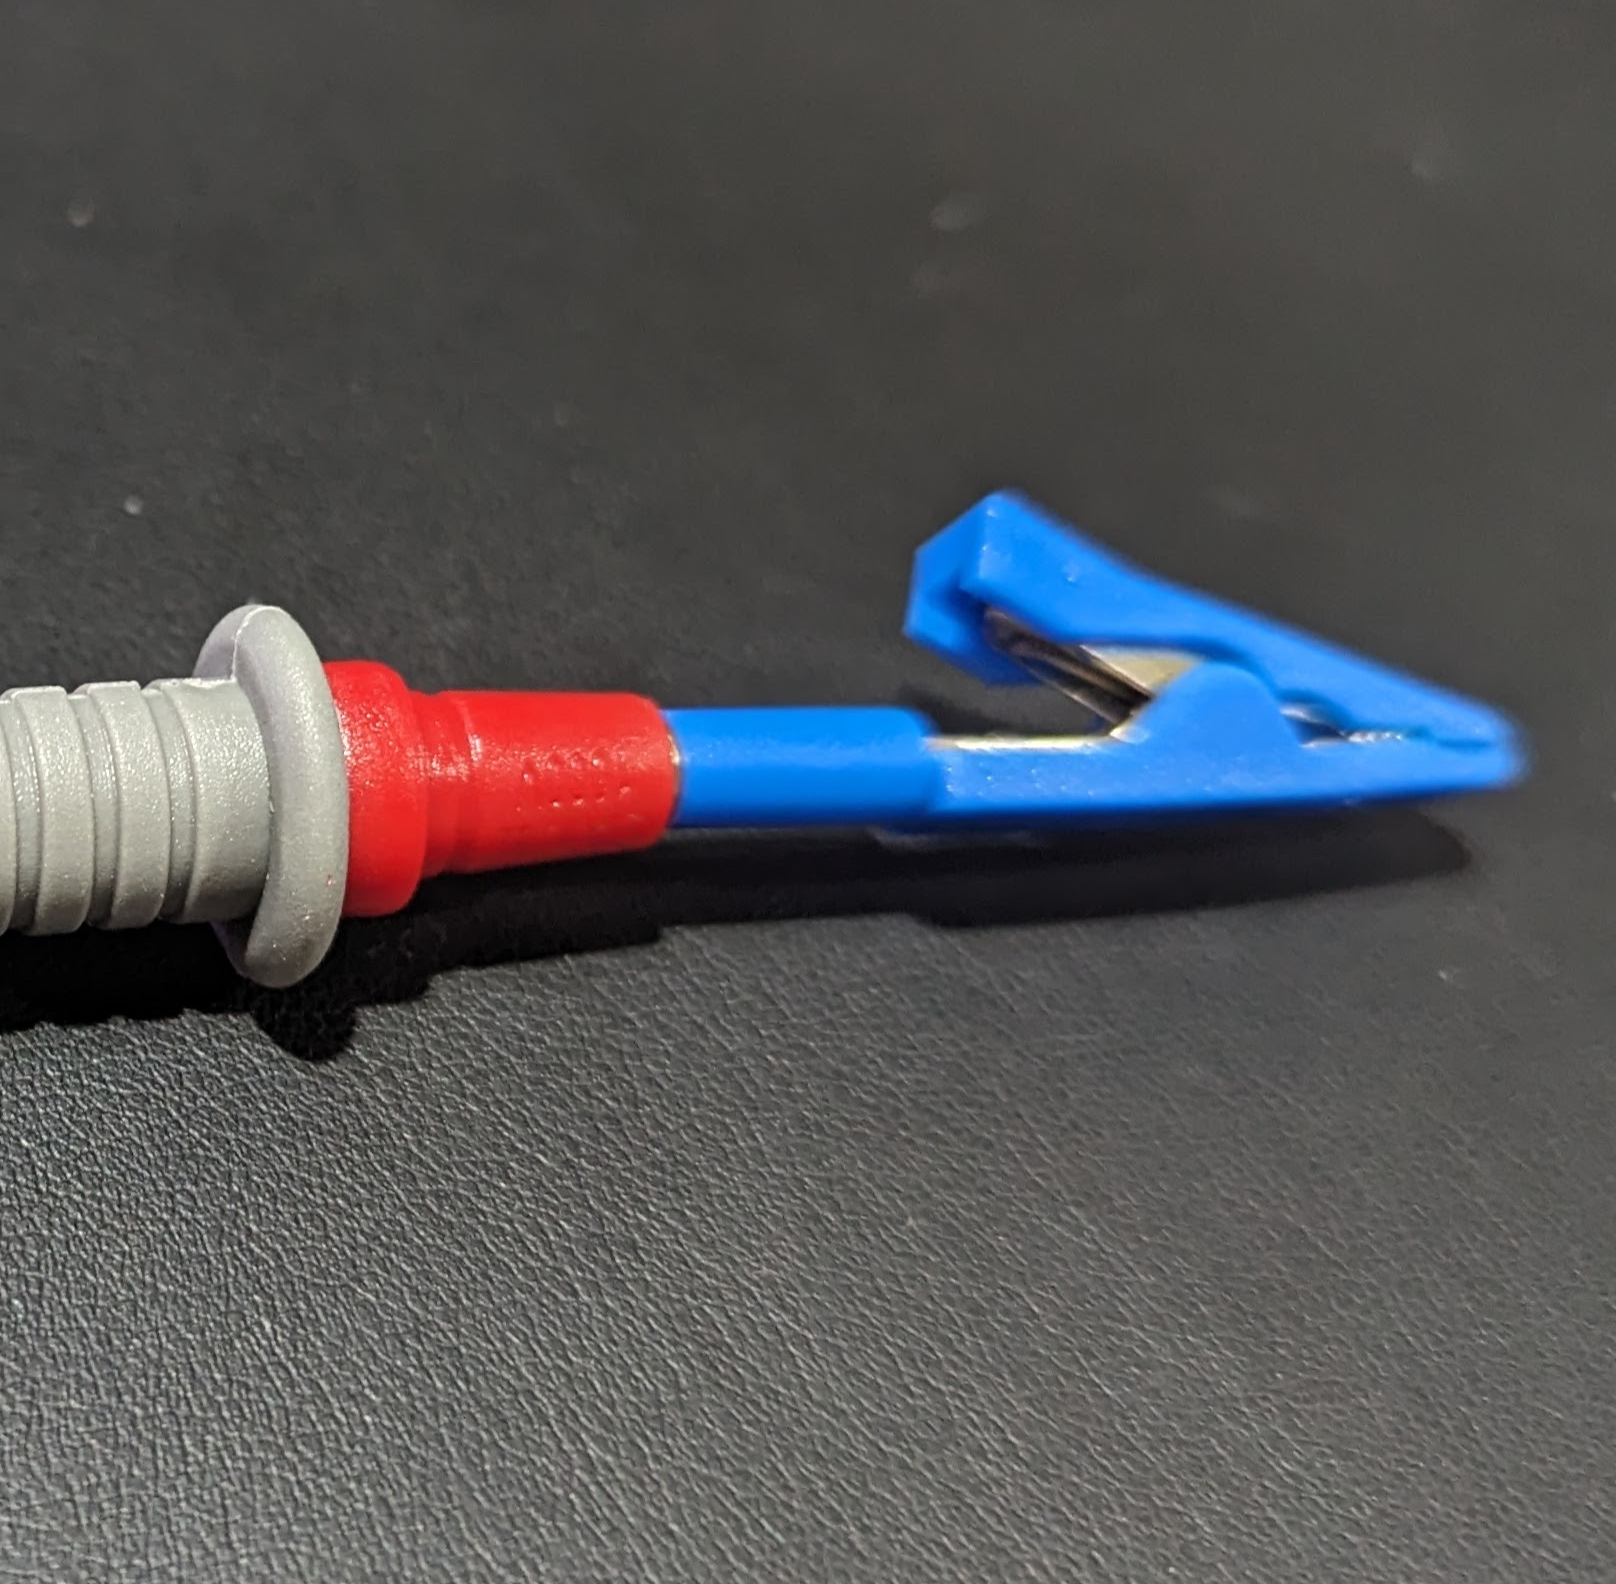
These alligator clips fit over most probes.
I also picked up some little alligator clips that slide over standard 2mm probe tips. These are very handy and prevent you from having to clip a lead to your probe so you can clip the other end to the circuit. However, if you look for a “test lead kit,” you’ll find many options for about $20. One kit had interchangeable probe tips, alligator clips, spades, SMD tweezers, and tiny hooks for IC legs. The alligator clips on the one I bought are the newer style that has a solid insulating body — not the cheap rubbery covers. They feel better and are easier to handle, too.
Breadboarding
Some of the accessories in the test probe kit.
Of course, you can make your own solderless breadboard jumpers, and you’ve probably seen that you can buy jumpers of various kinds. But if you search, you can even find test probes with breadboard wire ends. The other end will terminate in a test hook or alligator clips. You can also get them with banana plugs on the end to plug right into your meter. You can usually find versions with the male pin for a breadboard or a female receptacle for connecting to pins.
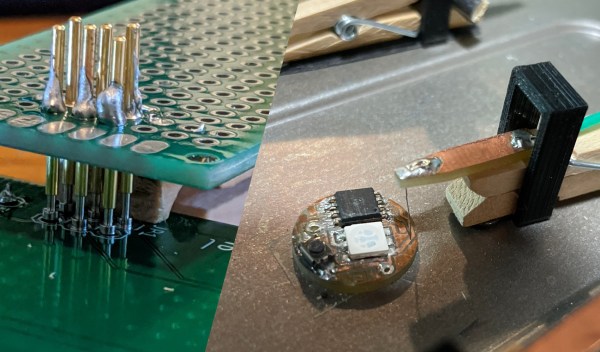
After browsing Thingiverse for some printable PCB probe designs, [Henry York] looked around and found a wooden clothespin on his desk. After some collaboration between his 3D printer and his CNC, Henry graced us with a nifty helper tool design that many of us might want to make in a pinch – a small, cheap and easy to make PCB probe, for circuits where soldering and headers are out of the question. Small magnets are glued to the clothespin, holding it flush to a magnetizable work surface (aka a toaster tray), and the probing itself is done by an extruder cleaning needle end. 3D printer and Edge.Cuts files are shared with us – thanks to Henry’s helpfulness, it should be easy to repeat if ever needed!
[Tyler Rosonke] (@zonksec) was programming a batch of badges and needed a reliable way to attach to a 6-pin ISP header – without actually soldering to the badges before they’re handed out to participants! A clothespin materialized nearby yet again – most likely, channeled from a different dimension by the spirit of numerous acrylic-cast pogopin-toothed clip-on tools we scroll by on Aliexpress. With a small perfboard piece and a bunch of pogopins jumping out of their respective drawers, it became no longer necessary to hold a bundle of male-ended pin header wires at a weird angle while nervously looking at the avrdude progress bar. This ended up saving a whole lot of time, something that’s always best spent on adding insidious bugs to the badge firmware (as well as, perhaps, easter eggs).
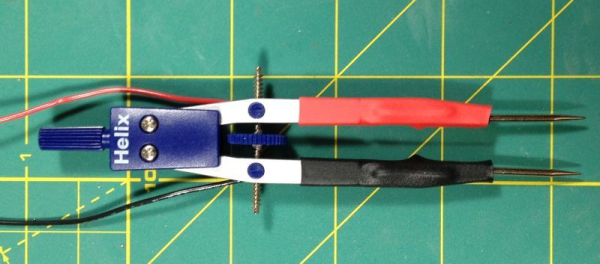
You’ve probably seen tweezers act as test probes for a multimeter or other instrument. Some electronics testing tweezers even have the multimeter built right in. Tools like these are especially handy for working with surface mount components. [Bweed2] found a probe made by E-Z hook that kept a fixed distance you can set with a thumbwheel. It looked good, but the $70-$80 price tag seemed too much.
Employing hacker ingenuity, he turned to a drafting compass. You know, the tool you use to draw circles. He picked up one for about $10 and then got some cheaper compasses to scavenge their needles (the compass usually only has one needle since the other side holds a pencil). The result was a useful set of adjustable probes.
Once you have the idea, it is a pretty simple project. Immobilize the knee of the compass with glue, connect some wires and–for extra points–add some red and black heat shrink to make it pretty.
Want to make a more classic SMD tweezer? Here’s one we’ve covered before. If you’d rather use your feet and your ears with your probes, you might be interested in these.